Configuring ODI 10.1.3.6 to use Oracle Golden Gate for Changed Data Capture
If you've an interest in Oracle data warehousing and ETL, you'll probably have noticed the recent announcements around the Oracle acquisition of Golden Gate. Golden Gate were a company that produced a cross-platform data replication and changed data capture product, that worked in a similar way to Oracle's asynchronous change data capture but handled greater volumes and worked across multiple database platforms. Golden Gate uses its own data logging (or "trails", in Golden Gate parlance) to record DML and DDL activity on a source database, which it then replays on staging and target platforms to replicate changes in real-time. Oracle claim that it handles about ten times the DML activity of their own, database-native change data capture, which makes it an interesting product if you are hitting replication performance limits.
In a related development, the 10.1.3.6 patchset for Oracle Data Integrator recently became available on My Oracle Support (patch no. 9377717), and this patchset, together with patch no. 9449058 provides integration with Golden Gate, delivering a new JKM Oracle to Oracle Consistent (OGG) knowledge module that you can use instead of the regular simple and LOGMINER journalize knowledge modules that ship with ODI 10g. Now at the moment, this new knowledge module only supports Oracle-to-Oracle changed data capture, from releases 9i upwards, and you'll need to go in and amend the shipped knowledge module if you want to extract from or load into other platforms.
What the new knowledge module does, is two things:
- Set up the various configuration files that Golden Gate requires, in order to create capture and apply processes on source and target, and
- Configure Golden Gate to place its new and changed data in the J$ and JV$ structures that ODI uses for its own CDC framework
In this blog post then, I'm going to go through the setup process for Golden Gate integration with ODI 10.1.3.6 with the 9449058 patchset also installed, and to keep the post size manageable I'm going to assume the reader has some basic knowledge of ODI. As fair warning, this is a fairly complicated setup and whilst I've tried to cover every step in this posting, the chances are that you'll get one or two steps wrong and need to debug what you've done, so it'd make sense to read up on Golden Gate before you start this and have a basic understanding on how the product works. Also I can't really offer technical support on this, so if it's not working, you'll need to work through it yourself (sorry).
- First we'll look at what software is involved.
In this example we are going to use the following software, downloadable from OTN and from Oracle Edelivery (http://edelivery.oracle.com).
- Golden Gate 10.4.0 for Oracle 11g on Windows 2000, XP and 2003
- Oracle Database 11.1.0.7 on Windows Server 2003 (this needs to be downloaded from Edelivery)
- Oracle Data Integrator 10.1.3.5 for Windows 32-bit, with the 10.1.3.6 patch (9377717) and the 10.1.3.6.0_02 patch (9449058)
Install and configure the Oracle Database software with the basic Data Warehousing database template (there is no need, for testing purposes, to set the database in ARCHIVELOG mode or any other non-default configuration setting). Install Oracle Data Integrator, apply the two patches, and create master and work repositories as you would do normally.
- Server and Environment Requirements
Oracle Golden Gate for Windows requires that you download and install the Microsoft Visual C++ 2005 SP1 Redistributable package from the Microsoft website:
http://www.microsoft.com/downloads/details.aspx?FamilyID=200b2fd9-ae1a-4a14-984d- 389c36f85647&displaylang=en
Do this, and then as a next step we need to set the ORACLE_HOME and ORACLE_SID environment variables. To do this, using the Windows System Properties dialog select the Advanced Tab, press the Environment Variables button, and create the ORACLE_HOME and ORACLE_SID environment variables if they are not already present, setting their values as appropriate for your system. If you were installing this all on Unix or Linux, you'd need to edit various login and configuration files to achieve the same thing.
- Setting up the sample data.
For the example, all of the three Source, Staging and Target database schemas are going to be on the same database (in reality, at least the source schema would be on a different box to the staging and target schemas). Assuming you are logged on as user part of the OS DBA group, run the following commands to set up the three schemas:
sqlplus /nolog

connect / as sysdba

create user gg_test_src identified by password;
grant connect, resource to gg_test_src;
create user gg_test_stg identified by password;
grant connect, resource, create view to gg_test_stg;
create user gg_test_tgt identified by password;
grant connect, resource to gg_test_tgt;

connect gg_test_src/password

create table customers (id number(6)
,                       name varchar2(20)
,                       city_id number(6));

alter table customers add constraint cust_pk primary key (id);

connect gg_test_stg/password

create table customers (id number(6)
,                       name varchar2(20)
,                       city_id number(6));

alter table customers add constraint cust_pk primary key (id);

connect gg_test_tgt/password

create table customers_full (id number(6)
,                            name varchar2(20)
,                            city_id number(6)
,                            city_name varchar2(20));

alter table customers_full add constraint cust_full_pk primary key (id);

create table cities (id number(6)
,            city_name varchar2(20));

alter table cities add constraint cities_pk primary key (id);

insert into cities (id, city_name) values (10,'New York');
insert into cities (id, city_name) values (11,'San Francisco');
insert into cities (id, city_name) values (12,'Boston');

commit;
Note that the Golden Gate documentation suggests that you set up a separate database user for use with Golden Gate, with a number of elevated privileges that allow it to perform actions needed by Golden Gate. Again to keep things simple, I'm going to use the "system" account, but in real-life you'd want to set up a separate user. The docs also recommend placing the database in ARCHIVELOG mode if you want to ensure no transactions are lost, but for demonstration purposes you can run Golden Gate on a database in NOARCHIVELOG model, with the obvious caveat that if the capture process goes down for any reason and your REDO logs get recycled, these transactions may not be replicated to the target schema.
One more setup process that you do have to perform though is to enable supplemental logging for tables:
connect / as sysdba
alter database add supplemental log data;
- Installing Oracle Golden Gate.
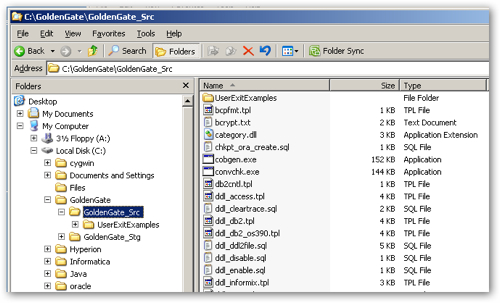
Now we are going to set up Golden Gate. This is actually quite a straightforward process as most of the work is done by just unzipping, and copying the installation files to a server directory. Unzip the zip file that the Golden Gate install files were downloaded in (for example, V18164-01.zip) and copy the files into two directories on the database server:
- C:/GoldenGate/GoldenGate_Src
- C:/GoldenGate/GoldenGate_Stg
Each of these two directories should have a copy of the GoldenGate files and subdirectories, so that it looks like this:
cd c:\GoldenGate\GoldenGate_Src
ggsci
From the Golden Gate command prompt, issue the following command:
create subdirs
exit
Then navigate to the second GoldenGate installation
cd c:\GoldenGate\GoldenGate_Stg
ggsci
Then from the Golden Gate command prompt, issue the following command:
create subdirs
exit
Your GoldenGate directories should now contain a number of subdirectories starting with "dir".
For the next step, we need to set up the Golden Gate Windows services. Start by navigating back to the C:\GoldenGate\GoldenGate_Src directory, and create or edit the file GLOBALS in this directory. In the file, put the following single line:
MGRSERVNAME gg_demo_srcNow navigate to the C:\GoldenGate\GoldenGate_Stg directory and create the same GLOBALS file in this directory, but this time enter the details:
MGRSERVNAME gg_demo_stgThen, create or edit the file C:\GoldenGate\GoldenGate_Src\dirprm\mgr.prm, and enter the following details into the file:
PORT 7909Then create the same file in the C:\GoldenGate\GoldenGate_Stg\dirprm\ directory, but this time enter the line
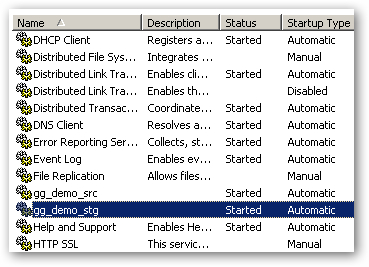
PORT 7910Then, from the Windows command prompt, enter the following commands to install the Windows services.
cd c:\GoldenGate\GoldenGate_Src
install addservice addevents
cd c:\GoldenGate\GoldenGate_Stg
install addservice addevents
Finally, start the Windows Services applet, locate the two new services, start them and make sure they start without error.
- In the next steps, we will set up the ODI Topology, Project and Models.
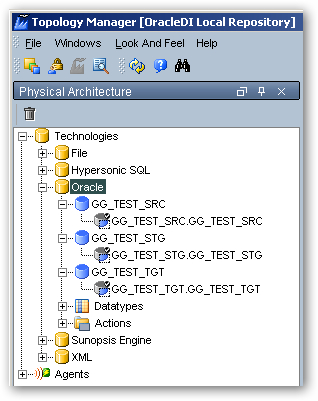
Start the ODI Topology Manager, and connect to the master and work repositories. Using the Physical Architecture tab, create three data servers under the Oracle technology entry, one for each of the three schemas, with a physical schema for each Oracle scheme you created before (you can create them all under one physical data server, but it sometimes then gets complicated as to what work schema will get used). Each physical schema should reference the same Oracle account for both the schema and work schema, and the physical topology at the end should look like this:

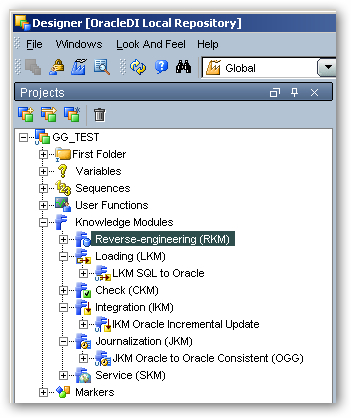
Now still within the Designer application, switch to the Projects tab, create a new project and import the following knowledge modules into it:
- LKM SQL to Oracle
- IKM Oracle Incremental Update
- JKM Oracle to Oracle Consistent (OGG)
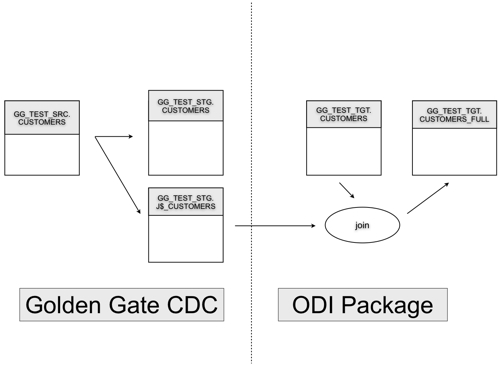
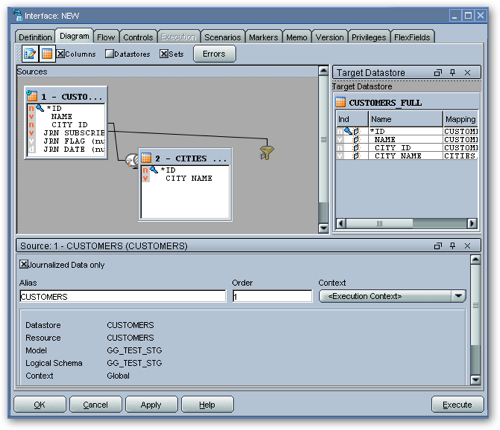
When we start the journalize process, ODI will configure GoldenGate to start replicating data from the CUSTOMER table in the GG_TEST_SRC schema into the CUSTOMER table in the GG_TEST_STG schema, and will put journalize records into a corresponding J$ table also in the GG_TEST_STG schema. ODI will then take this journalized data, join it to the CITIES table in the GG_TEST_TGT table and then load it into the CUSTOMERS_FULL table also in the GG_TEST_TGT table, giving us our updated target table.
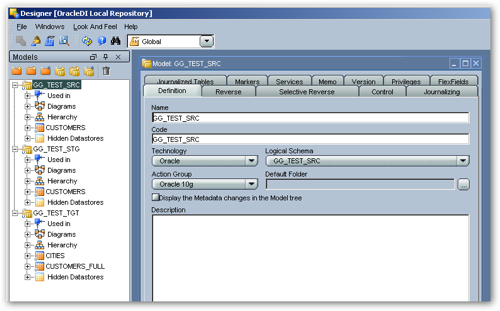
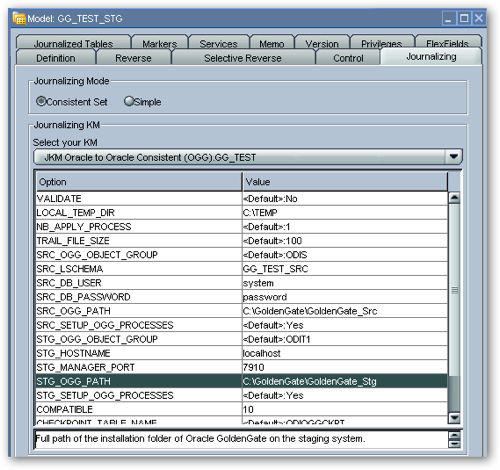
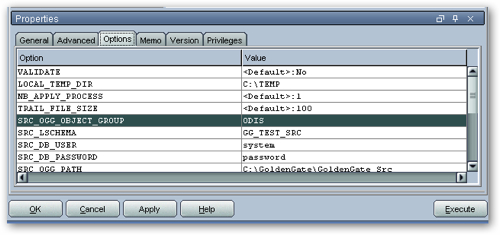
To set this up, return to the Model tab within the Designer application, and double-click on the GG_TEST_STG model. Select the Journalizing tab within the model and select Consistent as the journalizing type. From the drop-down menu, select the JKM Oracle to Oracle Consistent(OGG).GG_TEST knowledge module, so that the model looks like this:
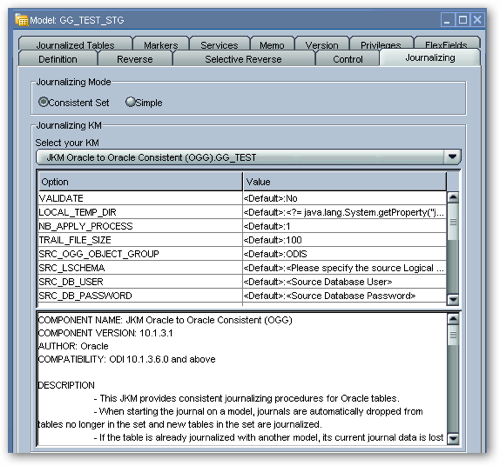
LOCAL_TEMP_DIR : C:\TEMP
SRC_LSCHEMA : GG_TEST_SRC
SRC_DB_USER : system
SRC_DB_PASSWORD : password
SRC_OGG_PATH : C:\GOLDENGATE\GOLDENGATE_SRC
SRC_HOST : LOCALHOST
STG_MANAGER_PORT : 7910
STG_OGG_PATH : C:\GOLDENGATE\GOLDENGATE_STG
COMPATIBLE : 10
You do not have to use the system account as the DB_USER, you can use any account that has been assigned the privileges outlined in the GoldenGate documentation (as mentioned before, typically you will have one "Golden Gate" account that has the elevated privileges required for the product, and can access data in any schema). Change the host name if you are not running ODI and GoldenGate on the same machine, change compatible to 9 if you are using Oracle 9i (10 works for 10g and 11g), and alter the password as necessary. Once this is done, your journalize KM options should look like this;
Remember, GoldenGate will take care of replicating the source CUSTOMERS table into the GG_TEST_STG schema, and maintaining the J$_CUSTOMER table that'll get created in a moment when you start the change data capture process. What ODI will do is then read these tables in the GG_TEST_STG schema and use them to insert, update and delete changes into the CUSTOMERS_FULL table in the GG_TEST_TGT schema.
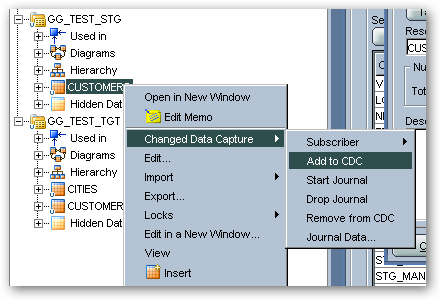
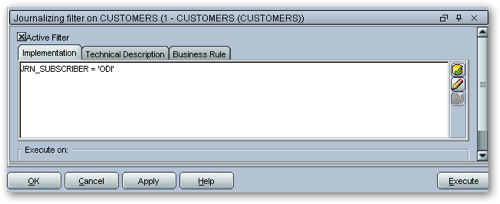
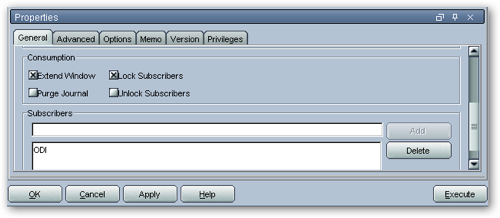
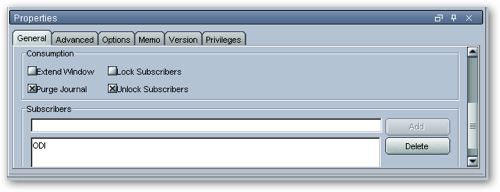
To select the GG_TEST_STG.CUSTOMER for change data capture, right-click on it and select Changed Data Capture > Add to CDC.
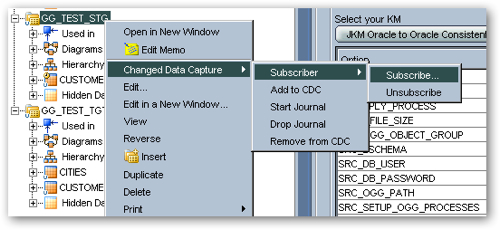
Next you need to define a CDC subscriber. Right-click on the GG_TEST_STG model now, and select Changed Data Capture > Subscriber > Subscribe, like this:
If you then use SQL*Plus to check the GG_TEST_STG schema, you should see the subscriber tables that ODI uses when journalizing a table or set of tables:
SQL> conn gg_test_stg/password
Connected
SQL> select table_name from user_tables;

TABLE_NAME
------------------------------
CUSTOMERS
SNP_CDC_SUBS
SNP_CDC_SET
SNP_CDC_SET_TABLE
SNP_CDC_OBJECTS
7. Now we will enable journaling by deploying the Golden Gate configuration files, and enabling Golden Gate.
Deploying the Golden Gate configuration files is done by selecting the Start Journal option from the Changed Data Capture menu. Right-click on the GG_TEST_STG model and select Changed Data Capture > Start Journal to start this process.

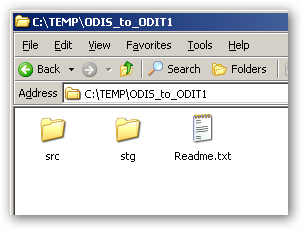
Within the C:\TEMP folder should be two subfolders (\src and \stg) and a file called Readme.txt, like this:
The Readme.txt file is generated by ODI as part of the CDC Process start and is customized for your installation, with mine looking like this:
This readme file provides a detail of the different steps to be executed manually in order to complete the setup of the CDC using OGG.

UPLOAD FILES TO SOURCE MACHINE
The files for the source machine have been generated in C:\TEMP/ODIS_to_ODIT1/src
These files must be copied on the source machine, to the following location C:\GoldenGate\GoldenGate_Src using the same directory structure.

For instance, files contained in C:\TEMP/ODIS_to_ODIT1/src/dirprm should end up in C:\GoldenGate\GoldenGate_Src/dirprm

UPLOAD FILES TO STAGING MACHINE
The files for the staging machine have been generated in C:\TEMP/ODIS_to_ODIT1/stg
These files must be copied on the target machine, to the following location C:\GoldenGate\GoldenGate_Tgt using the same directory structure.

For instance, files contained in C:\TEMP/ODIS_to_ODIT1/stg/dirprm should end up in C:\GoldenGate\GoldenGate_Tgt/dirprm

RUN THE SOURCE OBEY FILE
Connect to the source machine using a command line tool such as cmd on Windows or a shell on UNIX/Linux and execute the following command:
C:\GoldenGate\GoldenGate_Src/ggsci paramfile C:\GoldenGate\GoldenGate_Src/diroby/ODISS.oby

GENERATE THE DEFINITION FILE
Connect to the source machine using a command line tool such as cmd on Windows or a shell on UNIX/Linux and execute the following command:
C:\GoldenGate\GoldenGate_Src/defgen paramfile C:\GoldenGate\GoldenGate_Src/dirprm/ODISD.prm

COPY DEFINITION FILE
Copy the definition file C:\GoldenGate\GoldenGate_Src/dirdef/ODISC.def from the source machine to C:\GoldenGate\GoldenGate_Tgt/dirdef/ODISC.def on the staging machine.

RUN THE STAGING OBEY FILE
Connect to the staging machine using a command line tool such as cmd on Windows or a shell on UNIX/Linux and execute the following commands:
C:\GoldenGate\GoldenGate_Tgt/ggsci paramfile C:\GoldenGate\GoldenGate_Tgt/diroby/ODIT1T.oby
Run the first command in the file, like this:
C:\GoldenGate\GoldenGate_Src/ggsci paramfile C:\GoldenGate\GoldenGate_Src/diroby/ODISS.obythen run the next command in the file to generate the definition file:
C:\GoldenGate\GoldenGate_Src/defgen paramfile C:\GoldenGate\GoldenGate_Src/dirprm/ODISD.prmFor some reason, the JKM doesn't copy the userid that you entered into the KM options into all of the relevant configuration files. To fix this, replace the reference to GG_TEST_STG in the C:\GoldenGate\GoldenGate_Stg\diroby\ODIT1T.oby and the C:\GoldenGate\GoldenGate_Stg\dirprm\ODIT1A1.prm files with SYSTEM, then save the files, and then carry on.
Now run the following command to start everything up:
C:\GoldenGate\GoldenGate_Stg/ggsci paramfile C:\GoldenGate\GoldenGate_Stg/diroby/ODIT1T.obyWe can then use the ggsci utility that ships with Golden Gate to check that everything is up and running:
cd c:\GoldenGate\GoldenGate_Src
ggsci
info all

GGSCI (w2k3vm) 1> info all

Program     Status      Group       Lag           Time Since Chkpt

MANAGER     RUNNING
EXTRACT     RUNNING     ODISC       00:00:00      00:00:00
EXTRACT     RUNNING     ODIT1P      00:00:00      00:00:01
Do the same for the C:\GoldenGate\GoldenGate_Stg installation
cd c:\GoldenGate\GoldenGate_Src
ggsci
info all

GGSCI (w2k3vm) 1> info all

Program     Status      Group       Lag           Time Since Chkpt

MANAGER     RUNNING
REPLICAT    RUNNING     ODIT1A1     00:00:00      00:00:08
At this point, Golden Gate is running and sending new and changed data from the GG_TEST_SRC.CUSTOMERS table to the GG_TEST_STG.CUSTOMERS staging table. If you get a status of STOPPED, ABENDED or similar, go back and check what you've done as the process won't work later on without fixing this.
We will now set up the interface and package.
- We will now create the interface in ODI that will read the journalized brought across by Golden Gate.
Create a new interface, using the CUSTOMERS table from the GG_TEST_STG schema, the CITIES table from the GG_TEST_TGT schema as sources, and the CUSTOMERS_FULL table from the GG_TEST_TGT schema, like this:
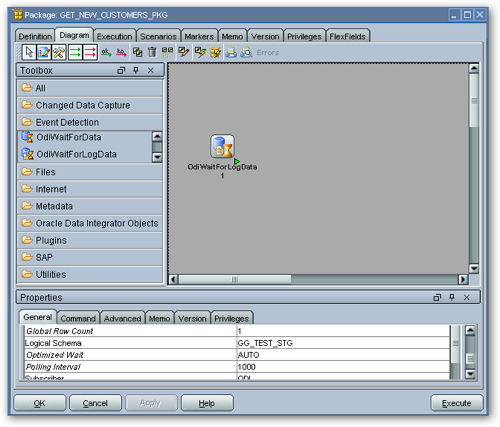
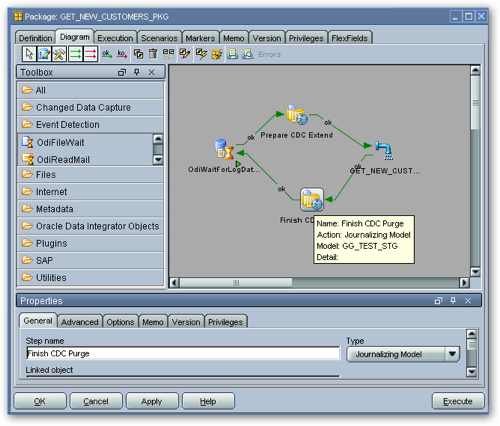
Create a new package, and add the OdiWaitForLogData tool to the package, and set the options to the following values (leave all other options at their default)
Global Row Count : 1
Logical Schema : GG_TEST_STG
Subscriber : ODI
CDC Set : GG_TEST_STG.GG_TEST_STG
- Now we can test it all out.
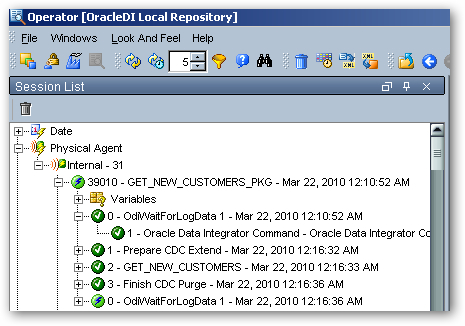
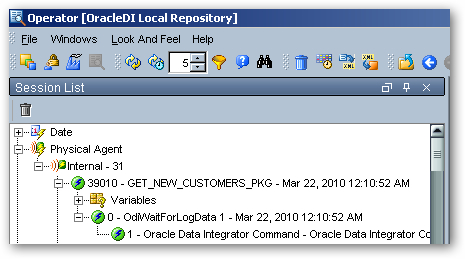
Press the Execute button on the bottom of the package, to start it running. Go over to the Operator application and check that the package is running, and waiting for a new row of changed data capture to arrive in the staging table, courtesy of Golden Gate.
Connected to:
Oracle Database 11g Enterprise Edition Release 11.1.0.7.0 - Production
With the Partitioning, OLAP, Data Mining and Real Application Testing option

SQL> show user
USER is "GG_TEST_SRC"
SQL> insert into customers (id, name, city_id)
2  values (5,'Bill',10);

1 row created.

SQL> commit;

Commit complete.

SQL> conn gg_test_tgt/password
Connected.
SQL> select * from customers_full;

ID NAME                    CITY_ID CITY_NAME
---------- -------------------- ---------- --------------------
4 Adam                         12 Boston
5 Bill                            10 New York
1 Mark                         10 New York
2 Dave                         11 San Francisco
3 Pete                         12 Boston

SQL>
And, if I check back to the ODI Operator, I can see that the CDC process has detected the new row in the staging table (or more accurately, the J$ table and JV$ views) and triggered rest of the package, joining the incoming data to a lookup table before adding the new row to the target table.