Tips and Tricks for the OBIEE linux sysadmin

As well as industry-leading solution architecture, consultancy and training on Oracle BI, here at Rittman Mead we also provide expert services in implementation and support of such systems. In this blog I want to share some of the things I find useful when working with OBIEE on a Linux system.
OBIEE Linux start up script / service
Ticking both the OBIEE and Linux boxes, this script that I wrote is probably top of my list of recommendations (he says modestly…). It enables you to start and stop OBIEE using the Linux standardservice command, integrate it into system startup/shutdown (through init.d), and also supports an advanced status command which does its very best to determine the health of your OBIEE system.
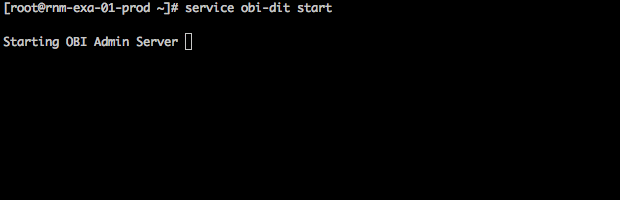
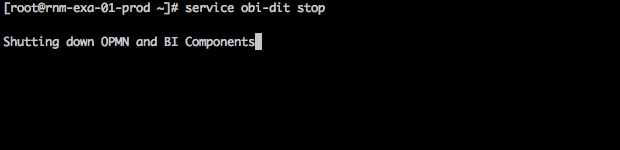

You can get the script from the Rittman Mead public GitHub repository, or directly download the script here (but don’t forget to check out the README).
screen
GNUscreen is one of the most useful programs that I use on Linux. I wrote extensively about it in my blog post screen and OBIEE. It enables you to do things such as:
- Run multiple commands simultaneously in one SSH session
- Disconnect and reconnect (deliberately, or from dropped connections, e.g. on unreliable wi-fi or 3G) and pick up exactly where you left off, with all processes still running
- Share your SSH view with someone else, for remote training or a second pair of eyes when troubleshooting
- Search through screen scroll back history, cut and paste
- …a lot more!
tmux, but I've found that screen is the most widely available by default. Since they all have quite steep learning curves and esoteric key shortcuts to operate them, I tend to stick with screen.
SSH keys
Likescreen, nothing to do with OBIEE per se, but an important part of Linux server security to understand, IMNSHO (In My Not-So Humble Opinion!).
Maybe I’m overly simple but I like pretty pictures when I’m trying to grasp concepts, so here goes:
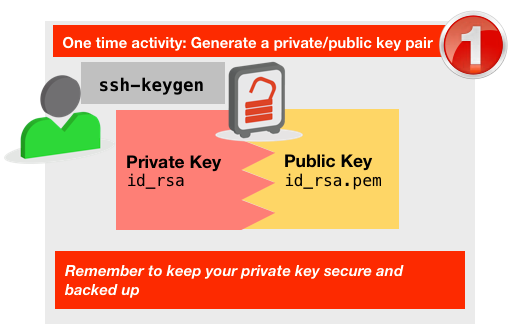 You create a pair of keys using
 ssh-keygen. These are plain text and can be cut and pasted , copied, as required. One is private (e.g.id_rsa), and you need to protect this as you would any other security artifact such as server passwords, and you can optionally secure with a pass phrase. The other is public (e.g.id_rsa.pub), and you can share with anyone.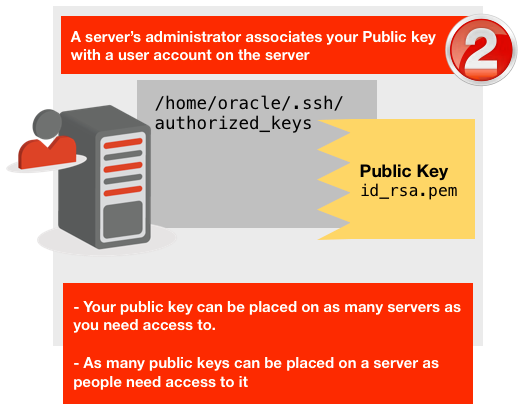 Your public key is placed on any server you need access to, by the server’s administrator. It needs to go in the
 .sshfolder in the user's home folder, in a file calledauthorized_keys. As many public keys as need access can be placed in this file. Don't forget the leading dot on.ssh.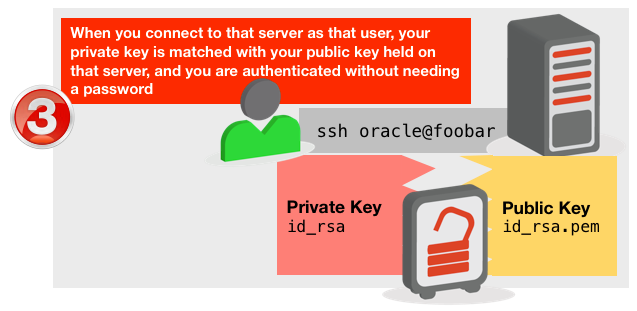
Why are SSH keys good?
- You don’t need a password to login to a server, which is a big time saver and productivity booster.
- Authentication becomes about “this is WHO may access something” rather than “here is the code to access it, we have no idea who knows it though”.
- It removes the need to share server passwords
- Better security practice
- Easier auditing of exactly who used a server
- It enables the ability to grant temporary access to servers, and precisely control when it is revoked and from whom.
- Private keys can be protected with a passphrase, without which they can't be used.
- Using SSH keys to control server access is a lot more secure since you can disable server password login entirely, thus kiboshing any chance of brute force attacks
- SSH keys can be used to support automatic connections between servers for backups, starting jobs, etc, without the need to store a password in plain text
Tips
- SSH keys are just plain text, making them dead easy to backup in a Password Manager such as LastPass, KeePass, or 1Password.
- SSH keys work just fine from Windows. Tools such as PuTTY and WinSCP support them, although you need to initially change the format of the private key to
ppkusing PuTTYGen, an ancillary PuTTY tool. - Whilst SSH keys reside by default in your user home .ssh folder, you can store them on a cloud service such as Dropbox and then use them from any machine you want.
- To make an ssh connection using a key not in the default location, use the
-iflag, for examplessh -i ~/Dropbox/ssh-keys/mykey [email protected]
- To make an ssh connection using a key not in the default location, use the
- To see more information about setting up SSH keys, type:
man ssh - The
authorized_keysfile is space separated, and the last entry on each line can be a comment. This normally defaults to the user and host name where the key was generated, but can be freeform text to help identify the key more clearly if needed. Seeman sshdfor the full spec of the file.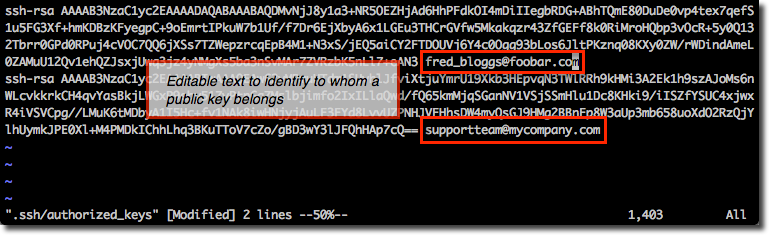
Determining your server’s public IP / validating Internet connectivity
Dead simple this one - if you’re working on a server, or maybe a development VM, and need to check it has internet connection or want to know what the IP address is :curl -s http://icanhazip.com/
curl installed then it won’t work, so you’re left with the ever-reliable
ping google.com
Learn vi
…or emacs, or whatever your poison is. My point is that if you are going to be spending any serious time as an admin you need to be able to view and edit files locally on the Linux server. Transferring them to your Windows desktop with WinSCP to view in Notepad is what my granny does, and even then she’s embarrassed about it.Elitism and disdain aside, the point remains. The learning curve of these console-based editors repays itself many-fold in time and thus efficiency savings in the long run. It’s not only faster to work with files locally, it reduces context-switching and the associated productivity loss.
Compare:
- I need to view this log file
vi log.txt- Done
- I need to check this log file for an error
- Close terminal window
- Start menu … now where was that program … hey fred, what’s the program … yeh yeh WinSCP that’s right
- Scroll though list of servers, or find IP to connect to
- Try to remember connection credentials
- Hey I wonder if devopsreactions has anything cool on it today
- Back to the job in hand … transfer file , which file?
- Hmmm, what was that folder called … something something logs, right?
- Dammit, back to the terminal …
pwd, right, gottcha - Navigate to the folder in WinSCP, find the file
- Download the file
- That dbareactions is pretty funny too, might just have a quick look at that
- Open Notepad (or at least Notepad++, please)
- Open file … where did Windows put it? My Documents? Desktop? Downloads? Libraries, whatever the heck they are ? gnaaargh
- Wonder if those cool guys at Rittman Mead have posted anything on their blog, let’s go have a look
- Back to Notepad, got the log file, now …… what was I looking for?
- Soddit
Silent Installs
This has to be my #1 tip in the Work Smarter, Not Harder category of OBIEE administration, and is as applicable to OBIEE on Windows as it is to OBIEE on Linux. Silent installs are where you run the installer “hands off”. You create a file in advance that describes all the configuration options to use, and then crank the handle and off it goes. You can use silent installs for- OBIEE Enterprise install
- OBIEE Software Only install
- OBIEE domain configurtion
- WebLogic Server (WLS) install
- Repository Creation Utility (RCU), both Drop and Create
- Guaranteed identical configurations across installations
- No need to waste time getting a X Server working for non-Windows installs to run the graphical install client
- Entire configuration of a server can be pre-canned and scripted
- Running the graphical installer is TEDIOUS the first time, the second, third, tenth, twentieth … kill me. Silent installs make the angels sing and new born lambs frolic in the virtual glades of OBIEE grass meadows heady with the scent of automatically built RCU schemas
- OBIEE: Installing Oracle Business Intelligence in Silent Mode
- RCU: Running Repository Creation Utility from the Command Line
- WLS: Running the Installation Program in Silent Mode
opatch napply
I wrote about this handy little option foropatch in a blog post here. Where you have more than one patch to apply (as happens frequently with OBIEE patch bundles) this can be quite a time saver.
Bash
Bash is the standard command line that you will encounter on Linux. Here are a few tricks I find useful:Ctrl-R - command history
This is one of those shortcuts that you’ll wonder how you did without. It’s like going through your command history by pressing the up/down arrows (you knew about that one, right?), but on speed.What Ctrl-R does is let you search through your command history and re-use a command just by hitting enter.
How it works is this:
- Press Ctrl-R. The bash prompt changes to
(reverse-i-search)`':
- Start entering part of the command line entry that you want to repeat. For example, I want to switch back to my FMW config folder. All I type is “co” to match the “co” in config, and bash shows me the match:
(reverse-i-search)`co': cd /u01/dit/fmw/instances/instance1/config/
-
If I want to amend the command, I can press left/right arrows to move along the line, or just hit enter and it gets re-issued straight off
-
If there are multiple matches, either keep typing to narrow the search down, or press Ctrl-R to show the next match or Shift-Ctrl-R to show the previous match
Another example, I want to repeat my sqlplus command, I just press Ctrl-R and start typing sql and it’s matched:
(reverse-i-search)`sq': sqlplus / as sysdba
Finally, repeat the restart of Presentation Services, just by entering ps:
(reverse-i-search)`ps': ./opmnctl restartproc ias-component=coreapplication_obips1
time
If you prefix any command bytime you get a nice breakdown of how long it took to run and where the time was spent after it completes. Very handy for quick bits of performance testing etc, or just curiosity :-)
$ time ./opmnctl restartproc ias-component=coreapplication_obis1
opmnctl restartproc: restarting opmn managed processes...
real    0m14.387s

user    0m0.016s

sys     0m0.031s
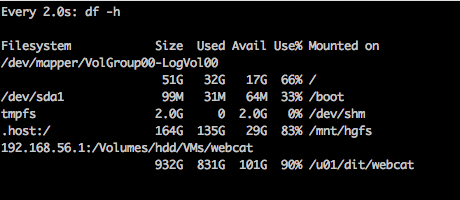
watch
This is a fantastic little utility that will take the command you pass it and repeatedly issue it, by default every two seconds.You can use it to watch disk space, directory contents, and so on.
watch df -h
sudo !!
Not the exclamation “sudo!”, butsudo !!, meaning, repeat the last command but with sudo.
$ tail /var/log/messages
tail: cannot open `/var/log/messages' for reading: Permission denied
$ sudo !!

sudo tail /var/log/messages

Sep 26 18:18:16 rnm-exa-01-prod kernel: e1000: eth1 NIC Link is Up 1000 Mbps Full Duplex, Flow Control: RX

Sep 26 18:18:16 rnm-exa-01-prod avahi-daemon[4965]: Invalid query packet.
What is sudo? Well I’m glad you asked:
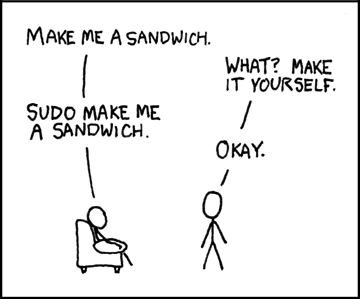
(credit: XKCD)