OBIEE SampleApp in The Cloud: Importing VirtualBox Machines to AWS EC2

Virtualisation has revolutionised how we work as developers. A decade ago, using new software would mean trying to find room on a real tin server to install it, hoping it worked, and if it didn’t, picking apart the pieces probably leaving the server in a worse state than it was to begin with. Nowadays, we can just launch a virtual machine to give a clean environment and if it doesn’t work - trash it and start again.
The sting in the tail of virtualisation is that full-blown VMs are heavy - for disk we need several GB just for a blank OS, and dozens of GB if you’re talking about a software stack such as Fusion MiddleWare (FMW), and the host machine needs to have the RAM and CPU to support it all too. Technologies such as Linux Containers go some way to making things lighter by abstracting out a chunk of the OS, but this isn't something that's reached the common desktop yet.
So whilst VMs are awesome, it’s not always practical to maintain a library of all of them on your local laptop (even 1TB drives fill up pretty quickly), nor will your laptop have the grunt to run more than one or two VMs at most. VMs like this are also local to your laptop or server – but wouldn’t it be neat if you could duplicate that VM and make a server based on it instantly available to anyone in the world with an internet connection? And that’s where The Cloud comes in, because it enables us to store as much data as we can eat (and pay for), and provision “hardware” at the click of a button for just as long as we need it, accessible from anywhere.

Here at Rittman Mead we make extensive use of Amazon Web Services (AWS) and their Elastic Computing Cloud (EC2) offering. Our website runs on it, our training servers run on it, and it scales just as we need it to. A class of 3 students is as easy to provision for as a class of 24 - no hunting around for spare servers or laptops, no hardware sat idle in a cupboard as spare capacity "just in case".
One of the challenges that we’ve faced up until now is that all servers have had to be built from scratch in the cloud. Obviously we work with development VMs on local machines too, so wouldn’t it be nice if we could build VMs locally and then push them to the cloud? Well, now we can. Amazon offer a route to import virtual machines, and in this article I’m going to show how that works. I’ll use the superb SampleApp v406 VM that Oracle provide, because this is a great real-life example of a VM that is so useful, but many developers can find too memory-intensive to be able to run on their local machines all the time.
This tutorial is based on exporting a Linux guest VM from a Linux host server. A Windows guest probably behaves differently, but a Mac or Windows host should work fine since VirtualBox is supported on both. The specifics are based on SampleApp, but the process should be broadly the same for all VMs.
Obtain the VM
We're going to use SampleApp, which can be downloaded from Oracle.
- Download the six-part archive from http://www.oracle.com/technetwork/middleware/bi-foundation/obiee-samples–167534.html
- Verify the md5 checksums against those published on the download page:
[oracle@asgard sampleapp406]$ ll total 30490752 -rw-r--r-- 1 oracle oinstall 5242880000 Sep 9 01:33 SampleAppv406.zip.001 -rw-r--r-- 1 oracle oinstall 5242880000 Sep 9 01:30 SampleAppv406.zip.002 -rw-r--r-- 1 oracle oinstall 5242880000 Sep 9 02:03 SampleAppv406.zip.003 -rw-r--r-- 1 oracle oinstall 5242880000 Sep 9 02:34 SampleAppv406.zip.004 -rw-r--r-- 1 oracle oinstall 5242880000 Sep 9 02:19 SampleAppv406.zip.005 -rw-r--r-- 1 oracle oinstall 4977591522 Sep 9 02:53 SampleAppv406.zip.006 [oracle@asgard sampleapp406]$ md5sum * 2b9e11f69ada5f889088dd74b5229322 SampleAppv406.zip.001 f8a1a5ae6162b20b3e9c6c888698c071 SampleAppv406.zip.002 68438cfea87e8d3a2e2f15ff00dadf12 SampleAppv406.zip.003 b71d9ace4f75951198fc8197da1cfe62 SampleAppv406.zip.004 4f1a5389c9e0addc19dce6bbc759ec20 SampleAppv406.zip.005 2c430f87e22ff9718d5528247eff2da4 SampleAppv406.zip.006 - Unpack the archive using 7zip — the instructions for SampleApp are very clear that you must use 7zip, and not another archive tool such as winzip.
[oracle@asgard sampleapp406]$ time 7za x SampleAppv406.zip.0017-Zip (A) [64] 9.20 Copyright (c) 1999-2010 Igor Pavlov 2010-11-18 p7zip Version 9.20 (locale=en_US.UTF-8,Utf16=on,HugeFiles=on,80 CPUs)Processing archive: SampleAppv406.zip.001
Extracting SampleAppv406Appliance
Extracting SampleAppv406Appliance/SampleAppv406ga-disk1.vmdk
Extracting SampleAppv406Appliance/SampleAppv406ga.ovfEverything is Ok
Folders: 1
Files: 2
Size: 31191990916
Compressed: 5242880000real 1m53.685s
user 0m16.562s
sys 1m15.578s - Because we need to change a couple of things on the VM first (see below), we'll have to import the VM to VirtualBox so that we can boot it up and make these changes.You can import using the VirtualBox GUI, or as I prefer, the
VBoxManagecommand line interface. I like to time all these things (just because, numbers), so stick atimecommand on the front:
This took 12 minutes or so, but that was on a high-spec system, so YMMV.time VBoxManage import --vsys 0 --eula accept SampleAppv406Appliance/SampleAppv406ga.ovf[...] 0%...10%...20%...30%...40%...50%...60%...70%...80%...90%...100% Successfully imported the appliance.real 12m15.434s
user 0m1.674s
sys 0m2.807s
Preparing the VM
Importing Linux VMs to Amazon EC2 will only work if the kernel is supported, which according to an AWS blog post includes Red Hat Enterprise Linux 5.1 - 6.5. Whilst SampleApp v406 is built on Oracle Linux 6.5 (which isn’t listed by AWS as supported), we have the option of telling the VM to use a kernel that is Red Hat Enterprise Linux compatible (instead of the default Unbreakable Enterprise Kernel - UEK). There are some other pre-requisites that you need to check if you’re trying this with your own VM, including a network adaptor configured to use DHCP. The aforementioned blog post has details.
- Boot the VirtualBox VM, which should land you straight in the desktop environment, logged in as the oracle user.
- We need to modify a file as root (superuser). Here’s how to do it graphically, or use
viif you’re a real programmer:- Open a Terminal window from the toolbar at the top of the screen
- Enter
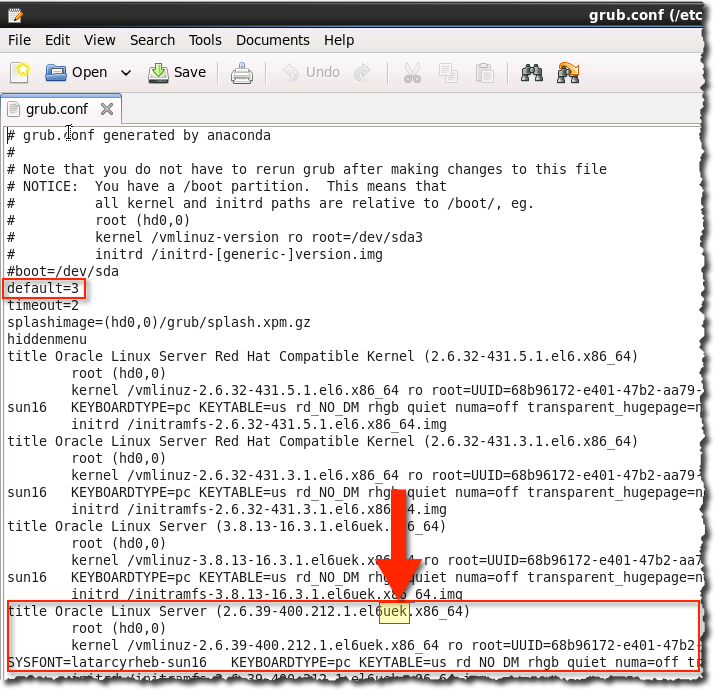
The sudo bit is important, because it tells Linux to run the command as root. (I’m on an xkcd-roll here: 1, 2)sudo gedit /etc/grub.conf - In the text editor that opens, you will see a header to the file and then a set of repeating sections beginning with title. These are the available kernels that the machine can run under. The default is 3, which is zero-based, so it’s the fourth
titlesection. Note that the kernel version details include uek which stands for Unbreakable Enterprise Kernel – and is not going to work on EC2.
- Change the default to 0, so that we’ll instead boot to a Red Hat Compatible Kernel, which will work on EC2
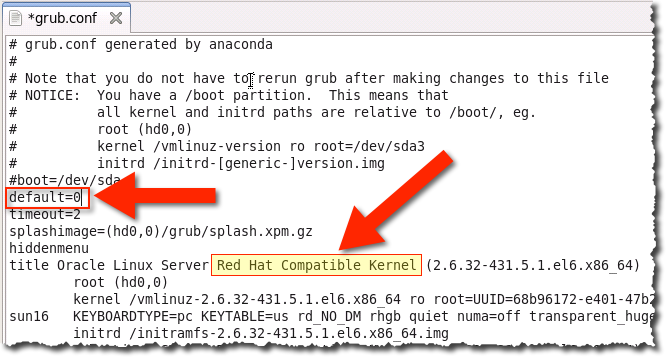
- Save the file
- Optional steps:
- Whilst you’ve got the server running, add your SSH key to the image so that you can connect to it easily once it is up on EC2. For more information about SSH keys, see my previous blog post here, and a step-by-step for doing it on SampleApp here.
- Disable non-SSH key logins (in
/etc/ssh/sshd_config, setPasswordAuthentication noandPubkeyAuthentication yes), so that your server once on EC2 is less vulnerable to attack. Particularly important if you’re using the stock image with Admin123 as the root password. - Set up screen, and OBIEE and the database as a Linux service, both covered in my article here.
- Shutdown the instance by entering this at a Terminal window:
sudo shutdown -h now
Export the VirtualBox VM to Amazon EC2
Now we’re ready to really get going. The first step is to export the VirtualBox VM to a format that Amazon EC2 can work with. Whilst they don’t explicitly support VMs from VirtualBox, they do support the VMDK format – which VirtualBox can create. You can do the export from the graphical interface, or as before, from the command line:
time VBoxManage export "OBIEE SampleApp v406" --output OBIEE-SampleApp-v406.ovf

0%...10%...20%...30%...40%...50%...60%...70%...80%...90%...100%
Successfully exported 1 machine(s).

real    56m51.426s
user    0m6.971s
sys     0m12.162s
If you compare the result of this to what we downloaded from Oracle it looks pretty similar - an OVF file and a VMDK file. The only difference is that the VMDK file is updated with the changes we made above, including the modified kernel settings which are crucial for the success of the next step.
[oracle@asgard sampleapp406]$ ls -lh
total 59G
-rw------- 1 oracle oinstall  30G Sep  9 10:55 OBIEE-SampleApp-v406-disk1.vmdk
-rw------- 1 oracle oinstall  15K Sep  9 09:58 OBIEE-SampleApp-v406.ovf
We’re ready now to get all cloudy. For this, you’ll need:
- An AWS account
- You’ll also need your AWS account’s Access Key and Secret Key
- AWS EC2 commandline tools installed, along with a Java Runtime Environment (JRE) 1.7 or greater:
wget http://s3.amazonaws.com/ec2-downloads/ec2-api-tools.zip
sudo mkdir /usr/local/ec2
sudo unzip ec2-api-tools.zip -d /usr/local/ec2
# You might need to fiddle with the following paths and version numbers:
sudo yum install -y java-1.7.0-openjdk.x86_64
cat >> ~/.bash_profile <<EOF
export JAVA_HOME="/usr/lib/jvm/java-1.7.0-openjdk-1.7.0.65.x86_64/jre"
export EC2_HOME=/usr/local/ec2/ec2-api-tools-1.7.1.1/
export PATH=$PATH:$EC2_HOME/bin
EOF<
- Set your credentials as environment variables:
export AWS_ACCESS_KEY=xxxxxxxxxxxxxx export AWS_SECRET_KEY=xxxxxxxxxxxxxxxxxxxxxx - Ideally a nice fat pipe to upload the VM file over, because at 30GB it is not trivial (not in 2014, anyway)
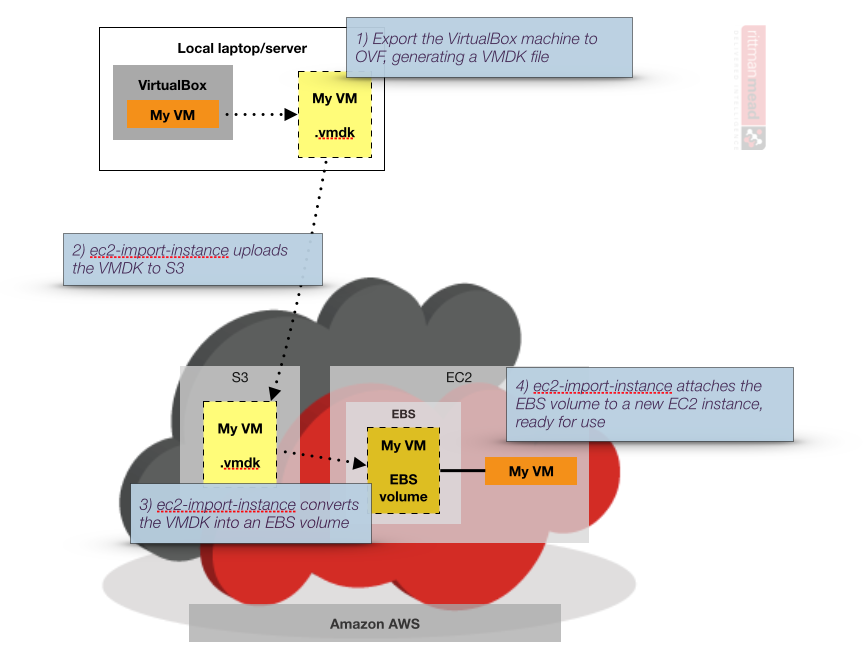
What’s going to happen now is we use an EC2 command line tool to upload our VMDK (virtual disk) file to Amazon S3 (a storage platform), from where it gets converted into an EBS volume (Elastic Block Store, i.e. a EC2 virtual disk), and from there attached to a new EC2 instance (a "server"/"VM").
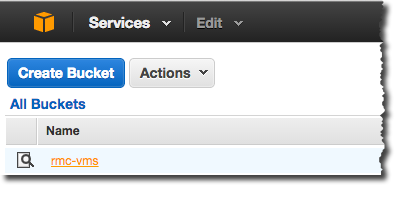
Before we can do the upload we need an S3 “bucket” to put the disk image in that we’re uploading. You can create one from https://console.aws.amazon.com/s3/. In this example, I’ve got one called rmc-vms - but you’ll need your own.
Once the bucket has been created, we build the command line upload statement using ec2-import-instance:
time ec2-import-instance OBIEE-SampleApp-v406-disk1.vmdk --instance-type m3.large --format VMDK --architecture x86_64 --platform Linux --bucket rmc-vms --region eu-west-1 --owner-akid $AWS_ACCESS_KEY --owner-sak $AWS_SECRET_KEY
Points to note:
- m3.large is the spec for the VM. You can see the available list here. In the AWS blog post it suggests only a subset will work with the import method, but I’ve not hit this limitation yet.
- region is the AWS Region in which the EBS volume and EC2 instance will be built. I’m using ew-west-1 (Ireland), and it makes sense to use the one geographically closest to where you or your users are located. Still waiting for uk-yorks-1...
- architecture and platform relate to the type of VM you’re importing.
The upload process took just over 45 minutes for me, and that’s from a data centre with a decent upload:
[oracle@asgard sampleapp406]$ time ec2-import-instance OBIEE-SampleApp-v406-disk1.vmdk --instance-type m3.large --format VMDK --architecture x86_64 --platform Linux --bucket rmc-vms --region eu-west-1 --owner-akid $AWS_ACCESS_KEY --owner-sak $AWS_SECRET_KEY
Requesting volume size: 200 GB
TaskType        IMPORTINSTANCE  TaskId  import-i-fh08xcya       ExpirationTime  2014-09-16T10:07:44Z    Status  active  StatusMessage   Pending InstanceID      i-b07d3bf0
DISKIMAGE       DiskImageFormat VMDK    DiskImageSize   31191914496     VolumeSize      200     AvailabilityZone        eu-west-1a      ApproximateBytesConverted       0       Status       active  StatusMessage   Pending : Downloaded 0
Creating new manifest at rmc-vms/d77672aa-0e0b-4555-b368-79d386842112/OBIEE-SampleApp-v406-disk1.vmdkmanifest.xml
Uploading the manifest file
Uploading 31191914496 bytes across 2975 parts
0% |--------------------------------------------------| 100%
   |==================================================|
Done
Average speed was 11.088 MBps
The disk image for import-i-fh08xcya has been uploaded to Amazon S3
where it is being converted into an EC2 instance.  You may monitor the
progress of this task by running ec2-describe-conversion-tasks.  When
the task is completed, you may use ec2-delete-disk-image to remove the
image from S3.

real    46m59.871s
user    10m31.996s
sys     3m2.560s
Once the upload has finished Amazon automatically converts the VMDK (now residing on S3) into a EBS volume, and then attaches it to a new EC2 instance (i.e. a VM). You can monitor the status of this task using ec2-describe-conversion-tasks, optionally filtered on the TaskId returned by the import command above:
ec2-describe-conversion-tasks --region eu-west-1 import-i-fh08xcya

TaskType        IMPORTINSTANCE  TaskId  import-i-fh08xcya       ExpirationTime  2014-09-16T10:07:44Z    Status  active  StatusMessage   Pending InstanceID      i-b07d3bf0
DISKIMAGE       DiskImageFormat VMDK    DiskImageSize   31191914496     VolumeSize      200     AvailabilityZone        eu-west-1a      ApproximateBytesConverted       3898992128
Status  active  StatusMessage   Pending : Downloaded 31149971456
This is now an ideal time to mention as a side note the Linux utility watch, which simply re-issues a command for you every x seconds (2 by default). This way you can leave a window open and keep an eye on the progress of what is going to be a long-running job
watch ec2-describe-conversion-tasks --region eu-west-1 import-i-fh08xcya

Every 2.0s: ec2-describe-conversion-tasks --region eu-west-1 import-i-fh08xcya                                                             Tue Sep  9 12:03:24 2014

TaskType        IMPORTINSTANCE  TaskId  import-i-fh08xcya       ExpirationTime  2014-09-16T10:07:44Z    Status  active  StatusMessage   Pending InstanceID      i-b07d3bf0
DISKIMAGE       DiskImageFormat VMDK    DiskImageSize   31191914496     VolumeSize      200     AvailabilityZone        eu-west-1a      ApproximateBytesConverted       5848511808
Status  active  StatusMessage   Pending : Downloaded 31149971456
And whilst we’re at it, if you’re using a remote server to do this (as I am, to take advantage of the large bandwidth), you will find screen invaluable for keeping tasks running and being able to reconnect at will. You can read more about screen and watch here.
So back to our EC2 import job. To start with, the task will be Pending: (NB unlike lots of CLI tools, you read the output of this one left-to-right, rather than as columns with headings)
$ ec2-describe-conversion-tasks --region eu-west-1
TaskType        IMPORTINSTANCE  TaskId  import-i-ffvx6z86       ExpirationTime  2014-09-12T15:32:01Z    Status  active  StatusMessage   Pending InstanceID      i-b2245ef2
DISKIMAGE       DiskImageFormat VMDK    DiskImageSize   5021144064      VolumeSize      60      AvailabilityZone        eu-west-1a      ApproximateBytesConverted       4707330352      Status  active  StatusMessage   Pending : Downloaded 5010658304
After a few moments it gets underway, and you can see a Progress percentage indicator: (scroll right in the code snippet below to see)
TaskType        IMPORTINSTANCE  TaskId  import-i-fgr0djcc       ExpirationTime  2014-09-15T15:39:28Z    Status  active  StatusMessage   Progress: 53%   InstanceID      i-c7692e87
DISKIMAGE       DiskImageFormat VMDK    DiskImageSize   5582545920      VolumeId        vol-f71368f0    VolumeSize      20      AvailabilityZone        eu-west-1a      ApproximateBytesConverted       5582536640      Status  completed
Note that at this point you’ll see also see an Instance in the EC2 list, but it won’t launch (no attached disk – because it’s still being imported!)
If something goes wrong you’ll see the Status as cancelled, such as in this example here where the kernel in the VM was not a supported one (observe it is the UEK kernel, which isn’t supported by Amazon):
TaskType        IMPORTINSTANCE  TaskId  import-i-ffvx6z86       ExpirationTime  2014-09-12T15:32:01Z    Status  cancelled       StatusMessage   ClientError: Unsupported kernel version 2.6.32-300.32.1.el5uek       InstanceID      i-b2245ef2
DISKIMAGE       DiskImageFormat VMDK    DiskImageSize   5021144064      VolumeId        vol-91b1c896    VolumeSize      60      AvailabilityZone        eu-west-1a      ApproximateBytesConverted    5021128688      Status  completed
After an hour or so, the task should complete:
TaskType        IMPORTINSTANCE  TaskId  import-i-fh08xcya       ExpirationTime  2014-09-16T10:07:44Z    Status  completed       InstanceID      i-b07d3bf0
DISKIMAGE       DiskImageFormat VMDK    DiskImageSize   31191914496     VolumeId        vol-a383f8a4    VolumeSize      200     AvailabilityZone        eu-west-1a      ApproximateBy
tesConverted    31191855472     Status  completed
At this point you can remove the VMDK from S3 (and should do, else you'll continue to be charged for it), following the instructions for ec2-delete-disk-image
Booting the new server on EC2
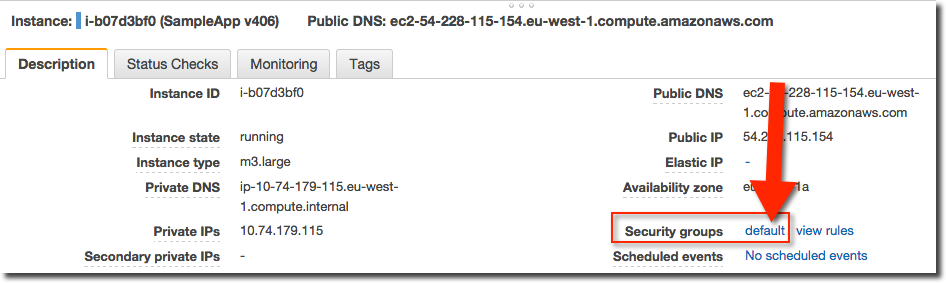
Go to your EC2 control panel, where you should see an instance (EC2 term for “server”) in Stopped state and with no name.

Select the instance, and click Start on the Actions menu. After a few moments a Public IP will be shown in the details pane. But, we’re not home free quite yet…read on.
Firewalls
So this is where it gets a bit tricky. By default, the instance will have launched with Amazon’s Firewall (known as a Security Group) in place which - unless you have an existing AWS account and have modified the default security group’s configuration - is only open on port 22, which is for ssh traffic.
You need to head over to the Security Group configuration page, accessed in several ways but easiest is clicking on the security group name from the instance details pane:
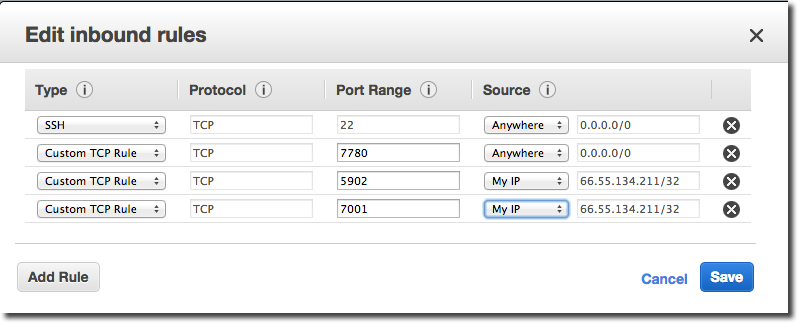
Click on the Inbound tab and then Edit, and add “Custom TCP Rule” for the following ports:
- 7780 (OBIEE front end)
- 7001 (WLS Console / EM)
- 5902 (oracle VNC)
You can make things more secure by allowing access to the WLS admin (7001) and VNC port (5902) to a specific IP address or range only.
Whilst we’re talking about security, your server is now open to the internet and all the nefarious persons out there, so you’ll be wanting to harden your server not least by resetting all the passwords to ones which aren’t publicly documented in the SampleApp user documentation!
Once you’ve updated your Security Group, you can connect to your server! If you installed the OBIEE and database auto start scripts (and if not, why not??) you should find OBIEE running just nicely on http://[your ip]:7780/analytics – note that the port is 7780, not 9704.
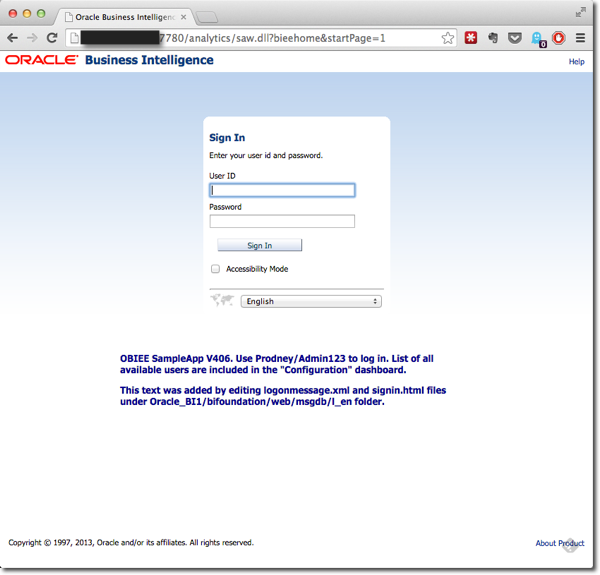
If you didn’t install the script, you will need to start the services manually per the SampleApp documentation. To connect to the server you can ssh (using Terminal, PuTTY, etc) to the server or connect on VNC (Admin123 is the password). For VNC clients try Screen Share on Macs (installed by default), or RealVNC on Windows.
Caveats & Disclaimers
- Running a server on AWS EC2 costs real money, so watch out. Once you’ve put your credit card details in, Amazon will continue to charge your card whilst there are chargeable items on your account (EBS volumes, instances - running or not- , and so on). You can get an idea of the scale of charges here.
- As mentioned above, a server on the open internet is a lot more vulnerable than one virtualised on your local machine. You will get poked and probed, usually by automated scripts looking for open ports, weak passwords, and so on. SampleApp is designed to open the toybox of a pimped-out OBIEE deployment to you, it is not “hardened”, and you risk learning the tough way about the need for it if you’re not careful.
Cloning
Amazon EC2 supports taking a snapshot of a server, either for backup/rollback purposes or spinning up as a clone, using an Amazon Machine Image (AMI). From the Instances page, simply select "Create an Image" to build your AMI. You can then build another instance (or ten) from this AMI as needed, exact replicas of the server as it was at the point that you created the image.
Lather, Rinse, and Repeat
There’s a whole host of VirtualBox “appliances” out there, and some of them such as the developer-tools-focused ones only really make sense as local VMs. But there are plenty that would benefit from a bit of “Cloud-isation”, where they’re too big or heavy to keep on your laptop all the time, but are handy to be able to spin up at will. A prime example of this for me is the EBS Vision demo database that we use for our BI Apps training. Oracle used to provide an pre-built Amazon image (know as an AMI) of this, but since withdrew it. However, Oracle do publish Oracle VM VirtualBox templates for EBS 12.1.3 and 12.2.3 (related blog), so from this with a bit of leg-work and a big upload pipe, it's a simple matter to brew your own AWS version of it -- ready to run whenever you need it.