Managing the OBIEE BI Server Cache from ODI 12c


I wrote recently about the OBIEE BI Server Cache and how useful it can be, but how important it is to manage it properly, both in the purging of stale data and seeding of new. In this article I want to show how to walk-the-walk and not just talk-the-talk (WAT? But you’re a consultant?!). ODI is the premier data integration tool on the market and one that we are great fans of here at Rittman Mead. We see a great many analytics implementations built with ODI for the data load (ELT, strictly speaking, rather than ETL) and then OBIEE for the analytics on top. Managing the BI Server cache from within your ODI batch makes a huge amount of sense. By purging and reseeding the cache directly after the data has been loaded into the database we can achieve optimal cache usage with no risk of stale data.
There are two options for cleanly hooking into OBIEE from ODI 12c with minimal fuss: JDBC, and Web Services. JDBC requires the OBIEE JDBC driver to be present on the ODI Agent machine, whilst Web Services have zero requirement on the ODI side, but a bit of config on the OBIEE side.
Setting up the BI Server JDBC Driver and Topology
Here I’m going to demonstrate using JDBC to connect to OBIEE from ODI. It’s a principle that was originally written up by Julien Testut here. We take the OBIEE JDBC driver bijdbc.jar from $FMW_HOME/Oracle_BI1/bifoundation/jdbc and copy it to our ODI machine. I’m just using a local agent for my testing, so put it in ~/.odi/oracledi/userlib/. For a standalone agent it should go in $AGENT_HOME/odi/agent/lib.
[oracle@ip-10-103-196-207 ~]$ cd /home/oracle/.odi/oracledi/userlib/
[oracle@ip-10-103-196-207 userlib]$ ls -l
total 200
-rw-r----- 1 oracle oinstall    332 Feb 17  2014 additional_path.txt
-rwxr-xr-x 1 oracle oinstall 199941 Sep 22 14:50 bijdbc.jar
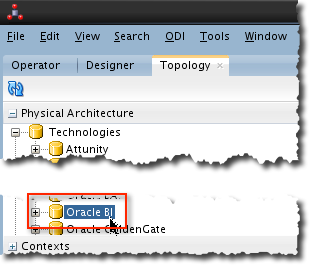
Now fire up ODI Studio, sign in to your repository, and head to the Topology pane. Under Physical Architecture -> Technologies and you’ll see Oracle BI
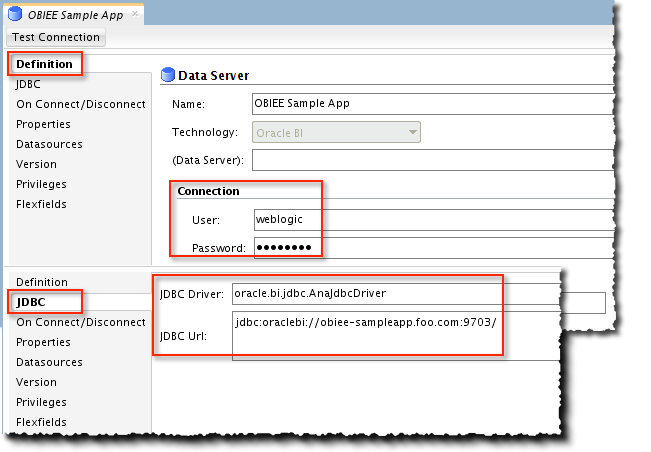
Right click and select New Data Server. Give it a sensible name and put your standard OBIEE credentials (eg. weblogic) under the Connection section. Click the JDBC tab and click the search icon to the right of the JDBC Driver text box. Select the default, oracle.bi.jdbc.AnaJdbcDriver, and then in the JDBC Url box put your server and port (9703, unless you’ve changed the listen port of OBIEE BI Server)
Now click Test Connection (save the data server when prompted, and click OK at the message about creating a physical schema), and select the Local Agent with which to run it. If you get an error then click Details to find out the problem.
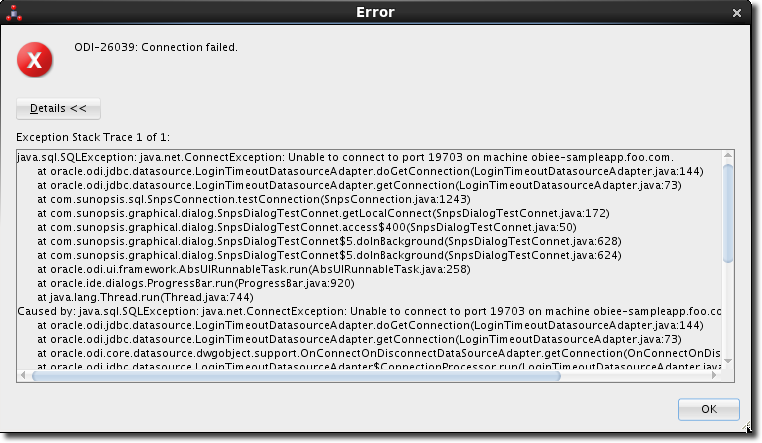
One common problem can be the connection through to the OBIEE server port, so to cut ODI out of the equation try this from the command prompt on your ODI machine (assuming it’s *nix):
nc -vz my-obiee-server.foo.com 9703
If the host resolves correctly and the port is open then you should get:
Connection to my-obiee-server.foo.com 9703 port [tcp/*] succeeded!
If not you’ll get something like:
nc: my-obiee-server.foo.com port 9703 (tcp) failed: Connection refused
Check the usual suspects - firewall (eg iptables) on the OBIEE server, firewalls on the network between the ODI and OBIEE servers, etc.
Assuming you’ve got a working connection you now need to create a Physical Schema. Right click on the new data server and select New Physical Schema.
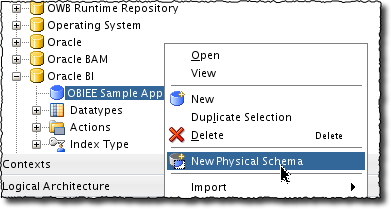
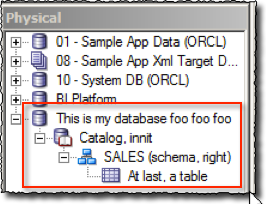
OBIEE’s BI Server acts as a “database” to clients, within which there are “schemas” (Subject Areas) and “tables” (Presentation Tables). On the New Physical Schema dialog you just need to set Catalog (Catalog), and when you click the drop-down you should see a list of the Subject Areas within your RPD. Pick one - it doesn’t matter which.
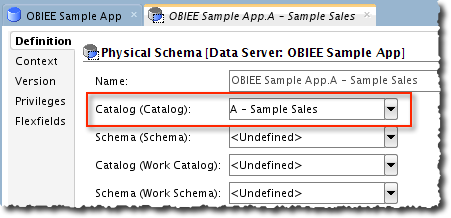
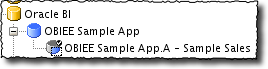
Save the physical schema (ignore the context message). At this point your Physical Architecture for Oracle BI should look like this:
Now under Logical Architecture locate the Oracle BI technology, right click on it and select New Logical Schema. From the Physical Schemas dropdown select the one that you’ve just created. Give a name to the Logical Schema.
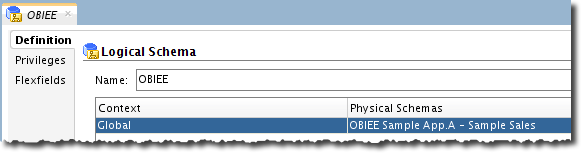
Your Logical Architecture for Oracle BI should look like this:
Building the Cache Management Routine
Full Cache Purge
Over in the Designer tab go to your ODI project into which you want to integrate the OBIEE cache management functions. Right click on Procedures and select Create New Procedure. Give it a name such as OBIEE Cache - Purge All and set the Target Technology to Oracle BI
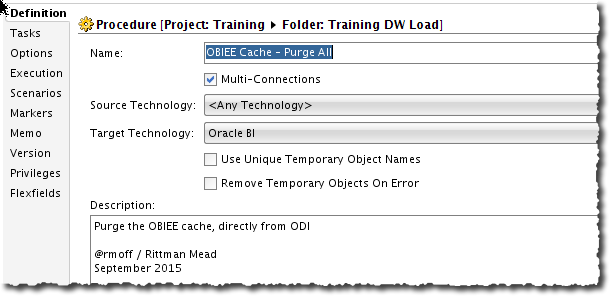
Switch to the Tasks tab and add a new Task. Give it a name, and set the Schema to the logical schema that you defined above. Under Target Command enter the call you want to make to the BI Server, which in this case is
call SAPurgeAllCache();

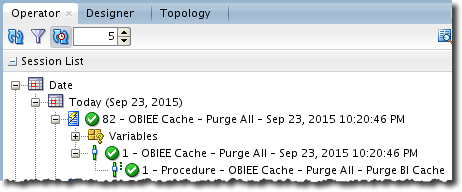
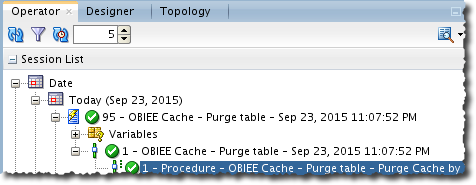
Save the procedure and then from the toolbar menu click on Run. Over in the Operator tab you should see the session appear and soon after complete - all being well - successfully.
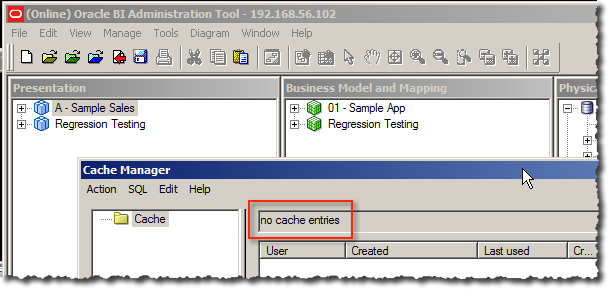
You can go and check your BI Server Cache from the OBIEE Administration Tool to confirm that it is now empty:
And confirm it through Usage Tracking:

From what I can see at the default log levels, nothing gets written to either nqquery.log or nqserver.log for this action unless there is an error in your syntax in which case it is logged in nqserver.log:
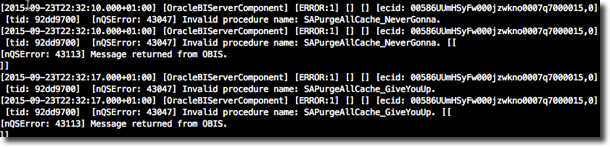
(For more information on that particular error see here)
Partial Cache Purge
This is the same pattern as above - create an ODI Procedure to call the relevant OBIEE command, which for purging by table is SAPurgeCacheByTable. We’re going to get a step more fancy now, and add a variable that we can pass in so that the Procedure is reusable multiple times over throughout the ODI execution for different tables.
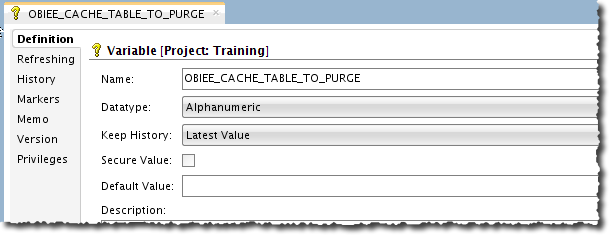
First off create a new ODI Variable that will hold the name of the table to purge. If you’re working with multiple RPD Physical Database/Catalog/Schema objects you’ll want variables for those too:
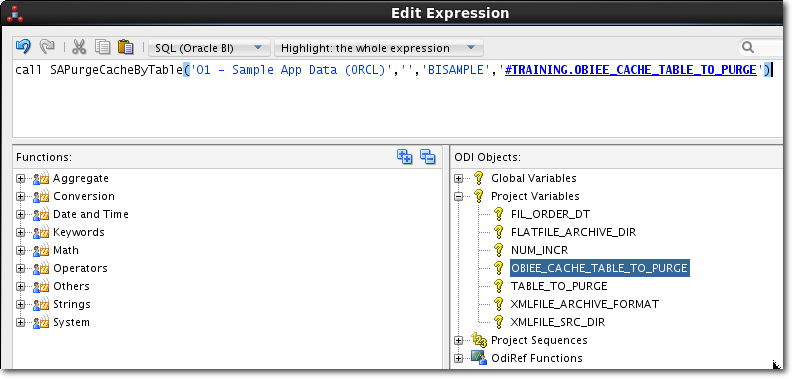
Now create a Procedure as before, with the same settings as above but a different Target Command, based on SAPurgeCacheByTable and passing in the four parameters as single quoted, comma separated values. Note that these are the Database/Catalog/Schema/Table as defined in the RPD. So “Database” is not your TNS or anything like that, it’s whatever it’s called in the RPD Physical layer. Same for the other three identifiers. If there’s no Catalog (and often there isn’t) just leave it blank.
When including ODI Variable(s) make sure you still single-quote them. The command should look something like this:
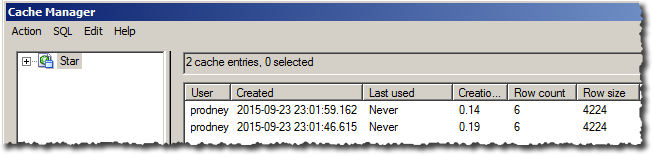
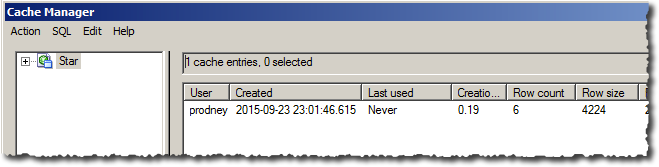
Now let’s seed the OBIEE cache with a couple of queries, one of which uses the physical table and one of which doesn’t. When we run our ODI Procedure we should see one cache entry go and the other remain. Here’s the seeded cache:
And now after executing the procedure:
And confirmation through Usage Tracking of the command run:

Cache Seeding
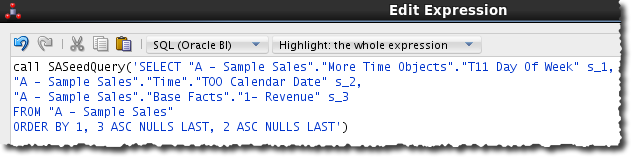
As before, we use an ODI Procedure to call the relevant OBIEE command. To seed the cache we can use SASeedQuery which strictly speaking isn’t documented but a quick perusal of the nqquery.log when you run a cache-seeding OBIEE Agent shows that it is what is called in the background, so we’re going to use it here (and it’s mentioned in support documents on My Oracle Support, so it’s not a state secret). The documentation here gives some useful advice on what you should be seeding the cache with -- not necessarily only exact copies of the dashboard queries that you want to get a cache hit for.
Since this is a cookie-cutter of what we just did previously you can use the Duplicate Selection option in ODI Designer to clone one of the other OBIEE Cache procedures that you’ve already created. Amend the Target Command to:
When you run this you should see a positive confirmation in the nqserver.log of the cache seed:
[2015-09-23T23:23:10.000+01:00] [OracleBIServerComponent] [TRACE:3]
[USER-42] [] [ecid: 005874imI9nFw000jzwkno0007q700008K,0] [tid: 9057d700]
[requestid: 477a0002] [sessionid: 477a0000] [username: weblogic]
--------------------
Query Result Cache: [59124]
The query for user 'weblogic' was inserted into the query result cache.
The filename is '/app/oracle/biee/instances/instance1/bifoundation/OracleBIServerComponent/coreapplication_obis1/cache/NQS__735866_84190_2.TBL'. [[
A very valid alternative to calling SASeedQuery would be to call the OBIEE SOA Web Service to trigger an OBIEE Agent that populated the cache (by setting 'Destination' to 'Oracle BI Server Cache (For seeding cache)'). OBIEE Agents can also be 'daisy chained' so that one Agent calls another on completion, meaning that ODI could kick off a single 'master' OBIEE Agent which then triggered multiple 'secondary' OBIEE Agents. The advantage of this approach over SASeedQuery is that cache seeding is more likely to change as OBIEE usage patterns do, and it is easier for OBIEE developers to maintain all the cache seeding code within 'their' area (OBIEE Presentation Catalog) than put in a change request to the ODI developers each time to change a procedure.
Integrating it in the ODI batch
You've two options here, using Packages or Load Plans. Load Plans were introduced in ODI 11.1.1.5 and are a clearer and more flexible of orchestrating the batch.
To use it in a load plan create a serial step that will call a mapping followed by the procedure to purge the affected table. In the procedure step in the load plan set the value for the variable. At the end of the load plan, call the OBIEE cache seed step:
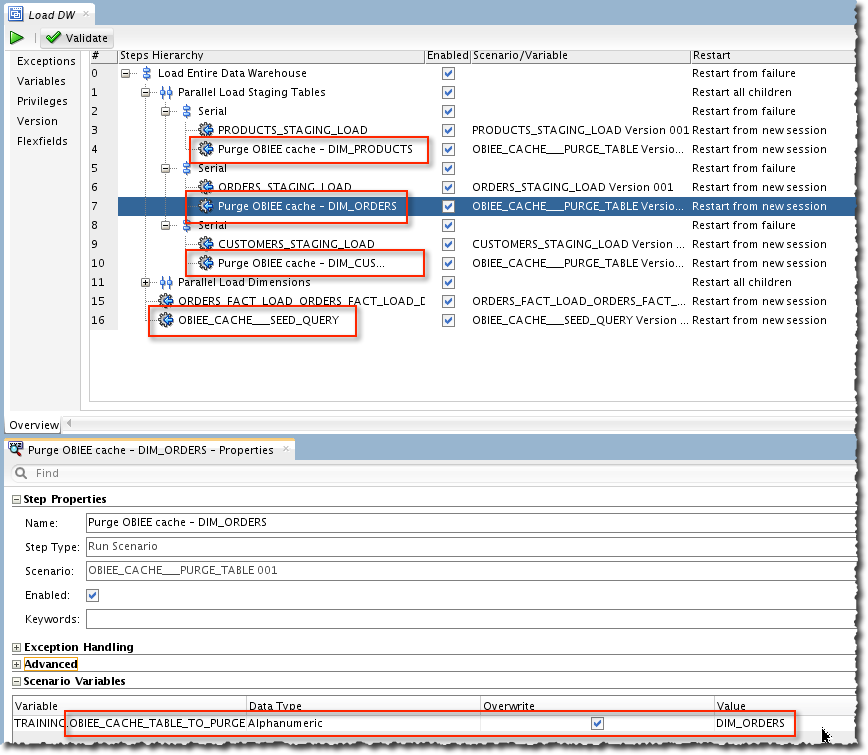
Alternatively, to integrate the above procedures into a Package instead of a load plan you need to add two steps per mapping. First, the variable is updated to hold the name of the table just loaded, and then the OBIEE cache is purged for the affected table. At the end of the flow a call is made to reseed the cache:
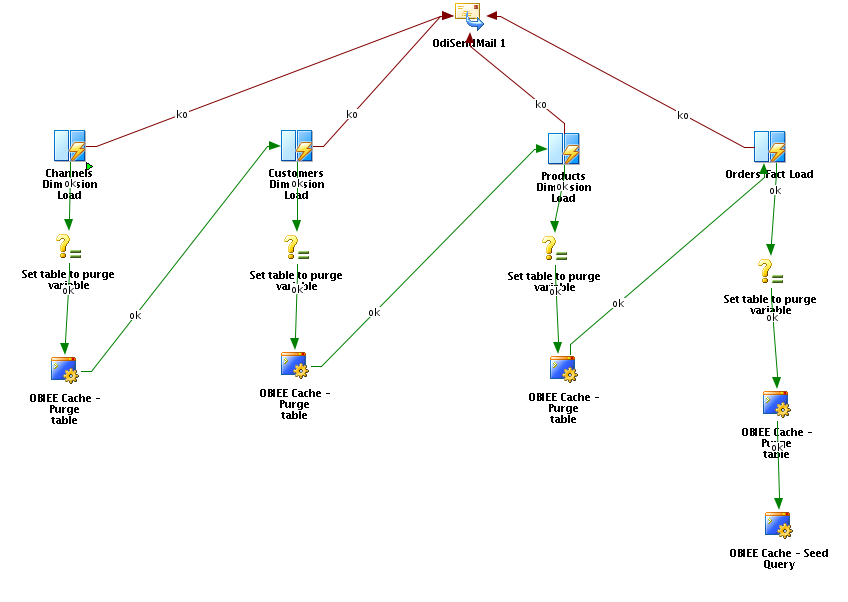
These are some very simple examples, but hopefully illustrate the concept and the powerful nature of integrating OBIEE calls directly from ODI. For more information about OBIEE Cache Management, see my post here.