OLAP Modelling using Oracle Warehouse Builder 10gR2
In one of last week's postings I looked at how relational data objects are defined using Oracle Warehouse Builder 10gR2. In this posting, I'll look at how OLAP objects are defined and populated.
To define OLAP objects, you don't need to have installed and licensed the OLAP Option to the Enterprise Edition of the database. Without this option installed, warehouse builder will give you the same user interface for defining OLAP objects, but all it will deploy are relational tables to represent your OLAP objects, together with CREATE DIMENSION statements to tell the Cost-Based Optimizer that there's a hierarchical relationship between columns in the table, information that is then used by query rewrite when considering when to use a materialized view to provide aggregated data for a user query. Once you license and install the OLAP Option however, you gain two additional options; if you still want to hold your OLAP data in relational tables, Warehouse Builder will add additional OLAP API metadata required for tools such as OracleBI Discoverer Plus OLAP and the OracleBI Spreadsheet Add-in, or you can choose to store your OLAP objects in multi-dimensional datatypes within an Analytic Workspace, a specialist, optimized storage type that is usually faster to access and more compact than regular relational tables when storing OLAP data, and gives you additional calculations and OLAP functionality such as high-end statistical analysis, forecasting and allocation. For the examples in this posting, I'll be working with a database with the OLAP Option installed, but for the time being I'll just store my data relationally with the additional OLAP API metadata; I'll look in more detail at storing data in analytic workspaces at a later date.
In this example, I'll look at building the OLAP cube that comes with the Global Sample Schema downloadable from OTN, but as I said I'll build it relationally rather than as an analytic workspace, and I'll be using Oracle Warehouse Builder 10gR2 rather than Analytic Workspace Manager. I start off with the Customer dimension, which I create using New... on the Dimension node in Project Explorer, and then I select ROLAP as the storage type for the dimension.
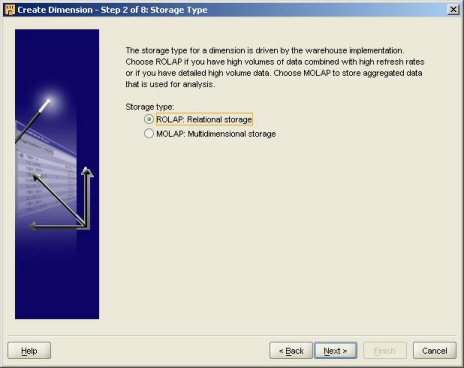
The choice you make here isn't final - you can change the storage type later on once you've exited the dimension-building wizard and you open the created object up in the Data Object Editor. Also, the functionality of the object, at least to the end-user, is the same whether you store the object relationally or multi-dimensionally, although as the wizard notes particularly large dimensions or those that get frequently updated are typical candidates for relational storage, whilst developers who expect to work with highly-summarized data, or data they need to access with fast, predictable response-times usually choose multi-dimensional storage. One big difference between the two storage types though is that there's no ability to store multiple, historical versions of a dimension record using multi-dimensional storage, and therefore support for slowly-changing dimensions of type 2 and 3 is limited to relational storage only.
Now that I've selected Relational storage, I enter the names of the attributes used by the dimension. This is where things start to differ from creating relational objects; the table that holds the source data for my dimension is called GLOBAL.CUSTOMER_DIM, and it's got columns that represent all of the levels in the dimension, plus some additional language columns that at this point can only be properly used when creating the dimension when using Analytic Workspace Manager. Here's how the source table looks using SQL*Plus:
SQL*Plus: Release 10.2.0.1.0 - Production on Mon Jul 17 07:40:08 20 Copyright (c) 1982, 2005, Oracle. All rights reserved. Connected to: Oracle Database 10g Enterprise Edition Release 10.2.0.1.0 - Product With the Partitioning, OLAP and Data Mining options SQL> set pages 100 SQL> describe customer_dim Name Null? Type ----------------------------------------- -------- --------------- SHIP_TO_ID NOT NULL NUMBER(5) SHIP_TO_DSC NOT NULL VARCHAR2(30) ACCOUNT_ID NOT NULL NUMBER(5) ACCOUNT_DSC NOT NULL VARCHAR2(30) MARKET_SEGMENT_ID NOT NULL NUMBER(5) MARKET_SEGMENT_DSC NOT NULL VARCHAR2(15) TOTAL_MARKET_ID NOT NULL NUMBER(5) TOTAL_MARKET_DSC NOT NULL VARCHAR2(15) WAREHOUSE_ID NOT NULL NUMBER(5) WAREHOUSE_DSC NOT NULL VARCHAR2(15) REGION_ID NOT NULL NUMBER(5) REGION_DSC NOT NULL VARCHAR2(15) TOTAL_CUSTOMER_ID NOT NULL NUMBER(5) TOTAL_CUSTOMER_DSC NOT NULL VARCHAR2(15) SHIP_TO_DSC_FRENCH VARCHAR2(60) ACCOUNT_DSC_FRENCH VARCHAR2(60) MARKET_SEGMENT_DSC_FRENCH VARCHAR2(60) TOTAL_MARKET_DSC_FRENCH VARCHAR2(60) WAREHOUSE_DSC_FRENCH VARCHAR2(60) REGION_DSC_FRENCH VARCHAR2(60) TOTAL_CUSTOMER_DSC_FRENCH VARCHAR2(60) SHIP_TO_DSC_DUTCH VARCHAR2(60) ACCOUNT_DSC_DUTCH VARCHAR2(60) MARKET_SEGMENT_DSC_DUTCH VARCHAR2(60) TOTAL_MARKET_DSC_DUTCH VARCHAR2(60) WAREHOUSE_DSC_DUTCH VARCHAR2(60) REGION_DSC_DUTCH VARCHAR2(60) TOTAL_CUSTOMER_DSC_DUTCH VARCHAR2(60)
The natural thing then, would be to go and create attributes for each column within a level, creating SHIP_TO_ID and SHIP_TO_DSC attributes for use with the SHIP_TO level, together with WAREHOUSE_ID and WAREHOUSE_DSC attributes for the WAREHOUSE level, and so on, similar to how you defined levels and attributes in earlier versions of Warehouse Builder.
Things are different, however, in this new version of Warehouse Builder, which creates OLAP dimensions and cubes that are compatible with the OLAP Option; those of you that are familiar with the OLAP Option and before that, Oracle Express Server, will be familar with the concept of dimension attributes, object definitions that are attached to the dimension itself, but that are then implemented, optionally, by levels within the dimension, so that for example an ID, or a DSC attribute might well be implemented by the SHIP_TO, WAREHOUSE, ACCOUNT and other levels within the dimension. Some attributes, such as CREDIT LIMIT, might only be implemented by a single level such as ACCOUNT, where as others such as EFFECTIVE DATE and END_DATE might only be implemented by the bottom, leaf level of the dimension. This model is then carried over to the relational implementation of OLAP objects, so that when you come to define your dimension attributes, you only define in our case ID and DSC attributes, and we implement these again and agan when we come to define the levels in the dimension.
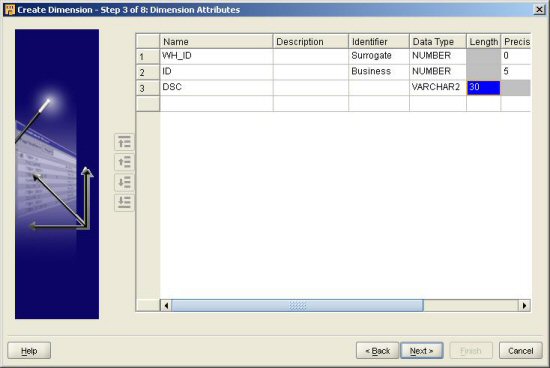
Taking this common approach means that our "abstract" definition of a dimension is re-usable across both types of storage, and OLAP query tools such as OracleBI Discoverer Plus OLAP can work consistently against both relational and multi-dimensionally stored data. When you come to deploy this dimension relationally though, Warehouse Builder will still store the data in separate columns for each level's attributes, with each column name prepended with the name of the level, but to OLAP query tools the data will seem consistent.
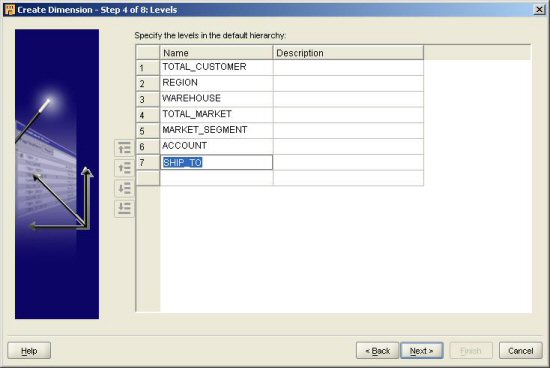
The next step is to define the levels for the dimension. In the case of the Customer dimension, there are actually two hierarchies with their own separate sets of levels, but which share a common leaf level known as SHIP_TO. I then enter the names of these levels, taking care to put the SHIP_TO level at the bottom; I'll come on to why this is important in a second.
Now that the dimension levels have been specified, it's time to tell Warehouse Builder what attributes each level implements. In our case this is simple, as each level implements all of the (currently available) attributes, as each one needs to have an ID column and a DSC column. Note that each implements the WH_ID "surrogate key" column; by giving each level a surrogate key, we make it possible for Warehouse Builder to switch between the denormalized star, and normalized snowflake, relational storage type, which gives you additional options if you wish to juggle with the precise way in which you arrange your underlying relational tables.

Note also that I rename each level's instance of the dimension attribute, to make the name more meaningful and easier to spot when working with a mapping. You can also rename the surrogate key attribute as well, I normally would but forgot in this instance.
Next, assuming you've chosen relational storage, as I have in this instance, you get to choose how Warehouse Builder will handle the storage of historical data for your dimension.
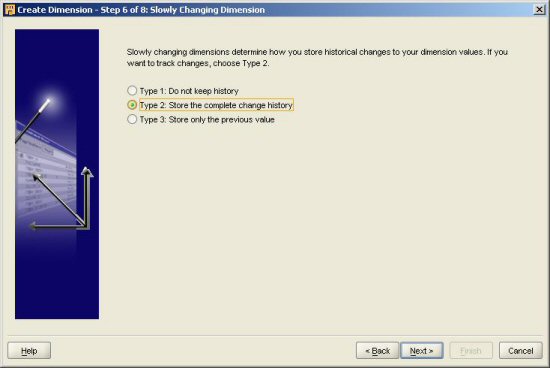
For anyone unfamiliar with the concept of Slowly Changing Dimensions, they're a concept introduced by Ralph Kimball to describe the different ways in which you might want to track the changes to data in your OLAP dimension. Kimball originally put forward three types of slowly changing dimension:
-
Type 1, where you overwrite the old attribute values in the dimension with the new values; for example, you might only be interested in the current name of your customer for analysis purposes, and you are happy for this new name to overwrite the old name in the customer dimension;
-
Type 2, where you keep all historical attribute versions of the dimension, so that for example you customer dimension keeps a complete record of all the credit limits a customer has had over the time they've been with you; and,
-
Type 3, where you keep the previous and current version of an attribute in the dimension, but no more; for example, you might be interested in the current and previous postcode for a customer, but not the ones before that.
Logically, it should be possible for some attributes in a dimension to be of type 1, some of type 2 and some of type 3, and this is a model used by many data warehouses to model more complex dimension setups. However in this current release of Warehouse Builder, you can only specify one type for the whole dimension (i.e. all of your attributes within the dimension will need to be of type 1, 2 or 3) although you can specify which attributes within the dimension will trigger a historical record to be written, with others being ignored if a change is detected. Also, you should note at this point that legally, to use Type 2 and Type 3 Slowly Changing Dimensions, you need to have licensed the Enterprise ETL Option to the Enterprise Edition of the database.
Once you've specified how Warehouse Builder stores history within dimensions, the wizard completes and the dimension model is created.

For simple dimensions, that's as much work as you need to do. In our case though, we need to open up the dimension definition in the Data Object Editor and add an additional hierarchy, as half of our dimension levels relate to an alternate hierarchy.
To do this, you need to navigate to the Hierarchies tab and add an additional hierarchy, "Market Segment", below the existing, default Standard Hierarchy. Then, working with the Standard hierarchy, you should amend the levels that belong to it to only include the levels that are part of the Standard Hierarchy, which in this case are Total Customer, Region, Warehouse and Ship To.

Take care at this point that you don't leave any levels from the other hierarchy in the list by mistake, and once this is done, switch to the new Market Segment hierarchy and specify the levels, which are Total Market, Market Segment, Account and Ship To.
At this point, if you attempt to validate the dimension, you'll get an error message telling you that the dimension doesn't bind to the underlying tables properly.
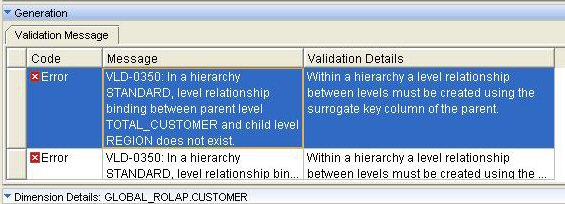
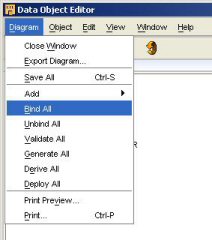
This situation happens because the table structure OWB put together originally was set up to support a single hierarchy with seven levels, each one of which rolled up to a single level above it, but now we're specifying two hierarchies with a common bottom level, which requires a slightly different table structure. To correct this situation, select File > Bind Changes from the application menu, and OWB will amend the table that links to the dimension.
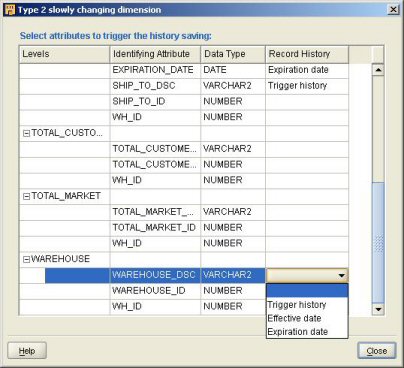
If you want to specify which attributes within the dimension trigger a historical record to be written, you can do this using the SCD tab within the Data Object Editor. In our case, we would like Warehouse Builder to write a new record if we detect a new value for either the Ship To details, or the Warehouse details.
The next step is to load data into the dimension from the source table. This is usually a good time to check that you've set the dimension up correctly. Adding SCD2 support to the dimension causes Warehouse Builder to add two new attributes, Effective Date and Expiration Date, by default to the lowest level in the list of levels you defined earlier, and you should make sure that these attributes are added to the correct level when you view it in the mapping editor. You can also use this diagram to check that each level is located in the correct position within each hierarchy, and that the lowest level rolls up in our case to the two possible levels above it.
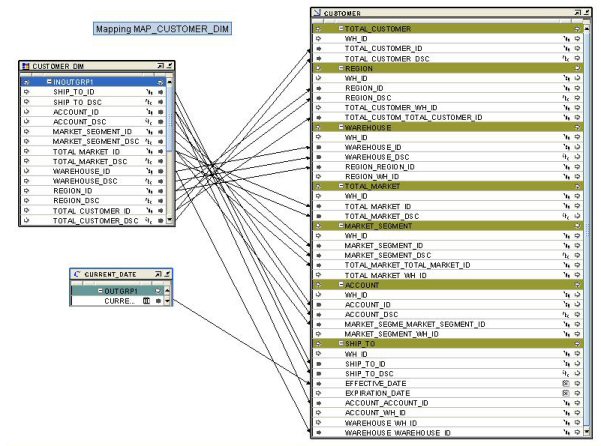
You then go through a process of mapping the source columns to the dimension object, remembering to map within each level the business ID and description of that level, together with the business ID of the level above. The columns in the dimension object that represent the surrogate keys are left blank and populated automatically by Warehouse Builder when you load the object, and you should create a constant containing SYSDATE and map it to the effective date column for use with SCD2 row versioning.
Once the dimension and it's supporting objects are deployed, followed by the mapping, the dimension can be loaded and then viewed in the Data Viewer to check that all is OK. If all has gone correctly, you should see a dimension structure like this, and be able to drill up and down levels, and switch between the two hierarchies.

That's it for OLAP modelling for now; to finish off the series, in the next couple of days I'll take a look at how Partition Exchange Loading works using Warehouse Builder.