BIPublisher and mySQL

The other day I was asked to look in to how we can use BIPublisher to report against a mySQL database. According to the documentation one can report against basically any database that can be connected to via JDBC. Obviously I am assuming you already have your mySQL database up and running :). But to connect to the database we have to get the JDBC drivers, mySQL Connector/J. The current release is 5.1, so download the zip file and unzip it somewhere on your machine. Next we must register the driver with the application server where the BIPublisher service is running.
- Log in to the Enterprise Manager for the Application server. If you are running a locally installed OC4J, the URL is most likely http://localhost:9704/em/
- Navigate to the Administration tab of the OC4J instance and find the Shared Libraries link.
- Proceed to create a new Shared Library by clicking on the Create button.
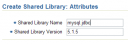
- Call the new shared library mysql.jdbc and give it version number 5.1.5
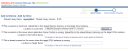
 and click on Next
 - Now add the newly downloaded driver archive to the shared library
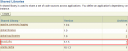
- Once the file has been uploaded to the Application Server instance, click on Finish.
- On the Application Server machine, find the file called orion-application.xml for the xmlpserver application (on my machine the file is located in C:\oracle\BI\OracleBI\oc4j_bi\j2ee\home\application-deployments\xmlpserver)
- Add the following code to the file: <imported-shared-libraries> <import-shared-library name="mysql.jdbc"/> </imported-shared-libraries> within the <orion-application> tags.
- Restart the xmlpserver application.


- Log in to the BIPublisher as a user with Administration privileges.
- Add a new JDBC Data Source via the Admin tab (here I have a special created a special bip user in the mySQL database):
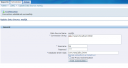
- Make sure your connection works by hitting the Test Connection button.
- Now you can move on and create your reports, using the newly created Data Source


