In the first instalment in this series, we covered the steps that we carry out when promoting the initial version on an OBIEE project from development into production. The process is fairly straightforward and it's generally a case of using the right tools (the Catalog Manager, for example) and following the list of steps. Things get a bit more interesting when promoting subsequent versions of the project from one environment to another, chiefly because you will probably want to preserve what's in production (reports generated by users, for example, and maybe some hot fixes to the RPD) rather than just overwrite it all with what's in the development environment.
One way of looking at this is as a flowchart, where the route we end up taking depends on how much development has also taken place in the production environment:

If you want to keep life simple, then don't allow users to create any reports in production; don't allow changes to the RPD in production; instead, do all development in the development environment and then just repeat the initial product deployment tasks each time you want to promote some changes, in the process over-writing whatever's in production. In reality though, this isn't really practical, as users will at a minimum want to create their own reports and there may be some hot-fixes applied to the production RPD that you want to preserve. If this is the case, you'll want a follow a slightly more nuanced approach to promoting from development to production, making use of the three-way merge facility in the BI Administrator tool, the selective archive and unarchive facility in the Catalog Manager, and the new Content Accelerator Framework plug-in to the Catalog Manager that's now available for download from OTN.
Assuming you're working to this situation and your development team have updated the development RPD, created a few new reports based on these changes and now want to promote them to production, here's the steps we'd typically follow:
- If you're sure that no changes have been made in the production RPD that are not already reflected in the development one, you can just copy across the development RPD to production and have done with it. The safer way to update the production RPD would be to three-way merge the development one into it, as this will preserve the changes made in production or at least prompt you to choose between them and any subsequent updates in development that conflict with them.
To start a three-way merge, you'll need the following three RPD files
i. A copy of the original RPD as initially put into production (this is known as the "baseline" RPD)
ii. A copy of the current production RPD (which may now differ from the baseline RPD)
iii The development RPD that you want to merge into the current production one.
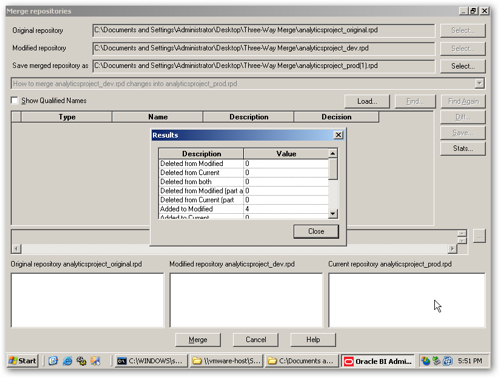
Once you've got all these files together, we can start on the three-way merge of the RPDs.
- To start merging, open up the BI Administration tool using an offline copy of the current production repository.
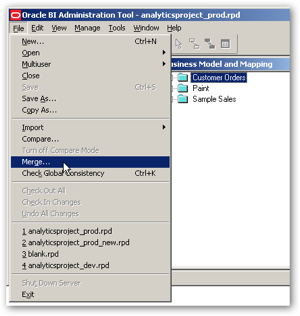
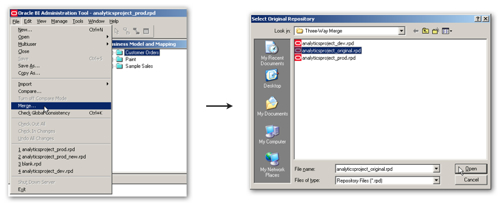
3. From the application menu, select File > Merge... and then select the baseline RPD as the original RPD.
4. The merge process will then parse the original and current production RPDs to identify and differences between them. If this is the first time you have updated the production RPD, and you've not made any changes to it in production, then this process will come up blank, otherwise it'll point out any changes between the original and current production RPDs.
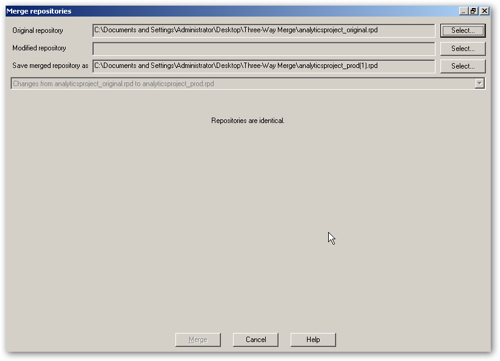
5. Now you can select the development RPD that you'd like to merge into the production one. Press the Select... button next to the Modified Repository area and pick up the development RPD. It's most likely that there will be no conflicts (there may be though if you've applied hotfixes to the production one), and so you'll need to press the Stats button to see what items will be added, deleted or updated during the merge process.
6. Now that the production RPD has been updated, it's time to consider the web catalog. Again, if you don't let users develop reports in production, or at least you don't let them develop in the Shared area, you can just archive and then unarchive the Shared and/or the Users folders from the development web catalog to the production one, using the Catalog Manager, to copy across the new reports. If you just want to migrate a few individual reports though, there's a new option in the form of the Content Accelerator Wizard that you can use for this purpose.
UPDATE : Kevin McGinley points out a blog post some significant shortcomings of CAF in the context of development to production migrations. Read his post in conjunction with his one, and also strongly consider a regular copy-and-paste between two open copies of the Catalog Manager if the circumstances he describes applies to you.
The Content Accelerator Wizard (CAF) is a plug-in to the Catalog Manager that migrates reports between two environments, and will also create any logical column calculations that the reports depend on but that aren't found in the target RPD. Coupled with a standard RPD three-way merge this is quite a neat way to migrate individual reports from development to production, as you don't need to have two copies of the Catalog Manager open at one time and it takes care of any calculated columns that you need.
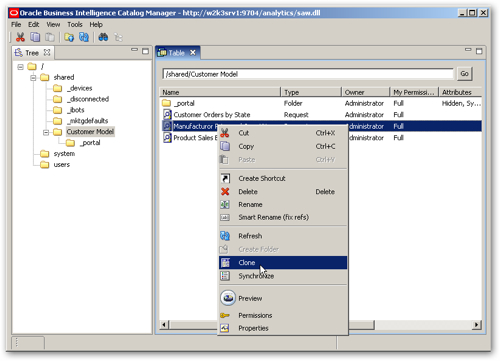
After installing CAF and making sure that the Catalog Manager is pointing towards a JDK 1.6 or higher, open the Catalog Manager to point to the development environment, and select the report you wish to promote (or "clone") into production.
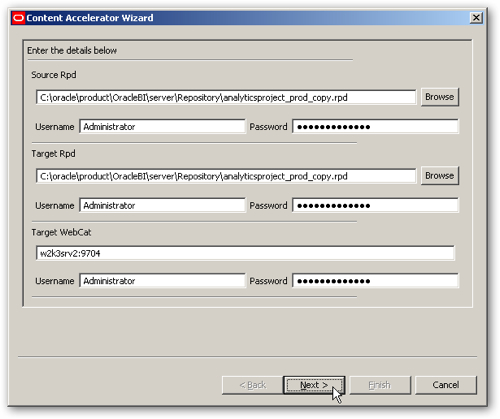
7. When the clone process starts, you are prompted to select the target web catalog (this need to be an online catalog, and can be either local or a remote server), and the location of the source and target BI Server repository (RPD) file, which have to be connected to offline. The RPD files are required so that the cloning process can create any logical calculations that are needed by the cloned report (if the report requires full logical columns, you'll need to add these to the target RPD using a three-way merge).
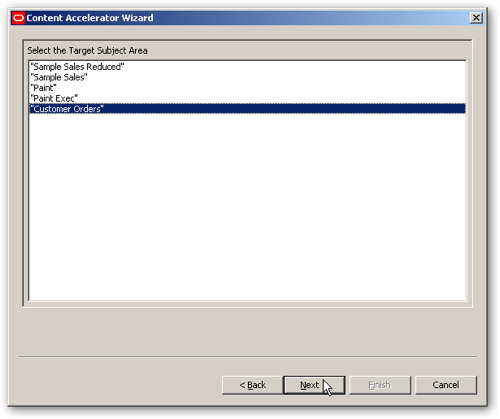
The wizard then prompts you to select the target subject area that the cloned report will be mapped on to.
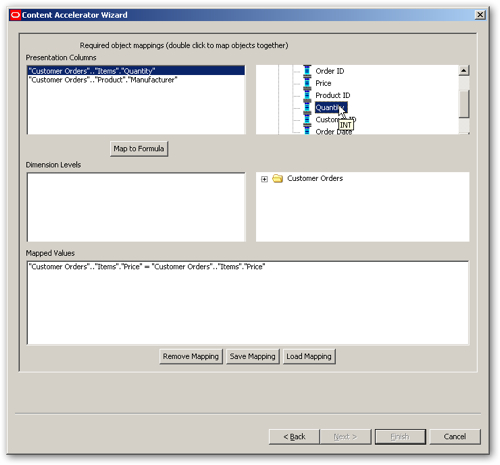
8. Next comes the mapping process. The logical columns in the source web catalog need to be mapped to their corresponding columns in the target web catalog, together with dimension levels, something that you need to do manually but that can be saved, as a CSV file, to use again in later migrations. Any new calculated columns are added automatically by CAF, but if there isn't a corresponding target column to map regular columns to then you'll need to bring it in via an RPD three-way merge.
9. Finally, the migration takes place, and you can choose to perform a consistency check as well as view the log of migrated objects.
- Once the migration has happened, you can take a look in the target web catalog and see the new report, ready to run and within the /Shared/Cloned folder. The target RPD will have any new calculated logical columns added, with "Autogen" as the name prefix.

So there you have it, one method to do incremental updates of OBIEE projects. In the next instalment, we'll take a look at version control using Subversion and TortoiseSVN.