Analytics with Kibana and Elasticsearch through Hadoop - part 2 - Getting data into Elasticsearch

Introduction
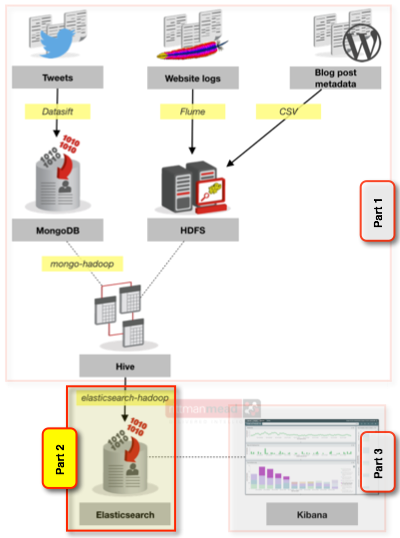
In the first part of this series I described how I made several sets of data relating to the Rittman Mead blog from various sources available through Hive. This included blog hits from the Apache webserver log, tweets, and metadata from Wordpress. Having got it into Hive I now need to get it into ElasticSearch as a pre-requisite for using Kibana to see how it holds up as a analysis tool or as a "data discovery" option. Here's a reminder of the high-level architecture, with the parts that I've divided it up into covering over the three number of blog posts indicated:
In this article we will see how to go about doing that load into ElasticSearch, before getting into some hands-on with Kibana in the final article of this series.
Loading data from Hive to Elasticsearch
We need to get the data into Elasticsearch itself since that is where Kibana requires it to be for generating the visualisations. Elasticsearch holds the data and provides the analytics engine, and Kibana provides the visualisation rendering and the generation of queries into Elasticsearch. Kibana and Elasticsearch are the ‘E’ and ‘K’ of the ELK stack, which I have written about previously (the ‘L’ being Logstash but we’re not using that here).
Using the elasticsearch-hadoop connector we can load data exposed through Hive into Elasticsearch. It’s possible to load data directly from origin into Elasticsearch (using, for example, Logstash) but here we’re wanting to bring together several sets of data using Hadoop/Hive as the common point of integration.
Elasticsearch has a concept of an ‘index’ within which data is stored, held under a schema known as a ‘mapping’. Each index can have multiple mappings. It’s dead easy to run Elasticsearch - simply download it, unpack the archive, and then run it - it really is as easy as that:
[oracle@bigdatalite ~]$ /opt/elasticsearch-1.4.0.Beta1/bin/elasticsearch
[2014-10-30 16:59:39,078][INFO ][node                     ] [Master] version[1.4.0.Beta1], pid[13467], build[1f25669/2014-10-01T14:58:15Z]
[2014-10-30 16:59:39,080][INFO ][node                     ] [Master] initializing ...
[2014-10-30 16:59:39,094][INFO ][plugins                  ] [Master] loaded [], sites [kopf, gui]
[2014-10-30 16:59:43,184][INFO ][node                     ] [Master] initialized
[2014-10-30 16:59:43,184][INFO ][node                     ] [Master] starting ...
[2014-10-30 16:59:43,419][INFO ][transport                ] [Master] bound_address {inet[/0:0:0:0:0:0:0:0:9300]}, publish_address {inet[/192.168.57.3:9300]}
[2014-10-30 16:59:43,446][INFO ][discovery                ] [Master] elasticsearch/mkQYgr4bSiG-FqEVRkB_iw
[2014-10-30 16:59:46,501][INFO ][cluster.service          ] [Master] new_master [Master][mkQYgr4bSiG-FqEVRkB_iw][bigdatalite.localdomain][inet[/192.168.57.3:9300]], reason: zen-disco-join (elected_as_master)
[2014-10-30 16:59:46,552][INFO ][http                     ] [Master] bound_address {inet[/0:0:0:0:0:0:0:0:9200]}, publish_address {inet[/192.168.57.3:9200]}
[2014-10-30 16:59:46,552][INFO ][node                     ] [Master] started
You can load data directly across into Elasticsearch from Hive without having to prepare anything on Elasticsearch - it will create the index and mapping for you. But, for it to work how we want, we do need to specify the mapping in advance because we want to tell Elasticsearch two important things:
- To treat the date field as a date - crucial for Kibana to do its time series-based magic
- Not to “analyze” certain fields. By default Elasticsearch will analyze each string field so that you can display most common terms within it etc. However if we want to report things like blog title, breaking it down into individual words doesn’t make sense.
This means that the process is as follows:
- Define the Elasticsearch table in Hive
- Load a small sample of data into Elasticsearch from Hive
- Extract the mapping and amend the date field and mark required fields as non-analysed
- Load the new mapping definition to Elasticsearch
- Do a full load from Hive into Elasticsearch
Steps 2 and 3 can be sidestepped by crafting the mapping by hand from the outset but it’s typically quicker not to.
Before we can do anything in terms of shifting data around, we need to make elasticsearch-hadoop available to Hadoop. Download it from the github site, and copy the jar file to /usr/lib/hadoop and add it to HIVE_AUX_JARS_PATH in /usr/lib/hive/conf/hive-env.sh.
Defining the Hive table over Elasticsearch
The Hive definition for a table stored in Elasticsearch is pretty simple. Here’s a basic example of a table that’s going to hold a list of all blog posts made. Note the _es suffix, a convention I’m using to differentiate the Hive table from others with the same data and denoting that it’s in Elasticsearch (es). Also note the use of EXTERNAL as previously discussed, to stop Hive trashing the underlying data if you drop the Hive table:
CREATE EXTERNAL TABLE all_blog_posts_es (
ts_epoch bigint ,
post_title string ,
post_title_a string ,
post_author string ,
url string ,
post_type string )
ROW FORMAT SERDE 'org.elasticsearch.hadoop.hive.EsSerDe'
STORED BY 'org.elasticsearch.hadoop.hive.EsStorageHandler'
TBLPROPERTIES (
'es.nodes'='bigdatalite.localdomain',
'es.resource'='all_blog/posts'
) ;
The ROW FORMAT and STORED BY are standard, but the TBLPROPERTIES values should be explained (you’ll find full details in the manual):
es.nodes- this is the hostname of the Elasticsearch server. If you have multiple nodes it will discover the others from this.es.resource- this is the index and mapping where the data should be stored. We’ll see more about these later, because they’re important.
Time for a tangent …
The biggest issue I had getting data from Hive into Elasticsearch was timestamps. To cut a very long story (involving lots of random jiggling, hi Christian!) short, I found it was easiest to convert timestamps into Unix epoch (number of seconds since Jan 1st 1970), rather than prat about with format strings (and prat about I did). For timestamps already matching the ISO8601 standard such as those in my Wordpress data, I could leverage the Hive function UNIX_TIMESTAMP which returns exactly that
0: jdbc:hive2://bigdatalite:10000> select post_date, unix_timestamp(post_date) as post_date_epoch from posts limit 1;
post_date        2007-03-07 17:45:07
post_date_epoch  1173289507
For others though that included the month name as text such as Wed, 17 Sep 2014 08:31:20 +0000 I had to write a very kludgy CASE statement to first switch the month names for numbers and then concatenate the whole lot into a ISO8601 that could be converted to unix epoch. This is why I also split the apache log SerDe so that it would bring in the timestamp components (time_dayDD, time_monthMMM, etc) individually, making the epoch conversion a little bit neater:
unix_timestamp(concat(concat(concat(concat(concat(concat(
a.time_yearyyyy,'-')
,case a.time_monthmmm when 'Jan' then 1 when 'Feb' then 2 when 'Mar' then 3 when 'Apr' then 4 when 'May' then 5 when 'Jun' then 6 when 'Jul' then 7 when 'Aug' then 8 when 'Sep' then 9 when 'Oct' then 10 when 'Nov' then 11 when 'Dec' then 12 else 0 end,'-')
,a.time_daydd,' ')
,a.time_hourhh,':')
,a.time_minmm,':')
,a.time_secss,'')
)
Because if you thought this was bad, check out what I had to do to the twitter timestamp:
unix_timestamp(
    concat(concat(concat(concat(regexp_replace(regexp_replace(created_at,'^\\w{3}, \\d{2} \\w{3} ',''),' .*$',''),'-')
    ,case regexp_replace(regexp_replace(created_at,'^\\w{3}, \\d{2} ',''),' .*$','')
    when 'Jan' then 1 when 'Feb' then 2 when 'Mar' then 3 when 'Apr' then 4 when 'May' then 5 when 'Jun' then 6 when 'Jul' then 7 when 'Aug' then 8 when 'Sep' then 9 when 'Oct' then 10 when 'Nov' then 11 when 'Dec' then 12 else 0 end,'-')
    ,regexp_replace(regexp_replace(created_at,'^\\w{3}, ',''),' .*$',''),' '),regexp_replace(regexp_replace(created_at,'^\\w{3}, \\d{2} \\w{3} \\d{4} ',''),' .*$',''))
)
As with a few things here, this was all for experimentation than streamlined production usage, so it probably could be rewritten more efficiently or solved in a better way – suggestions welcome!
So the nett result of all of these is the timestamp as epoch in seconds – but note that Elasticsearch works with millisecond epoch, so they all need multiplying by 1000.
As I’ve noted above, this feels more complex than it needed to have been, and maybe with a bit more perseverence I could have got it to work without resorting to epoch. The issue I continued to hit with passing timestamps across as non-epoch values (i.e. as strings using the format option of the Elasticsearch mapping definition, or Hive Timestamp, and even specifying es.mapping.timestamp) was org.elasticsearch.hadoop.rest.EsHadoopInvalidRequest: TimestampParsingException, regardless of the careful format masks that I applied.
Back on track – loading a sample row into Elasticsearch
We want to send a sample row of data to Elasticsearch now for two reasons:
- As a canary to prove the “plumbing” - no point chucking thousands of rows across through MapReduce if it’s going to fall over for a simple problem (I learnt my lesson during the timestamp fiddling above).
- Automagically generate the Elasticsearch mapping, which we subsequently need to modify by hand and is easier if it’s been created for us first.
Since the table is defined in Hive, we can just run a straightforward INSERT to send some data across, making use of the LIMIT clause of HiveQL to just send a couple of rows:
INSERT INTO TABLE all_blog_posts_es
SELECT UNIX_TIMESTAMP(post_date) * 1000 AS post_date_epoch,
       title,
       title,
       author,
       REGEXP_EXTRACT(generated_url, '\\S*(\\/\\d{4}\\/\\d{2}\\/[^\\/]+).*', 1) ,
       post_type
FROM   posts
WHERE  post_date IS NOT NULL
LIMIT 2
;
Hive will generate a MapReduce job that pushes the resulting data over to Elasticsearch. You can see the log for the job – essential for troubleshooting – at /var/log/hive/hive-server2.log (by default). In this snippet you can see a successful completion:
2014-10-30 22:35:14,977 INFO  exec.Task (SessionState.java:printInfo(417)) - Starting Job = job_1414451727442_0011, Tracking URL = http://bigdatalite.localdomain:8088/proxy/application_1414451727442_0011/
2014-10-30 22:35:14,977 INFO  exec.Task (SessionState.java:printInfo(417)) - Kill Command = /usr/lib/hadoop/bin/hadoop job  -kill job_1414451727442_0011
2014-10-30 22:35:22,244 INFO  exec.Task (SessionState.java:printInfo(417)) - Hadoop job information for Stage-0: number of mappers: 1; number of reducers: 1
2014-10-30 22:35:22,275 WARN  mapreduce.Counters (AbstractCounters.java:getGroup(234)) - Group org.apache.hadoop.mapred.Task$Counter is deprecated. Use org.apache.hadoop.mapreduce.TaskCounter instead
2014-10-30 22:35:22,276 INFO  exec.Task (SessionState.java:printInfo(417)) - 2014-10-30 22:35:22,276 Stage-0 map = 0%,  reduce = 0%
2014-10-30 22:35:30,757 INFO  exec.Task (SessionState.java:printInfo(417)) - 2014-10-30 22:35:30,757 Stage-0 map = 100%,  reduce = 0%, Cumulative CPU 2.51 sec
2014-10-30 22:35:40,098 INFO  exec.Task (SessionState.java:printInfo(417)) - 2014-10-30 22:35:40,098 Stage-0 map = 100%,  reduce = 100%, Cumulative CPU 4.44 sec
2014-10-30 22:35:40,100 INFO  exec.Task (SessionState.java:printInfo(417)) - MapReduce Total cumulative CPU time: 4 seconds 440 msec
2014-10-30 22:35:40,132 INFO  exec.Task (SessionState.java:printInfo(417)) - Ended Job = job_1414451727442_0011
2014-10-30 22:35:40,158 INFO  ql.Driver (SessionState.java:printInfo(417)) - MapReduce Jobs Launched:
2014-10-30 22:35:40,158 INFO  ql.Driver (SessionState.java:printInfo(417)) - Job 0: Map: 1  Reduce: 1   Cumulative CPU: 4.44 sec   HDFS Read: 4313 HDFS Write: 0 SUCCESS
2014-10-30 22:35:40,158 INFO  ql.Driver (SessionState.java:printInfo(417)) - Total MapReduce CPU Time Spent: 4 seconds 440 msec
2014-10-30 22:35:40,159 INFO  ql.Driver (SessionState.java:printInfo(417)) - OK
But if you’ve a problem with your setup you’ll most likely see this generic error instead passed back to beeline prompt:
Error: Error while processing statement: FAILED: Execution Error, return code 2 from org.apache.hadoop.hive.ql.exec.mr.MapRedTask (state=08S01,code=2)
Meaning that you need to go to the Hive log file for the full diagnostics.
Amending the Elasticsearch mapping
So assuming the previous step worked (if you got the innocuous No rows affected from beeline then it did) you now have an index and mapping (and a couple of “documents” of data) in Elasticsearch. You can inspect the mapping in several ways, including with the GUI for Elasticsearch admin kopf.
You can also interogate Elasticsearch directly with its REST API, which is what we’re going to use to update the mapping so let’s use it also to view it. I’m going to use curl to do the HTTP call, and then pipe it | straight to jq to prettify the resulting JSON that Elasticsearch sends back.
[oracle@bigdatalite ~]$ curl --silent -XGET 'http://bigdatalite.localdomain:9200/all_blog/posts/_mapping' | jq '.'
{
  "all_blog": {
    "mappings": {
      "posts": {
        "properties": {
          "url": {
            "type": "string"
          },
          "ts_epoch": {
            "type": "long"
          },
          "post_type": {
            "type": "string"
          },
          "post_title_a": {
            "type": "string"
          },
          "post_title": {
            "type": "string"
          },
          "post_author": {
            "type": "string"
          }
        }
      }
    }
  }
}
We can see from this that Elasticsearch has generated the mapping to match the data that we’ve sent across from Hive (note how it’s picked up the ts_epoch type as being numeric not string, per our Hive table DDL). But, as mentioned previously, there are two things we need to rectify here:
ts_epochneeds to be a date type, not long. Without the correct type, Kibana won’t recognise it as a date field.- Fields that we don’t want broken down for analysis need marking as such. We’ll see the real difference that this makes when we get on to Kibana later.
To amend the mapping we just take the JSON document, make the changes, and then push it back with curl again. You can use any editor with the JSON (I’ve found Atom on the Mac to be great for its syntax highlighting, brace matching, etc). To change the type of the date field just change long to date. To mark a field not for analysis add "index": "not_analyzed" to the column definition. After these changes, the amended fields in my mapping JSON look like this:
            [...]
          "url": {
            "type": "string","index": "not_analyzed"
          },
          "ts_epoch": {
            "type": "date"
          },
          "post_title_a": {
            "type": "string"
          },
          "post_title": {
            "type": "string","index": "not_analyzed"
          },
          "post_author": {
            "type": "string","index": "not_analyzed"
            [...]
The particularly eagle-eyed of you will notice that I am loading post_title in twice. This is because I want to use the field both as a label but also to analyse it as a field itself, looking at which terms get used most. So in the updated mapping, only post_title is set to not_analyzed; the post_title_a is left alone.
To remove the existing mapping, use this API call:
curl -XDELETE 'http://bigdatalite.localdomain:9200/all_blog/posts'
and then the amended mapping put back. Note that the "all_blog" / "mappings" outer levels of the JSON have been removed from the JSON that we send back to Elasticsearch:
curl -XPUT 'http://bigdatalite.localdomain:9200/all_blog/_mapping/posts' -d '
{
      "posts": {
        "properties": {
          "url": {
            "type": "string","index": "not_analyzed"
          },
          "ts_epoch": {
            "type": "date"
          },
          "post_type": {
            "type": "string"
          },
          "post_title_a": {
            "type": "string"
          },
          "post_title": {
            "type": "string","index": "not_analyzed"
          },
          "post_author": {
            "type": "string","index": "not_analyzed"
          }
        }
      }
    }
'
Full load into Elasticsearch
Now we can go ahead and run a full INSERT from Hive, and this time the existing mapping will be used. Depending on how much data you’re loading, it might take a while but you can always tail the hive-server2.log file to monitor progress. So that we don’t duplicate the ‘canary’ data that we sent across, use the INSERT OVERWRITE statement:
INSERT OVERWRITE table all_blog_posts_es
SELECT UNIX_TIMESTAMP(post_date) * 1000 AS post_date_epoch,
title,
title,
author,
REGEXP_EXTRACT(generated_url, '\\S*(\\/\\d{4}\\/\\d{2}\\/[^\\/]+).*', 1) ,
post_type
FROM   posts
WHERE  post_date IS NOT NULL
;
To check the data’s made it across we can do a count from Hive:
0: jdbc:hive2://bigdatalite:10000> select count(*) from all_blog_posts_es;
+------+
| _c0  |
+------+
| 2257 |
+------+
1 row selected (27.005 seconds)
But this requires a MapReduce job to run and is fairly slow. Much faster is direct from the horse’s mouth - from Elasticsearch itself where the data is. Just as we called a REST API to get and set the mapping, Elasticsearch can also give us statistics back this way too:
[oracle@bigdatalite ~]$ curl --silent -XGET 'http://bigdatalite.localdomain:9200/all_blog/_stats/docs' | jq '.indices[].total.docs'
{
  "deleted": 0,
  "count": 2257
}
Here I’ve used a bit more jq to parse down the stats in JSON that Elasticsearch sends back. If you want to explore more of what jq can do, you’ll find https://jqplay.org/ useful.
Code
For reference, here is the set of three curl/DDL/DML that I used:
- Elasticsearch index mappings
# For reruns, remove and recreate index curl -XDELETE 'http://bigdatalite.localdomain:9200/all_blog' && curl -XPUT 'http://bigdatalite.localdomain:9200/all_blog' # For partial rerun, remove mapping curl -XDELETE 'http://bigdatalite.localdomain:9200/all_blog/_mapping/posts' # Create posts mapping curl -XPUT 'http://bigdatalite.localdomain:9200/all_blog/_mapping/posts' -d ' { "posts" : { "properties": { "ts_epoch": {"type": "date"}, "post_author": {"type": "string", "index" : "not_analyzed"}, "post_title": {"type": "string", "index" : "not_analyzed"}, "post_title_a": {"type": "string", "index" : "analyzed"}, "post_type": {"type": "string", "index" : "not_analyzed"}, "url": {"type": "string", "index" : "not_analyzed"} }}} ' # For partial rerun, remove mapping # Create tweets mapping curl -XDELETE 'http://bigdatalite.localdomain:9200/all_blog/_mapping/tweets' curl -XPUT 'http://bigdatalite.localdomain:9200/all_blog/_mapping/tweets' -d ' {"tweets": { "properties": { "tweet_url": { "index": "not_analyzed", "type": "string" }, "tweet_type": { "type": "string" }, "ts_epoch": { "type": "date" }, "tweet_author": { "index": "not_analyzed", "type": "string" }, "tweet_author_followers": { "type": "string" }, "tweet_author_friends": { "type": "string" }, "tweet_author_handle": { "index": "not_analyzed", "type": "string" }, "tweet": { "index": "not_analyzed", "type": "string" }, "tweet_analysed": { "type": "string" } ,"post_author": { "index": "not_analyzed","type": "string" } ,"post_title": { "index": "not_analyzed", "type": "string" } ,"post_title_a": { "type": "string" } } } }' # For partial rerun, remove mapping curl -XDELETE 'http://bigdatalite.localdomain:9200/all_blog/_mapping/apache' # Create apachelog mapping curl -XPUT 'http://bigdatalite.localdomain:9200/all_blog/_mapping/apache' -d ' {"apache": { "properties": { "user": { "type": "string" }, "url": { "index": "not_analyzed", "type": "string" }, "status": { "type": "string" }, "agent": { "index": "not_analyzed", "type": "string" }, "host": { "type": "string" }, "http_call": { "type": "string" }, "http_status": { "type": "string" }, "identity": { "type": "string" }, "referer": { "index": "not_analyzed", "type": "string" }, "ts_epoch": { "type": "date" }, "size": { "type": "string" },"post_author": { "index": "not_analyzed","type": "string" } ,"post_title": { "index": "not_analyzed", "type": "string" } ,"post_title_a": { "type": "string" } }}}' - Hive table DDL
drop table all_blog_posts_es;
CREATE external TABLE all_blog_posts_es(
ts_epoch bigint ,
post_title string ,
post_title_a string ,
post_author string ,
url string ,
post_type string )
ROW FORMAT SERDE
'org.elasticsearch.hadoop.hive.EsSerDe'
STORED BY
'org.elasticsearch.hadoop.hive.EsStorageHandler'
TBLPROPERTIES (
'es.nodes'='bigdatalite.localdomain',
'es.resource'='all_blog/posts')
;

drop table all_blog_tweets_es;
CREATE EXTERNAL TABLE all_blog_tweets_es(
tweet_type string ,
tweet_url string ,
tweet_author string ,
tweet string ,
tweet_analysed string ,
ts_epoch bigint ,
tweet_author_handle string ,
tweet_author_followers string ,
tweet_author_friends string ,url string ,post_author string ,
post_title string ,post_title_a string )
ROW FORMAT SERDE
'org.elasticsearch.hadoop.hive.EsSerDe'
STORED BY
'org.elasticsearch.hadoop.hive.EsStorageHandler'
TBLPROPERTIES (
'es.nodes'='bigdatalite.localdomain',
'es.resource'='all_blog/tweets')
;

drop table all_blog_apache_es;
CREATE EXTERNAL TABLE all_blog_apache_es(
host string ,
identity string ,
user string ,
ts_epoch bigint ,
http_call string ,
url string ,
http_status string ,
status string ,
size string ,
referer string ,
agent string, post_author string ,
post_title string ,post_title_a string )
ROW FORMAT SERDE
'org.elasticsearch.hadoop.hive.EsSerDe'
STORED BY
'org.elasticsearch.hadoop.hive.EsStorageHandler'
TBLPROPERTIES (
'es.nodes'='bigdatalite.localdomain',
'es.resource'='all_blog/apache');
- Hive DML - load data to Elasticsearch
insert into table all_blog_posts_es
select unix_timestamp(post_date) * 1000 as post_date_epoch,title,title,author,
regexp_extract(generated_url,'\\S*(\\/\\d{4}\\/\\d{2}\\/[^\\/]+).*',1)
,post_type
from posts
where post_date is not null
;

insert overwrite table all_blog_tweets_es
select x.*,p.author,p.title
from (
select 'tweets'
,t.url as tweet_url
,t.author
,t.content as tweet
,t.content as tweet_analyzed
,unix_timestamp(concat(concat(concat(concat(regexp_replace(regexp_replace(t.created_at,'^\\w{3}, \\d{2} \\w{3} ',''),' .*$',''),'-'),case regexp_replace(regexp_replace(t.created_at,'^\\w{3}, \\d{2} ',''),' .*$','') when 'Jan' then 1 when 'Feb' then 2 when 'Mar' then 3 when 'Apr' then 4 when 'May' then 5 when 'Jun' then 6 when 'Jul' then 7 when 'Aug' then 8 when 'Sep' then 9 when 'Oct' then 10 when 'Nov' then 11 when 'Dec' then 12 else 0 end,'-'),regexp_replace(regexp_replace(t.created_at,'^\\w{3}, ',''),' .*$',''),' '),regexp_replace(regexp_replace(t.created_at,'^\\w{3}, \\d{2} \\w{3} \\d{4} ',''),' .*$',''))) * 1000 as ts_epoch
,t.author_handle
,t.author_followers
,t.author_friends
,regexp_extract(ref_url,'\\S*(\\/\\d{4}\\/\\d{2}\\/[^\\/]+).*',1) as url
from tweets t lateral view explode (referenced_urls) refs as ref_url
where t.author_followers is not null
and ref_url regexp '\\S*\\/\\d{4}\\/\\d{2}\\/.*'
) x left outer join posts p on regexp_extract(x.url,'\\S*(\\/\\d{4}\\/\\d{2}\\/[^\\/]+).*',1) = p.generated_url
;

insert overwrite table all_blog_tweets_es
select x.*,p.author,p.title
from (
select 'retweets'
,t.url as tweet_url
,t.author
,t.content as tweet
,t.content as tweet_analyzed
,unix_timestamp(concat(concat(concat(concat(regexp_replace(regexp_replace(t.created_at,'^\\w{3}, \\d{2} \\w{3} ',''),' .*$',''),'-'),case regexp_replace(regexp_replace(t.created_at,'^\\w{3}, \\d{2} ',''),' .*$','') when 'Jan' then 1 when 'Feb' then 2 when 'Mar' then 3 when 'Apr' then 4 when 'May' then 5 when 'Jun' then 6 when 'Jul' then 7 when 'Aug' then 8 when 'Sep' then 9 when 'Oct' then 10 when 'Nov' then 11 when 'Dec' then 12 else 0 end,'-'),regexp_replace(regexp_replace(t.created_at,'^\\w{3}, ',''),' .*$',''),' '),regexp_replace(regexp_replace(t.created_at,'^\\w{3}, \\d{2} \\w{3} \\d{4} ',''),' .*$',''))) * 1000 as ts_epoch
,t.author_handle
,t.author_followers
,t.author_friends
,regexp_extract(ref_url,'\\S*(\\/\\d{4}\\/\\d{2}\\/[^\\/]+).*',1) as url
from retweets t lateral view explode (referenced_urls) refs as ref_url
where t.author_followers is not null
and ref_url regexp '\\S*\\/\\d{4}\\/\\d{2}\\/.*'
) x left outer join posts p on regexp_extract(x.url,'\\S*(\\/\\d{4}\\/\\d{2}\\/[^\\/]+).*',1) = p.generated_url
;

insert into table all_blog_apache_es
select x.*,p.author,p.title,p.title
from (
select
a.host,a.identity,a.user
,unix_timestamp(concat(concat(concat(concat(concat(concat(
a.time_yearyyyy,'-')
,case a.time_monthmmm when 'Jan' then 1 when 'Feb' then 2 when 'Mar' then 3 when 'Apr' then 4 when 'May' then 5 when 'Jun' then 6 when 'Jul' then 7 when 'Aug' then 8 when 'Sep' then 9 when 'Oct' then 10 when 'Nov' then 11 when 'Dec' then 12 else 0 end,'-')
,a.time_daydd,' ')
,a.time_hourhh,':')
,a.time_minmm,':')
,a.time_secss,'')
) * 1000 as ts_epoch
,a.http_call ,regexp_extract(a.url,'\\S*(\\/\\d{4}\\/\\d{2}\\/[^\\/]+).*',1) as url,a.http_status ,a.status ,a.size ,a.referer ,a.agent
from apachelog a
where a.url regexp "^\\/\\d{4}\\/\\d{2}\\/.*"
) x left outer join posts p on regexp_extract(x.url,'\\S*(\\/\\d{4}\\/\\d{2}\\/[^\\/]+).*',1) = p.generated_url
;
Summary
With the data loaded into Elasticsearch we're now ready to start our analysis against it. Stay tuned for the final part in this short blog series to see how we use Kibana to do this.