Oracle Data Integrator 12c: Getting Started - Installation and Configuration

I’ve decided that it’s time for a refresher on Oracle Data Integrator 12c. This week, I’m continuing the “[Oracle Data Integrator 12c: Getting Started](http://ritt.md/odi12c-getting-started" target="_blank)” series with the next topic: Installation and Configuration. I don’t plan to dig into all of the nitty gritty details on each specific scenario you might run into. Rittman Mead have an excellent [training program](https://www.rittmanmead.com/odi-12c-bootcamp/" target="_blank) for ODI 12c where you can ask the specifics. There is also this 100+ page document from Oracle that can provide further details: [Oracle® Fusion Middleware - Installing and Configuring Oracle Data Integrator 12c (12.2.1) E55859-03](https://docs.oracle.com/middleware/1221/core/ODING.pdf" target="_blank). In this post, we’ll hit on the basics and hopefully guide you in the right direction.
First, let’s take a look at the installation process. Installing ODI 12c is quite simple compared to past versions of product. This is mainly due to the configuration of agents being moved outside of the initial installation and into a completely different process. The big choice we have now is which implementation to choose: standard or enterprise.
Standard:
Choose this installation if you plan to use a Standalone Agent to execute your mappings and data integration processes. This will install ODI Studio and the Standalone Agent, along with all of the necessary drivers and libraries to make everything work. Choose this option when installing ODI Studio on your client machine.
Enterprise:
This option will install the JEE Agent, Standalone Colocated Agent, as well as ODI Studio. The installation footprint is slightly larger than the Standard install, coming in at 3390 MB vs 3017 MB for standard. That’s a part of why I choose Standard when just installing Studio. Along with the JEE Agent and ODI Studio, you’ll also have the ODI Console and ODI plugin for Fusion Middleware Control (Enterprise Manager). One thing to note, you’ll need to first install the [Oracle Fusion Middleware Infrastructure (download)](http://download.oracle.com/otn/nt/middleware/12c/12212/fmw_12.2.1.2.0_infrastructure_Disk1_1of1.zip" target="_blank) package as it is a prerequisite to the ODI 12c Enterprise version.
To get started, download the bits and bytes from Oracle OTN and unzip the file. Next, using the appropriate Java version, run the ODI installer.
[oracle@bigdatalite bin]$ ./java -version
java version "1.8.0_111"
Java(TM) SE Runtime Environment (build 1.8.0_111-b14)
Java HotSpot(TM) 64-Bit Server VM (build 25.111-b14, mixed mode)
[oracle@bigdatalite bin]$ cd ../..
[oracle@bigdatalite odi122120]$ ./jdk1.8.0_111/bin/java -jar fmw_12.2.1.2.0_odi.jar
Launcher log file is /tmp/OraInstall2016-10-21_12-20-12PM/launcher2016-10-21_12-20-12PM.log.
Extracting the installer . . . . . . . . . . . . . . . . . . . . . . . . . . . . . .
. . . . .
From there, simply go through the install wizard. I won’t go into too much because there’s not much to it. First, decide whether you will install the Standard or Enterprise version. Next, determine where you want to install your ODI home. For a JEE or Colocated Agent installation, ODI must be installed into the Oracle Home containing Fusion Middleware Infrastructure. For Standalone agent, a brand new Oracle Home must be used. Now that we’ve installed the software, it’s time to setup the repository database schema.
Master and Work Repository Setup
The Repository Configuration Utility (RCU) is delivered as a part of the ODI install. It is used to create Fusion Middleware repositories, such as the ODI Master/Work Repositories, and any additional database schemas necessary.
Start the RCU by browsing to ODI_HOME/oracle_common/bin and running ./rcu. The steps are pretty straightforward, so I’ll leave this as an exercise for everyone to try at home. Once we have our repositories, we can begin configuring Agents and Studio.
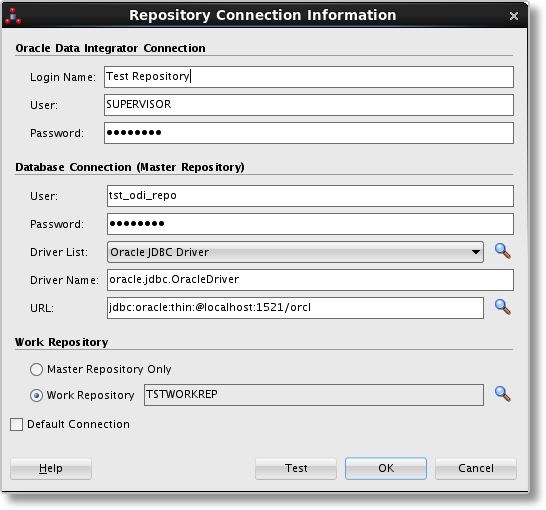
ODI Studio Configuration
Setting up ODI Studio is fairly straightforward, so I’ll keep it brief. Once installed, browse to ODI_HOME/odi/studio and fire up ./odi.sh (or odi.exe in Windows). Then, create a new connection to your ODI Master and Work repository. Enter the ODI username/password to connect with, master repository schema username/password, JDBC connection information, and Work repository. Test the connection to ensure it’s all working and you’re set.
Standalone Agent Configuration
Browse to your <ODI_HOME>/oracle_common/common/bin and run the WebLogic Server Configuration wizard.
./config.sh
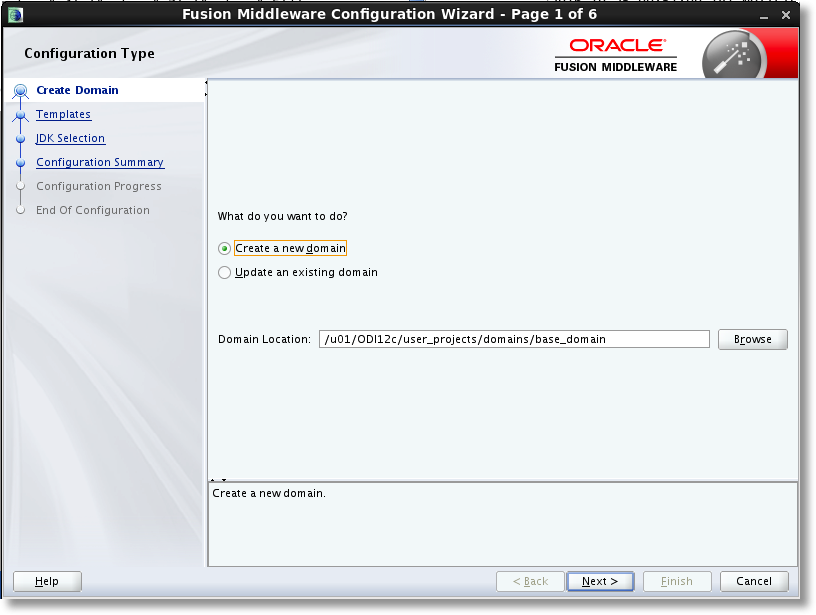
First, create a new domain for the agent. This is similar to a WebLogic domain if you’ve gone through the setup process for any application that relies on WLS. It’s recommended to create the domain outside of the ODI Oracle Home. That way you can avoid issues when upgrading/reinstalling and can follow the same domain directory structure if installing multiple agents, since each must be installed in its own domain.
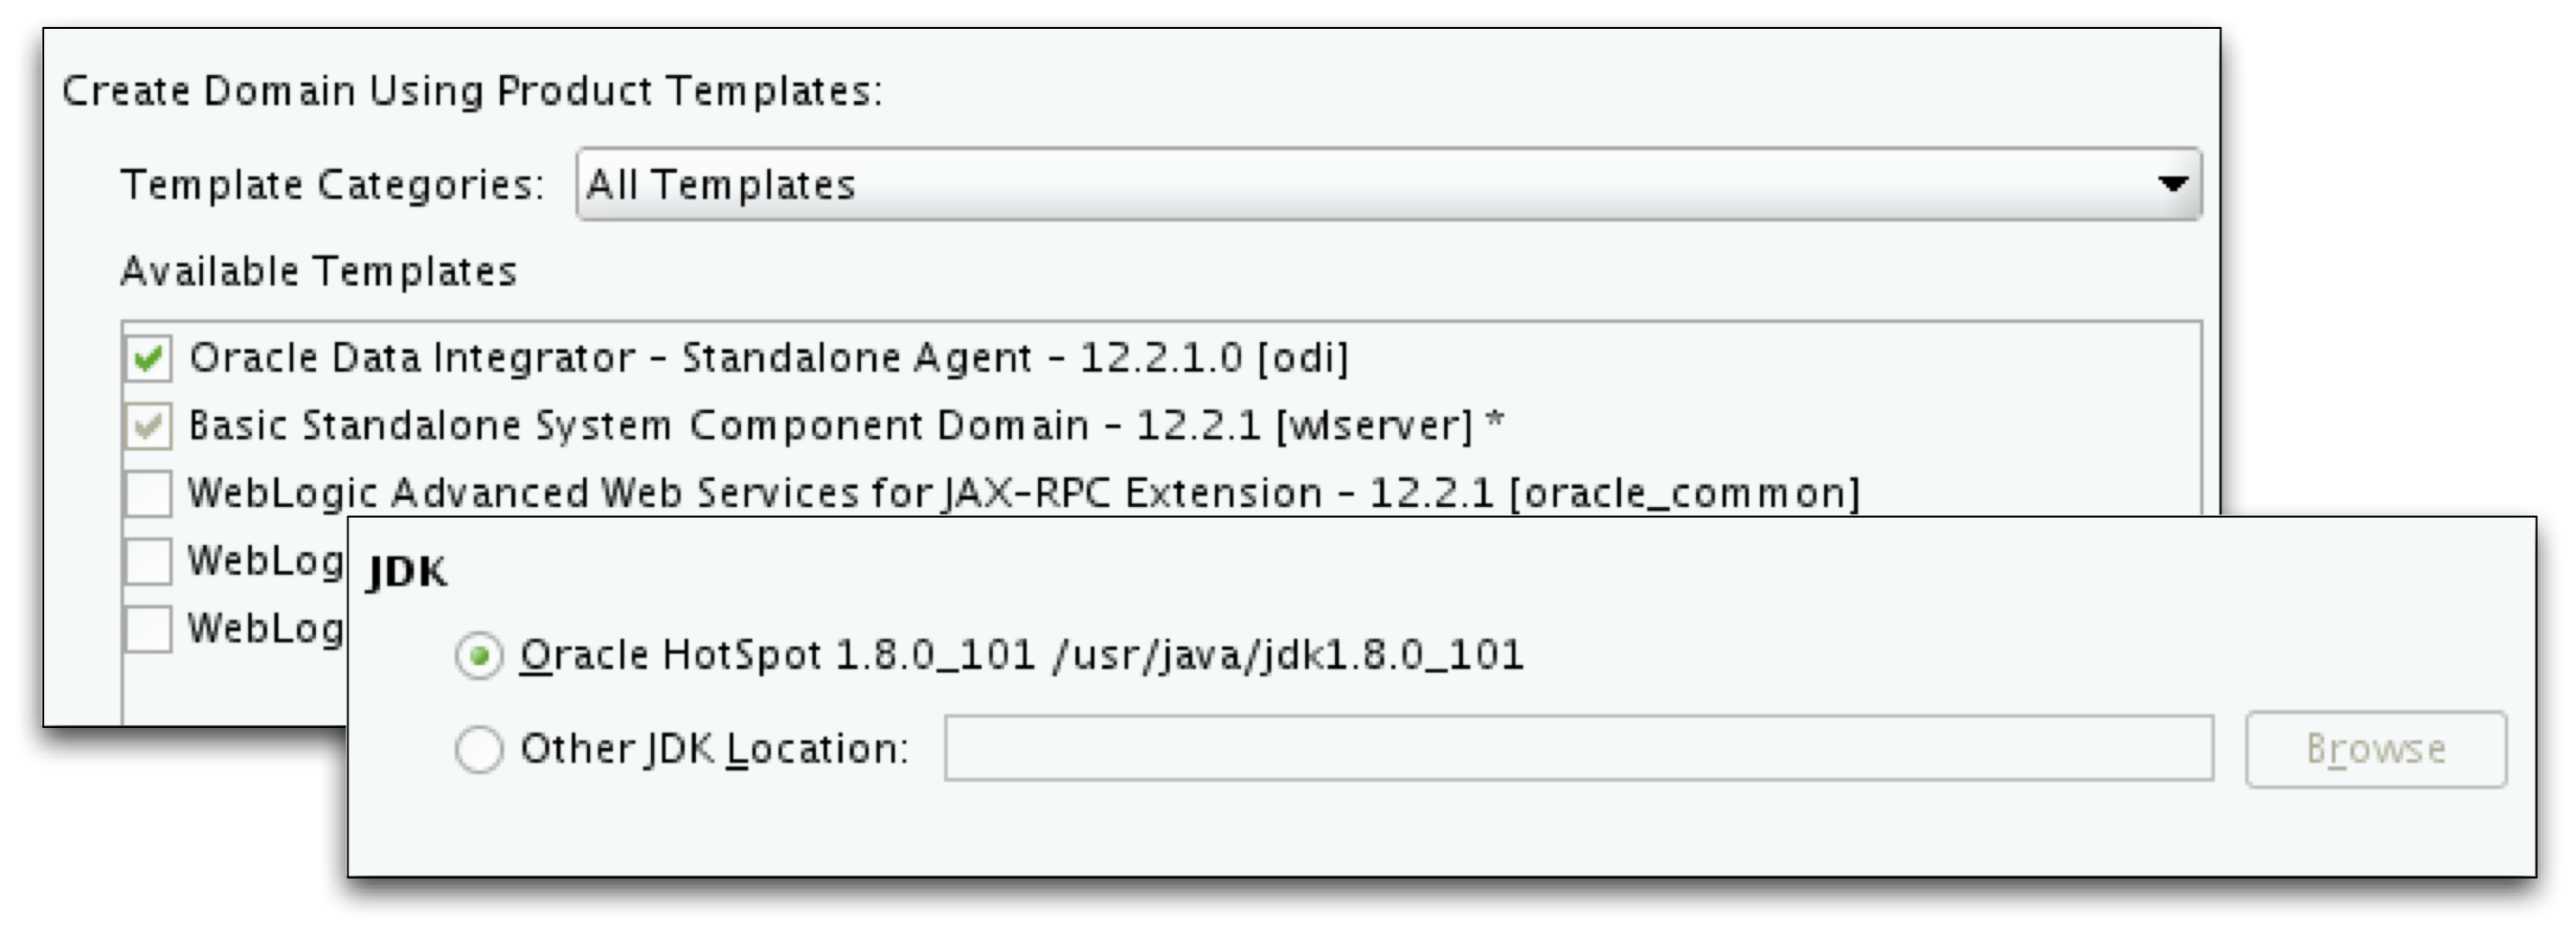
Next, choose the Standalone Agent Template, installed as part of the ODI download. Then, select the JDK to be used by the agent.
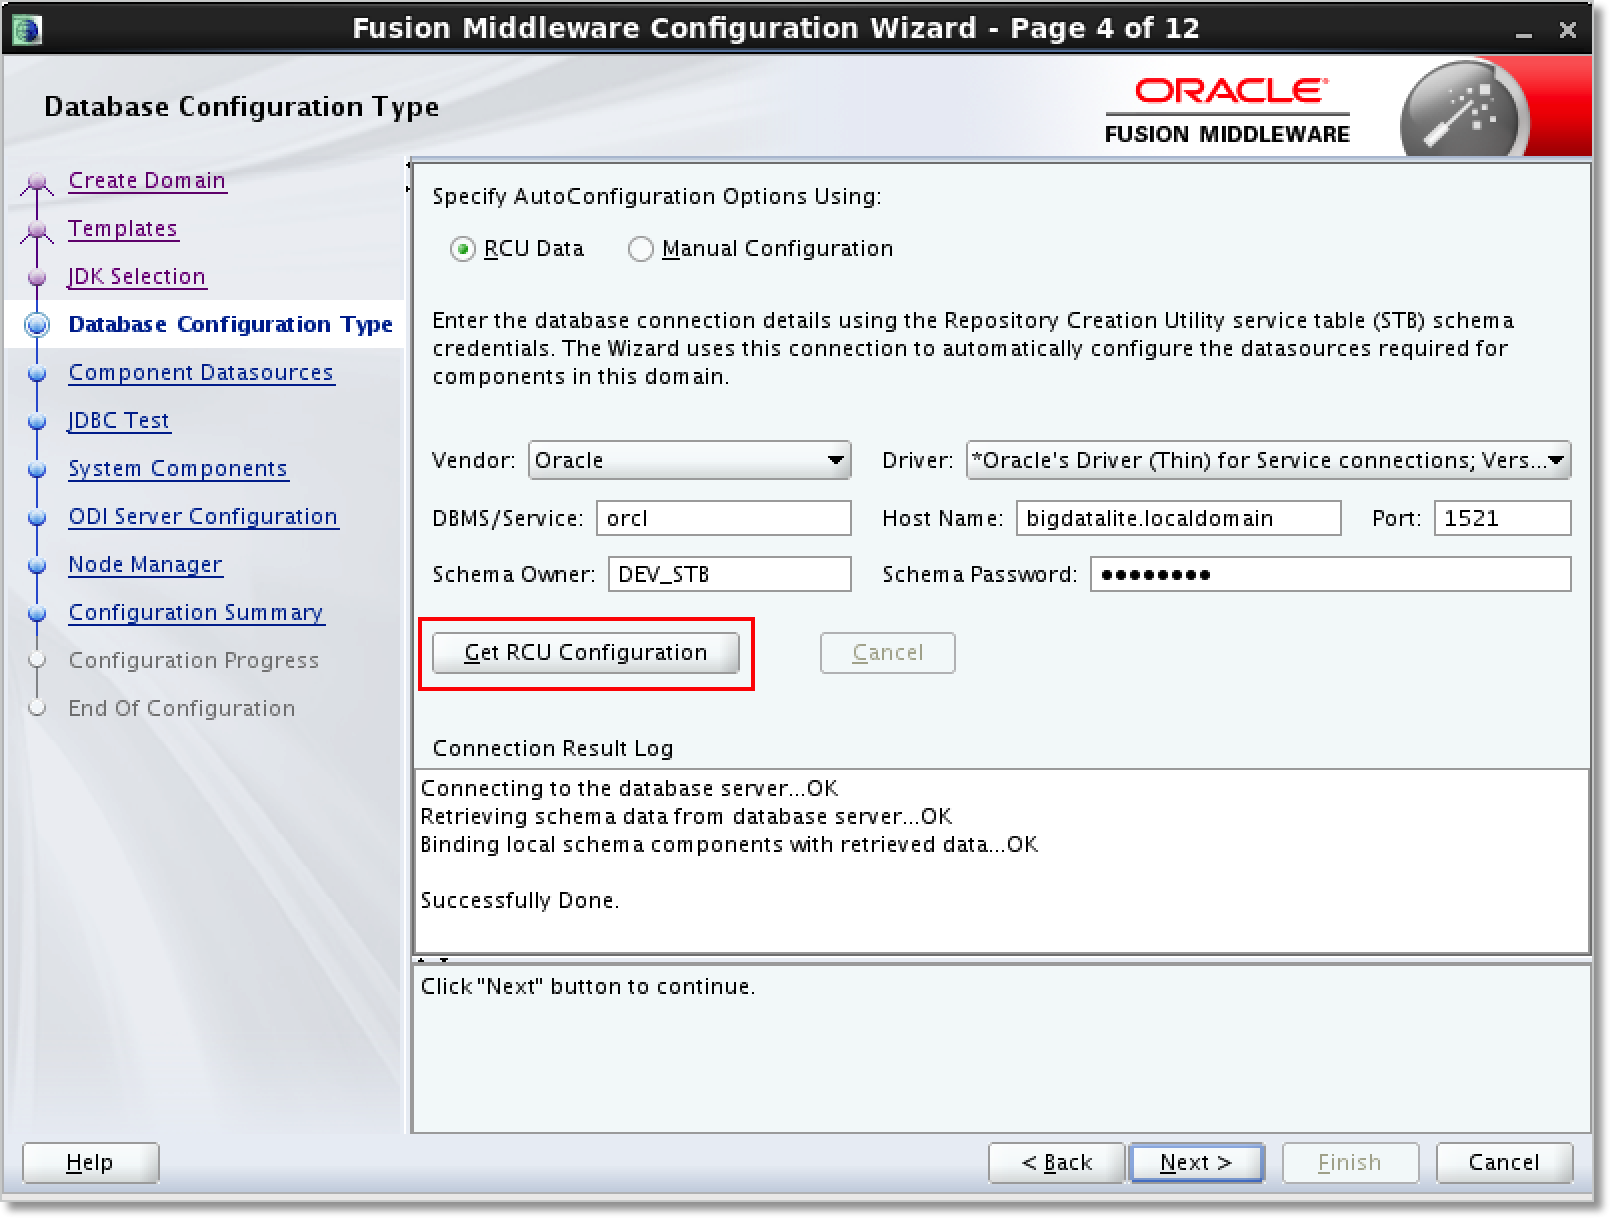
The repository is already setup, so now if we connect to the service table (STB) schema, we can look up the ODI repository connection information without having to manually enter anything.
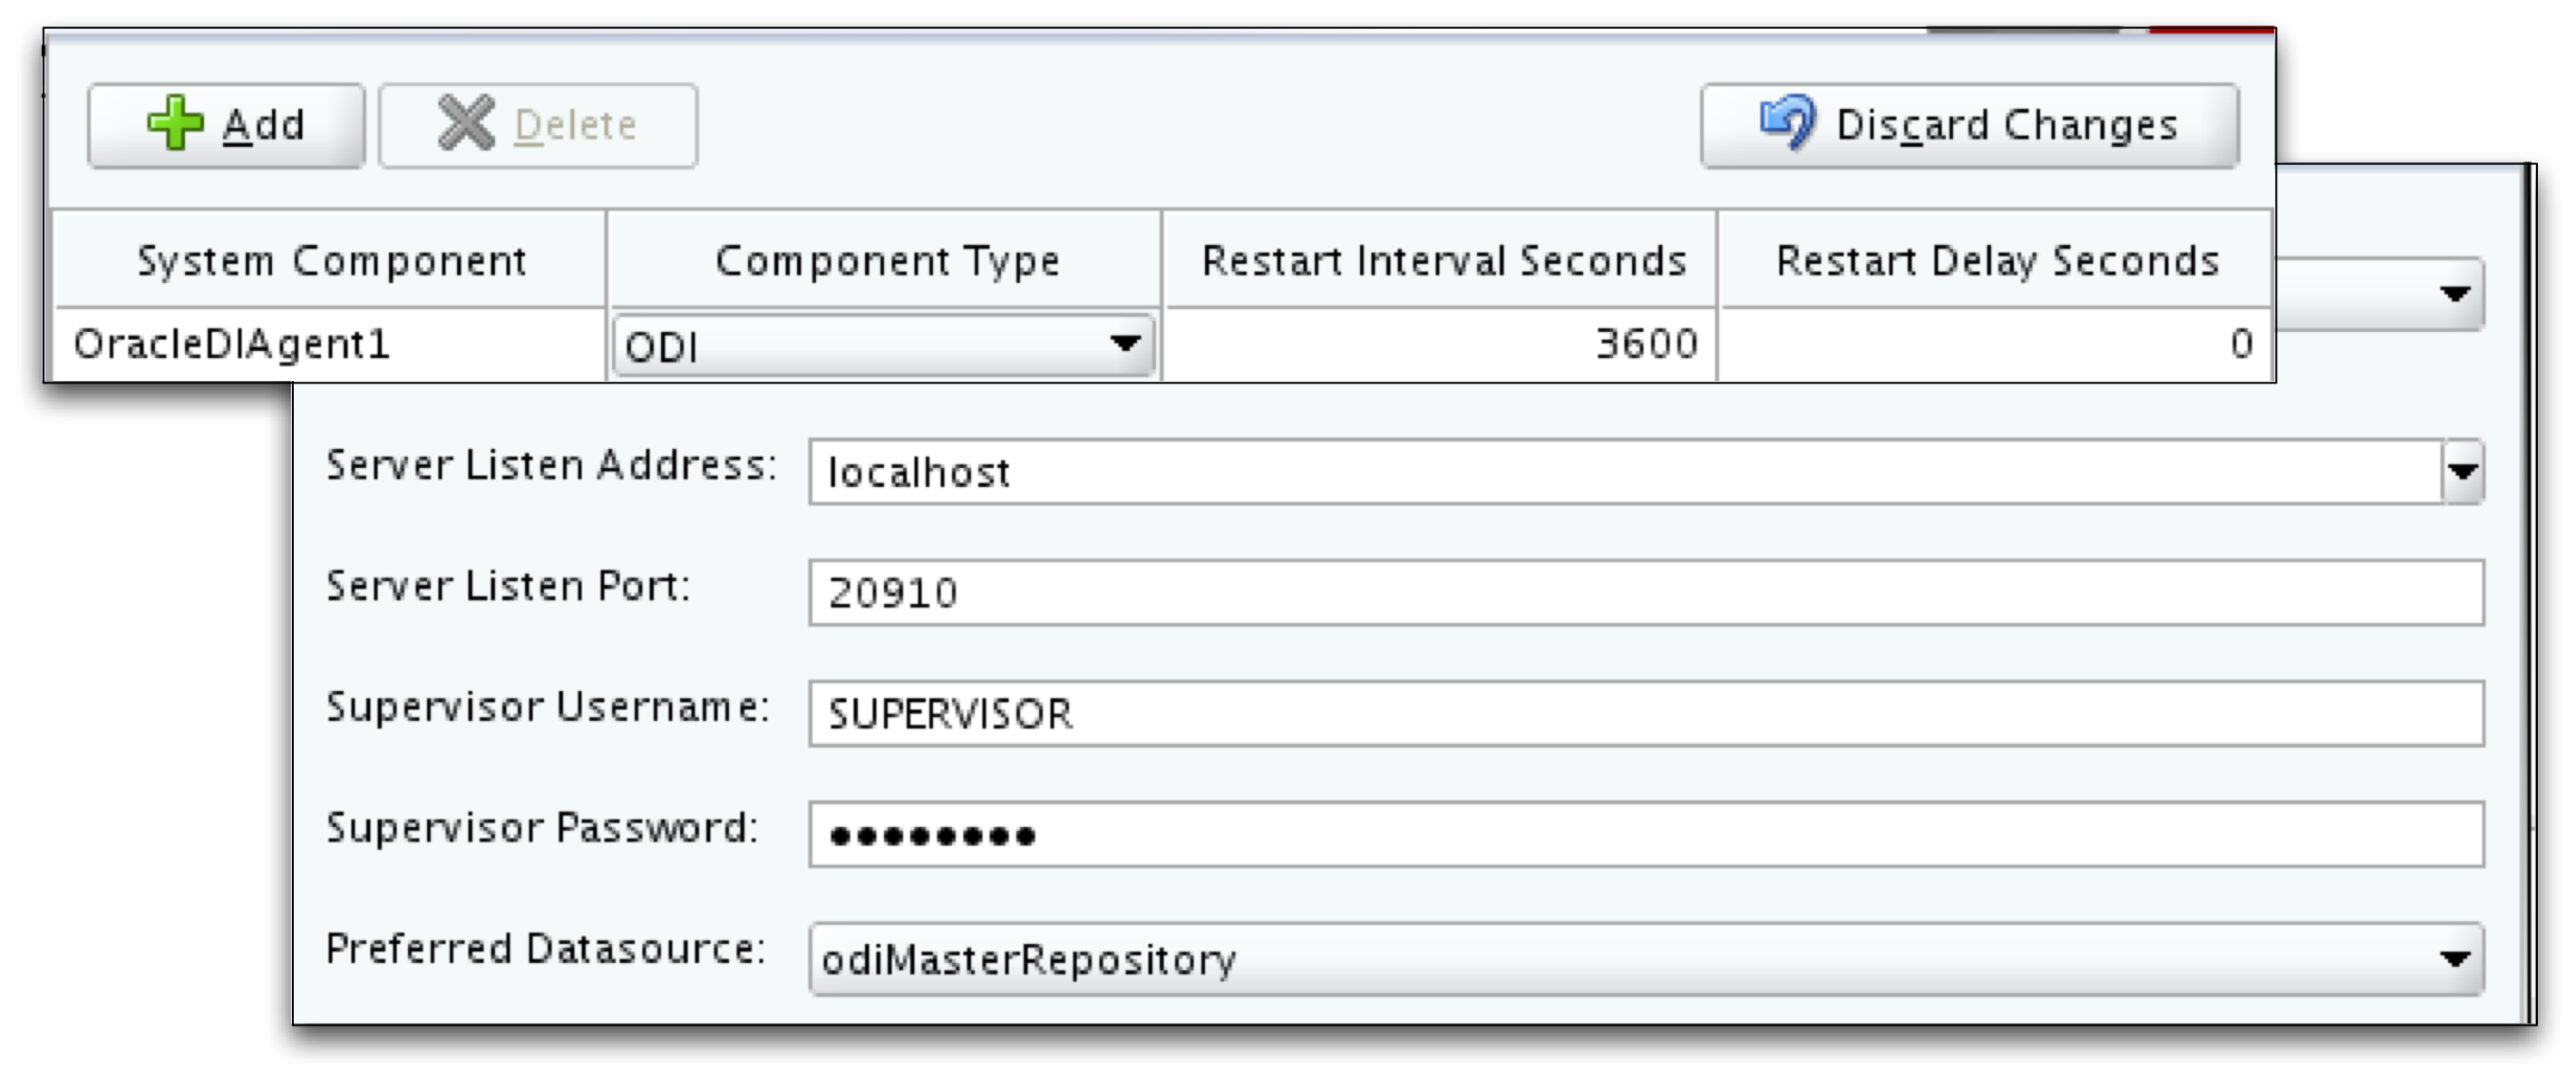
The system component will be the ODI Agent name. Then, set the host server listen address, port, and Supervisor username/password.
Finally, setup the Node Manager for the ODI Agent. The Node Manager doesn’t have to be used when starting the agent, but it is a requirement to set up during configuration. The Username/Password should be kept in a safe place, as it will be necessary for starting components within the Node Manager.
Finally, click Create and you’re off and running.
Starting the Standalone Agent
Before you can start the agent, be sure to configure it in the master repository via ODI studio. Check out the video below for a short tutorial.
Now, you can startup the agent with the node manager or without it. If we want to manage the agent via Fusion Middleware Control, use the Node Manager. But, if you plan to simply use the command line to start / stop the agent, you can do so using the classic startup method.
Start Agent with Node Manager
From within the DOMAIN_HOME/bin directory, run the following. You’ll want to use nohup to start the process in the background on Linux. For Windows, create a service to run nodemanager.cmd.
[oracle@bigdatalite bin]$ pwd
/u01/odi_agent/user_projects/domains/base_domain/bin
[oracle@bigdatalite bin]$ nohup ./startNodeManager.sh > nm.out&
[oracle@bigdatalite bin]$ nohup: ignoring input and redirecting stderr to stdout
Next, start the agent component from within the same directory. You’ll be prompted for the Node Manager password setup during configuration.
[oracle@bigdatalite bin]$ ./startComponent.sh OracleDIAgent1
Starting system Component OracleDIAgent1 ...

Initializing WebLogic Scripting Tool (WLST) ...
...
Reading domain from /u01/odi_agent/user_projects/domains/base_domain

Please enter Node Manager password:
Connecting to Node Manager ...
Start Agent without Node Manager
For times when you don’t need the Node Manager, you can still start the ODI Agent using the classic method. Just remember to always use all-caps when referring to the agent parameters, such as NAME.
./agent.sh -NAME=OracleDIAgent1
Either approach for starting the agent will get you up and running.
Colocated Agent Configuration
The Colocated Agent is essentially a Standalone agent that is managed and maintained via WebLogic Server. Rather than repeat the steps, I thought I would point you to a nice [Oracle By Example on Creating a Colocated Agent](http://www.oracle.com/webfolder/technetwork/tutorials/obe/fmw/odi/odi_12c/odi12c_agent_collocated/index.html" target="_blank). As mentioned earlier, be sure to create your domain outside of the ODI home.
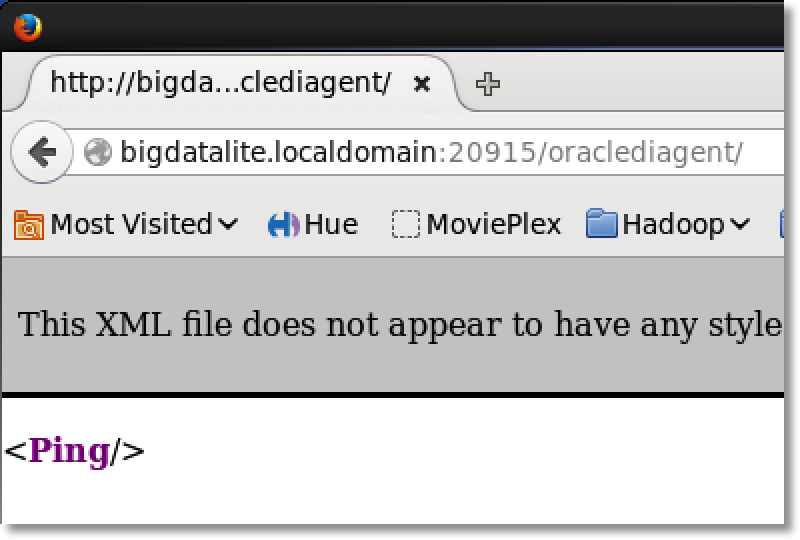
For reference, when testing an agent, simply place the hostname:port/agent-web-application-context in a browser. The Ping response means the agent is up and running.
JEE Agent Configuration
Finally, we’ll discuss the JEE Agent configuration. As mentioned in my previous post, the main reasons for using the JEE Agent is for high availability or connection pooling. You may also want to use the ODI Console or need to manage and monitor ODI agents from FMW Control. Whatever the reason, here’s how we configure the agent.
The configuration process is very similar to that of the Colocated Agent, but with a several extra steps involved. I’ll highlight those steps here. To get started, just as with the other agents, browse to the ODI_HOME/oracle_common/common/ directory and run ./config.sh.
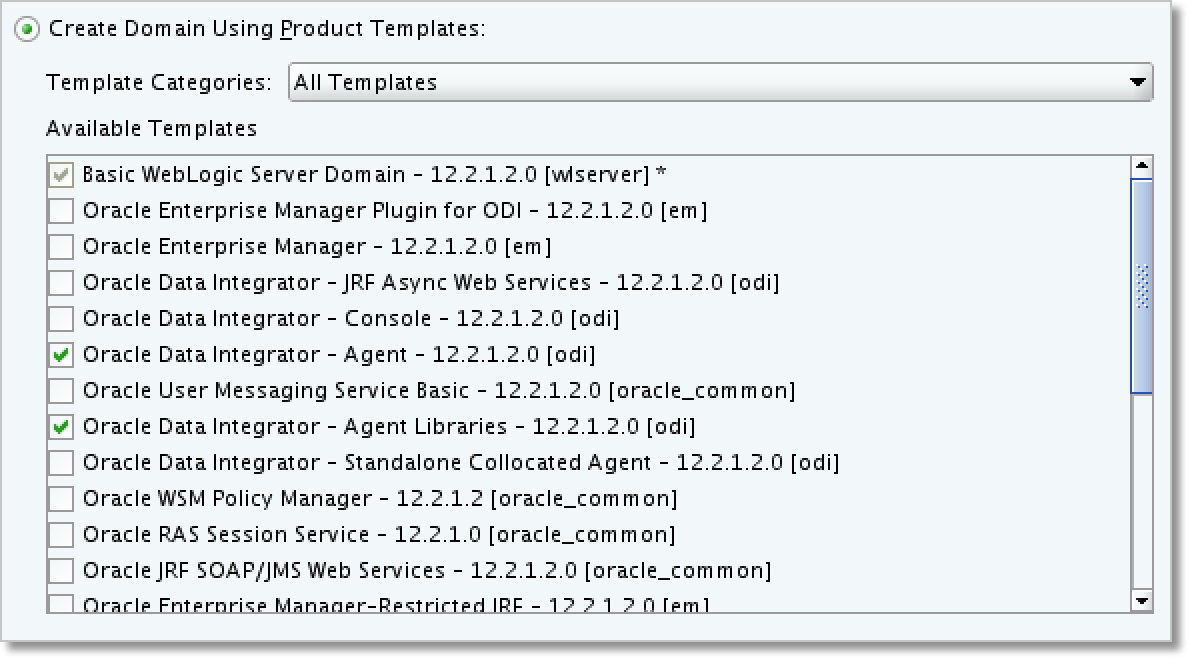
Work through the usual first few installer screens. Then, we select the template to configure. Choose ODI Agent and any additional items you’d like to add to the domain, such as ODI Console or Enterprise Manager plugin.
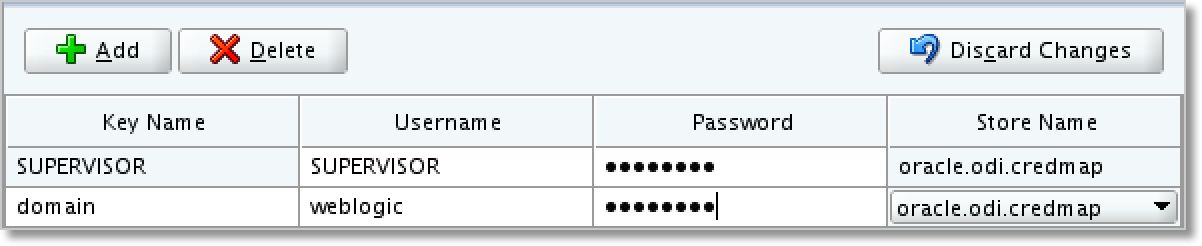
Next, add the credential mappings for both the ODI user, allowing JEE agent access to the Master / Work Repository, and the WebLogic domain user.
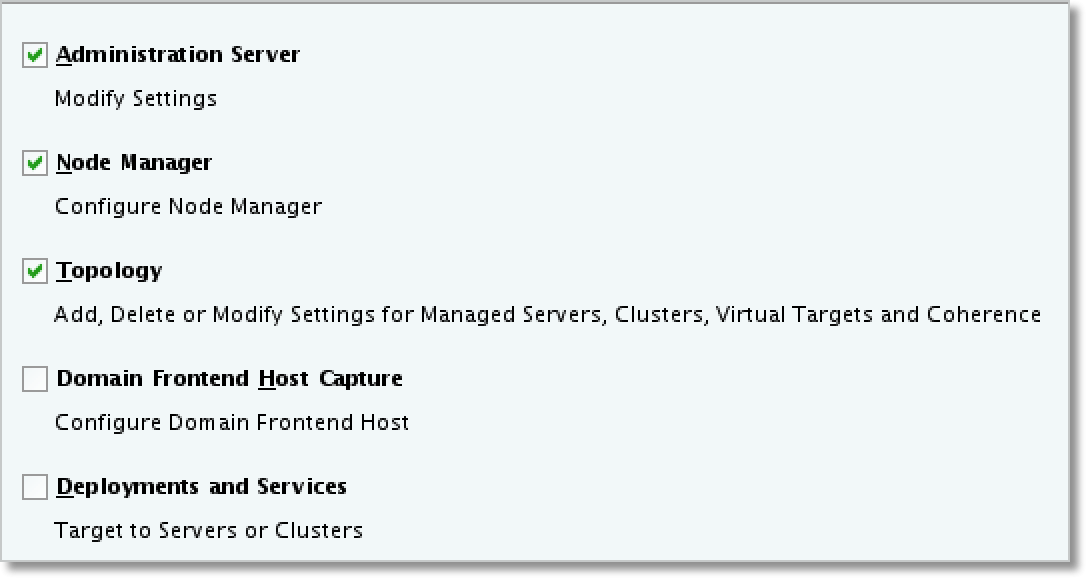
Select the options you plan to configure for the domain. This will vary based on what currently exists in WebLogic Server, but in this example we’ll be setting up a new AdminServer, Node Manager, and the Managed Server to host the ODI JEE Agent.
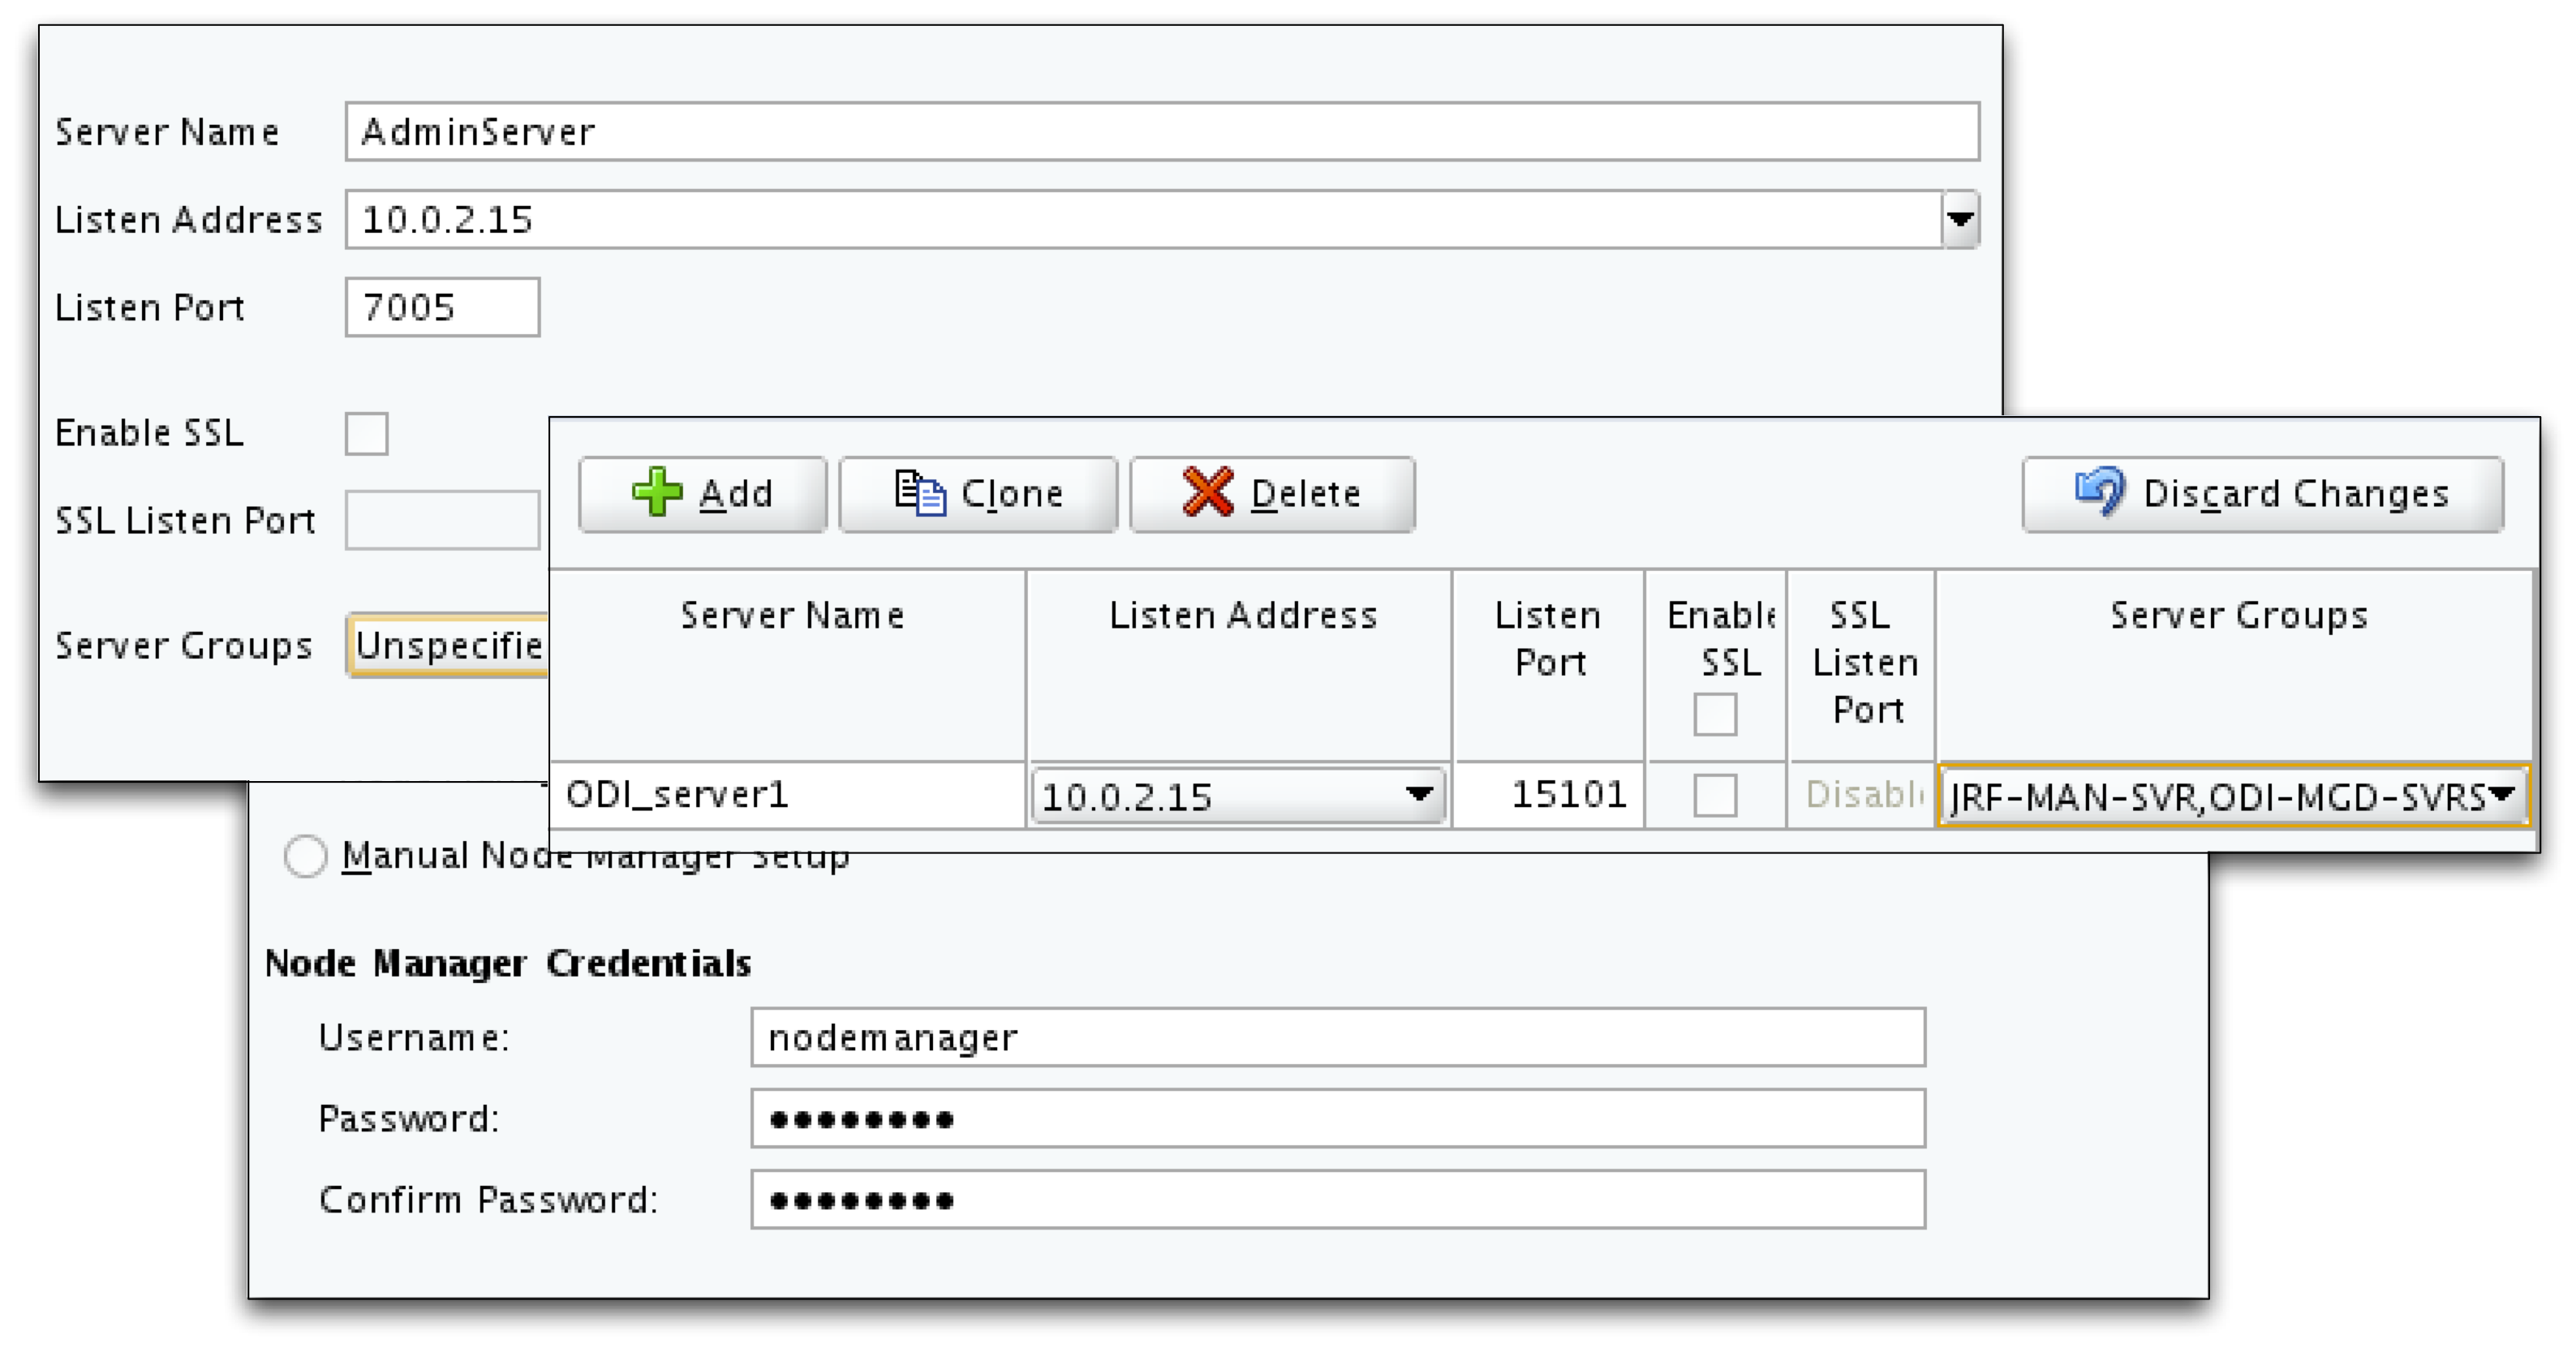
Next, configure the AdminServer, Node Manager, and Managed Server. For each, remember to use the machine IP address and not the default “Local All Machines”. For the node manager, enter a username and password as we did in previous configurations.
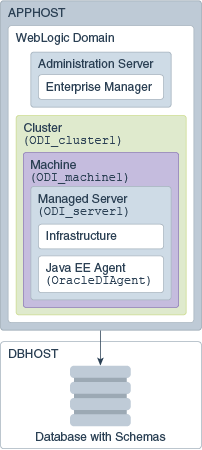
The final screens in the configuration wizard allow you to create a cluster and assign the cluster to the server. You can assign a dynamic cluster as needed for scalability, though this falls outside the context of this article. Assign the cluster to a server, create the machine (remember to assign the IP address), and finally assign the servers (AdminServer and Managed Server) to the machine.
Click create and you're done! Now start weblogic, node manager, then login to console to start ODI managed server and agent.
There you are, ODI Agents installed and configured. As always, there are many external factors that may change how your configuration and setup works in your environment, so please think of this as a simple guide and not the exact approach for each unique situation. If you do have further questions and would like a more detailed answer, you can always join one of the [Rittman Mead ODI bootcamps](https://www.rittmanmead.com/odi-12c-bootcamp/" target="_blank) to learn more from one of our experts on the product. Up next in the Getting Started series, we’ll look at creating your first ODI mapping.
Oracle Data Integrator 12c: Getting Started series: