Real World OBIEE: Demystification of Variables Pt. 1

OBIEE has some very powerful features and capabilities when it comes to how we visualize and present our data. There are some features which almost everyone uses (filters, prompts, rename columns ect.) and then some that are less common. In part, I think there is a lot of "noise" that surrounds the explanation of some of these features. Another reason, and probably the most likely, is that a lot of report developers may just don't know that they exist. I can't tell you how many times in one of our training courses here at Rittman Mead that someone says "wow, I didn't know I could do that!" or that I get asked, "could you explain how Presentation Variables work?". Now, I am not saying that there is anything wrong with not knowing or being confused when it comes to some of the features in OBIEE. In fact, it's my main purpose in writing this blog series! I want to demystify and show you some of the features and techniques I have used with almost every client I have worked with. Even if you are a seasoned veteran, my goal is to present something in a way that you haven't heard before and spark some ideas in your day-to-day development. So with all of that said, let's dive into part one of the Demystification of Variables.
For the first part of this series, I want to talk about using Bins and Presentation Variables together at a report level and also in dashboard prompts. Before we dive into an example, let me talk a little bit about bins and presentation variables.
Bins
Sometimes we need to group values differently than what we have available from our column selection. Common examples could be when we need to group products differently than product category, when we need to create a group for items on sale or, maybe the most common I've seen, when we need to create custom groups for certain values and then have a group for the "others". Creating custom groups can be accomplished in a few different ways (selection steps, add new group from the Results tab), but the way I'm going to show you involves using the Bins tab under Edit formula within a column. I'll go over this process shortly when we dive into the example.
Presentation Variables
These are one of the most powerful features in Answers. They are also one of the things that trip people up the most. Think of presentation variables like placeholders and these placeholders are waiting for a value or a group of values to be passed into them. There are really only three parts to the presentation variables we will look at in this example: First you assign the presentation variable (give it a name) in a prompt to pass the value or group of values selected into the second part. The second part is where the placeholder (presentation variable with the same name) is put in a column formula, column heading, text object etc. The third part is called formatting. Formatting is used when you need to apply a certain format to the values coming into the presentation variable placeholder. There are a massive amount of use cases for presentation variables but I am going to cover only a couple of the ones that I've used the most.
Make sense? If you're still a little confused or hearing about this for the first time, don't worry. We are going to go through an example that I hope will explain the uses of Bins and Presentation Variables in a way that is concise and clear.
Now, lets dive into the example.
The Scenario
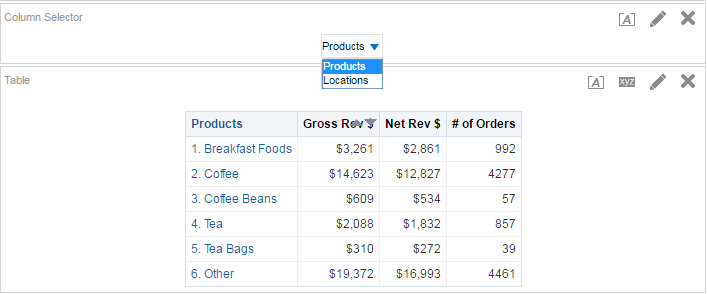
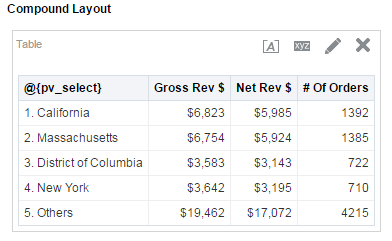
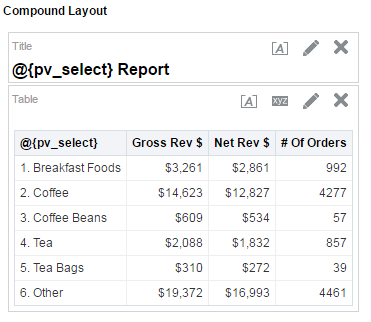
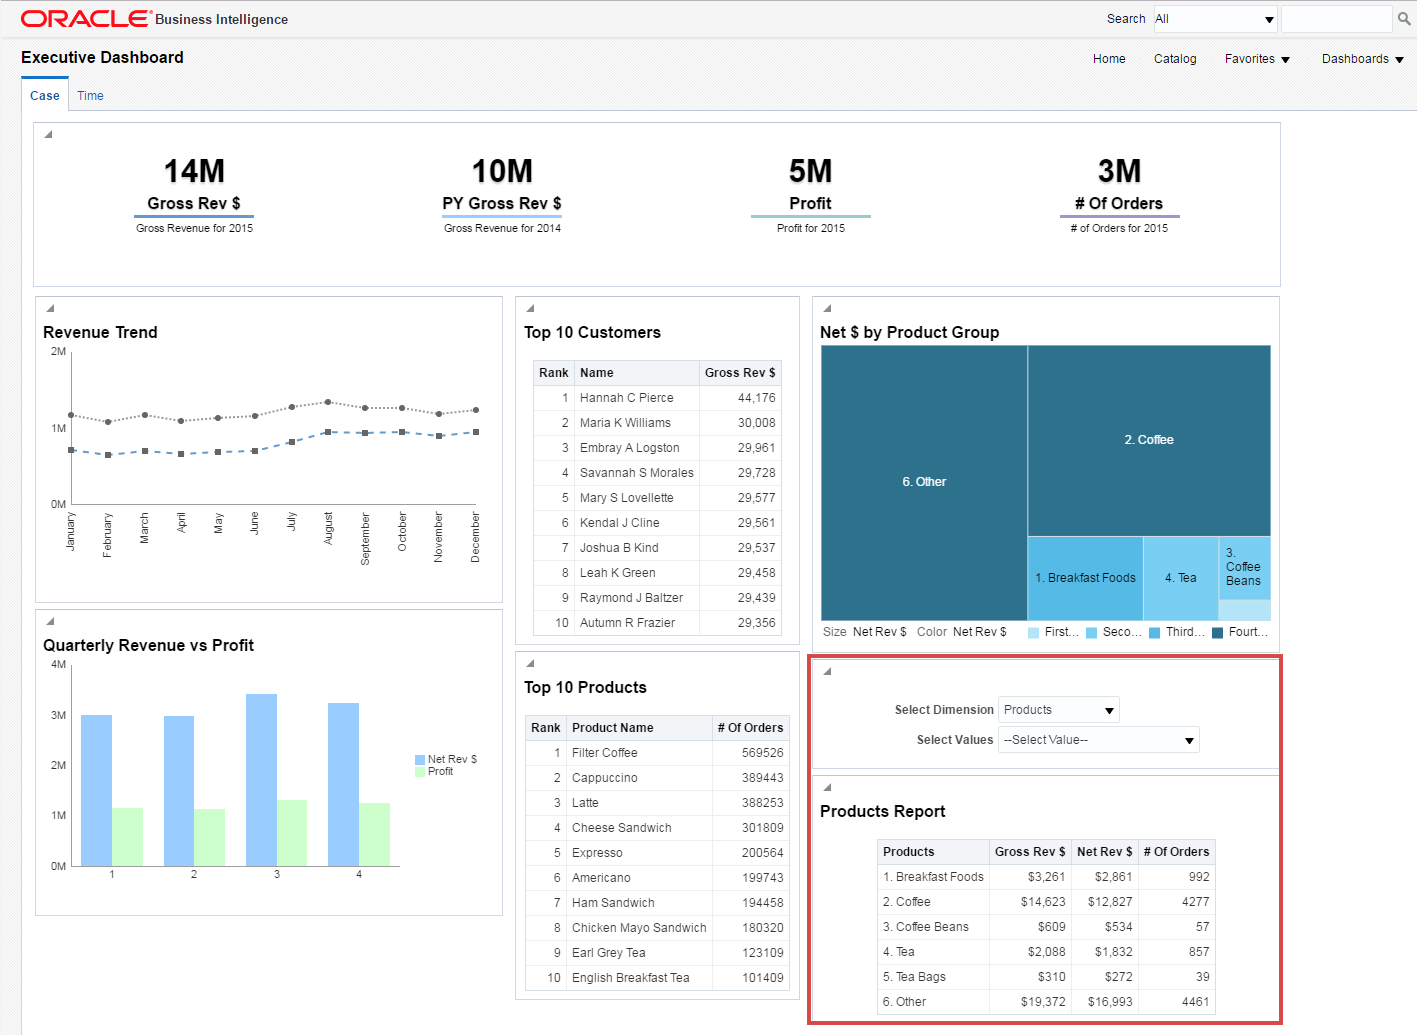
In this example, I am going to work through a hypothetical situation where I am the front-end developer for a coffee shop and I've been asked to create a report for an executive dashboard. The report needs to include Gross Revenue, Net Revenue and # of Orders for the current date for six groups of products (Breakfast Foods, Coffee, Coffee Beans, Tea, Tea Bags and Other) and five location groups which contain all the stores located in four states (California, Massachusetts, District of Columbia, New York and Others). The report needs to be in a table view and the person that requested this report also wants the ability to switch between the two columns for product groups and location groups. They also want a dashboard prompt for selecting from one or more groups for each column.
The Example
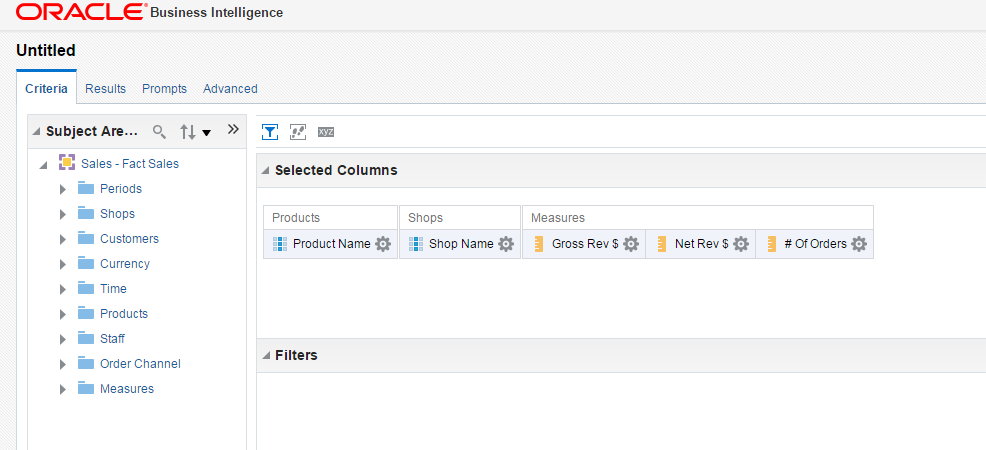
Let's start by tackling the custom groups. Since both groups are going to be created from the lowest level of detail for both products and locations, we need to bring in both Product Name and Shop Name columns and also our measures.
Note: For all of the examples in this blog series I am using OBIEE 12.2.1.2
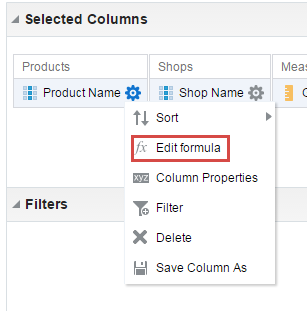
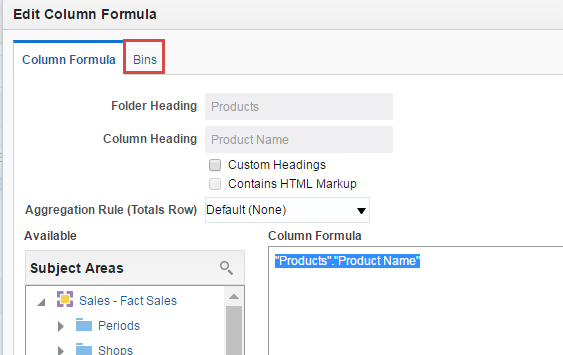
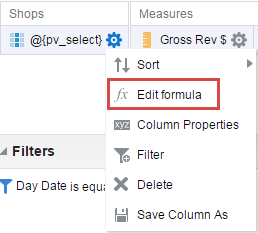
I can click on column properties > Edit Formula then click on the Bins tab to start creating my groups.
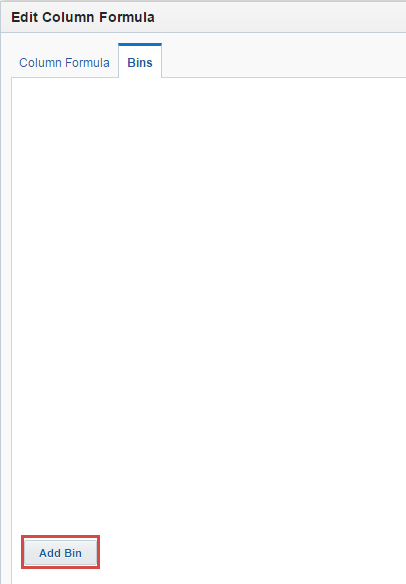
In the Bins tab, I can click on Add Bin to start creating my first group.
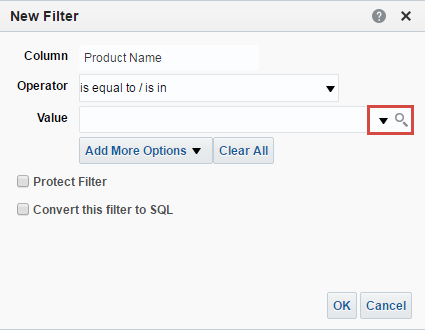
Once I click on Add Bin, I am presented with a New Filter window. The process of creating a new group (or bin) is exactly the same as creating a column filter. I can type the values individually, separated by ; or I can click on the search icon to add values manually. In this case, I am going to add them manually.
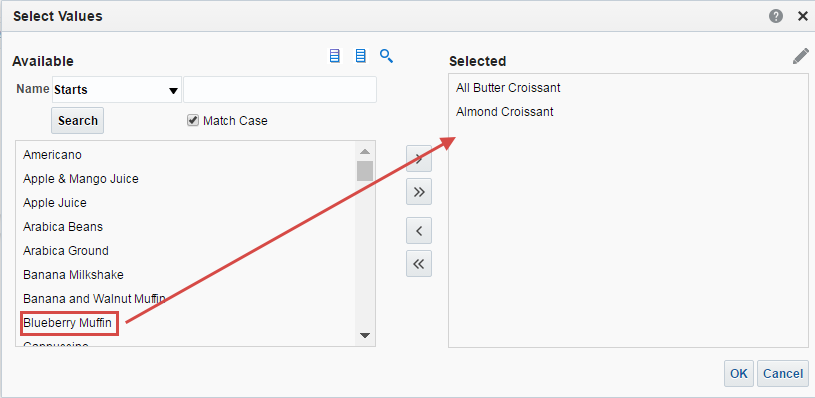
Once in the Select Values window, I am going to select all of the products that belong in the first group (Breakfast Foods).
Note: In this scenario, the person has given me a list of all the products and stores that they want in each group
Once I'm done adding all the items, clicking OK will take me to the Edit Bin Name window where I can give my new group (or Bin) a custom name.
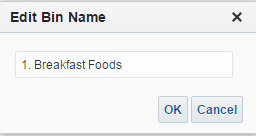
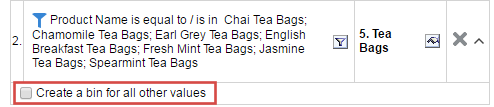
Since the person who requested the report probably wants the Others group to be last, I am going to add numerical values to each group. This will give me the flexibility to order columns any way that I choose. After I’m done creating all my Bins, there is a checkbox at the bottom of the Bins window where I can create a custom bin for all other values.
Clicking OK will return me to the Criteria where I can view the formula that OBIEE generated for all of my selections.
When using Bins, OBIEE generates a custom Case statement for us. At a high level, a Case statement takes a set of conditions and executes a corresponding statement. In other words, when the Product Name column has these values, put them all together an call them THIS.
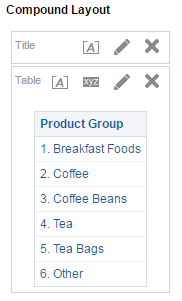
If I go to Results, I can see the Bins I just created.
Now I can return to the Criteria to create the groups for the stores. Upon completion, here is the formula for the Locations:
And the result:
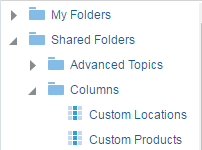
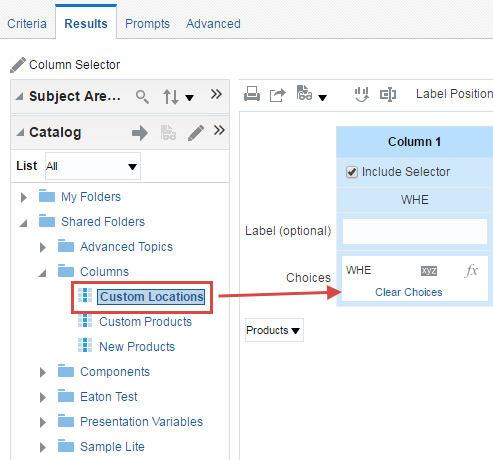
Now I need to come up with a way to be able to switch between the Product and Location columns I just created. There are a couple of options. Since i'm using OBIEE 12c, I can save both the Products and Locations columns to the web catalog and simply create a column selector just like I would do for any of the columns within a subject area.
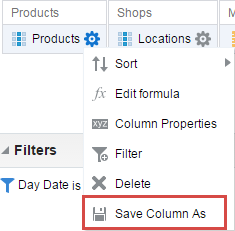
There are two problems with this method. One is that the Save Column As feature is only available from OBIEE 11.1.1.9 forward so, if you are still on 11.1.1.7 or earlier, this method won't work. The second problem is that the request is not just for swapping the Product and Location columns with a prompt but also being able to select individual values for each column with a prompt. To avoid confusion, we probably want the prompt values for each column to change dynamically depending on which column is selected. To accomplish this I am going to use a second method which requires me to do the following:
-
Combine the case statements for both Products and Locations column formulas
-
Insert two additional case statements along with presentation variables to allow me to switch between the two.
-
Create a filter for the combined column with a presentation variable to allow me to use prompted values.
-
Create a variable type dashboard prompt to select between the Product and Locations independently.
-
Create a dashboard prompt that dynamically changes between the value selections for the Products and Locations.
I'm going to start with the first two steps since they require editing the same column formula.
I am going to create a new column and copy both my Products and Locations column formulas into the new column's edit formula window and, to make it easier to edit and insert the two additional case statements, I am going to put a blank line between them.
Now I need to put in my two additional case statements with presentation variables so that I can switch between the two. The syntax and naming convention I am going to use is as follows:
CASE WHEN @{pv_select}['@']{'Products'} = 'Products' THEN [Products Case Statment]
CASE WHEN @{pv_select}['@']{'Products'} = 'Location' THEN [Locations Case Statment]
Let me take a moment to examine and explain the presentation variable I'm using.
The syntax for putting a presentation variable in a column formula, column heading or text object is as follows:
@{presentation_variable_name}[formatting]{default_value}
Note: I am going to use the presentation variable name (pv_select) in my variable prompt later in this example
The default value I have defined (Products) is an optional step that is primarily used for when I want to view my report without any values being passed into the presentation variable. The default value is used when no value has been passed into the presentation variable.
Notice that I have also included formatting between the presentation variable name and the default value (['@']). The reason for this is because the prompt values (which will be defined as Products and Locations in the variable prompt I will create) are a string (text) datatype and I have to explicitly define the format I need for the presentation variable value or I will get an error. You have to define formatting using single brackets [] and then encapsulate the @ character with the formatting you need applied to the presentation variable value. Think of the @ character as a sort of shorthand or an abbreviation for the presentation variable itself.
Note: I could enclose my presentation variable in single quotes to achieve the same results in this senario ('@{pv_select}{Products}').
So, to explain the entire statement another way:
CASE WHEN the value of the presentation variable coming from the prompt is equal to 'Products', THEN then use the CASE statment for the product groups
CASE WHEN the value of the presentation variable coming from the prompt is equal to 'Location', THEN then use the CASE statment for the location groups
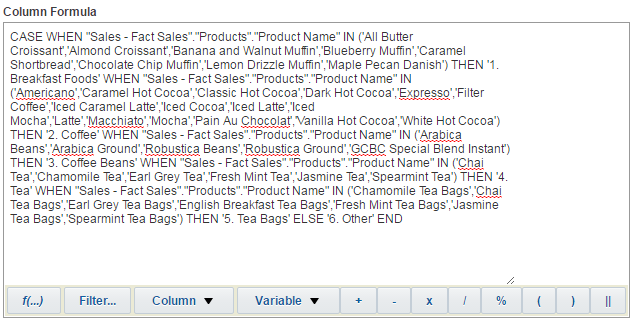
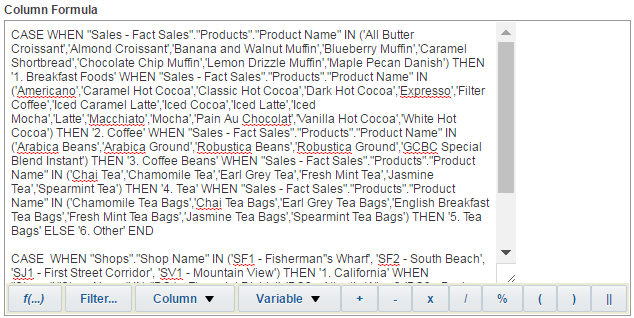
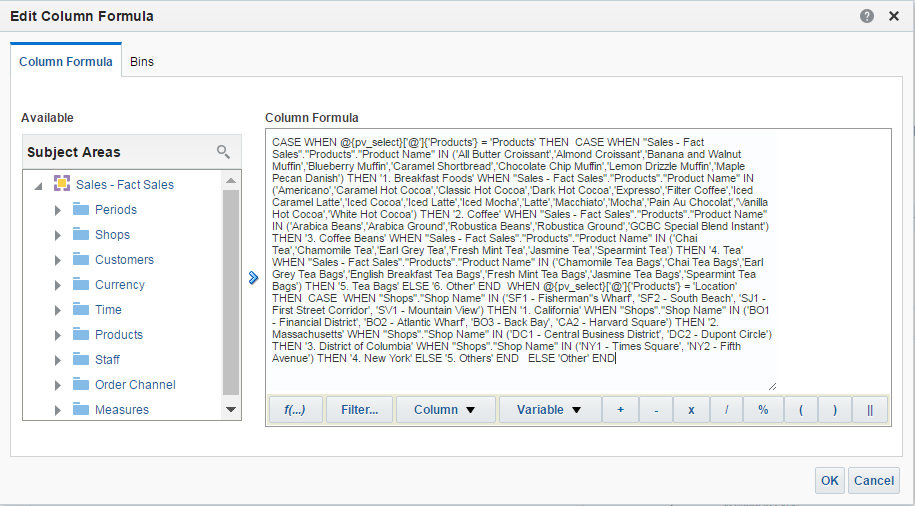
My new column formula is as follows:
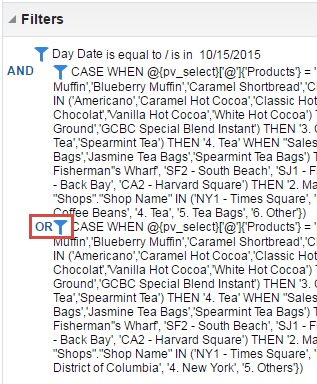
CASE WHEN @{pv_select}['@']{Products} = 'Products' THEN
CASE WHEN "Sales - Fact Sales"."Products"."Product Name" IN ('All Butter Croissant','Almond Croissant','Banana and Walnut Muffin','Blueberry Muffin','Caramel Shortbread','Chocolate Chip Muffin','Lemon Drizzle Muffin','Maple Pecan Danish') THEN '1. Breakfast Foods' WHEN "Sales - Fact Sales"."Products"."Product Name" IN ('Americano','Caramel Hot Cocoa','Classic Hot Cocoa','Dark Hot Cocoa','Expresso','Filter Coffee','Iced Caramel Latte','Iced Cocoa','Iced Latte','Iced Mocha','Latte','Macchiato','Mocha','Pain Au Chocolat','Vanilla Hot Cocoa','White Hot Cocoa') THEN '2. Coffee' WHEN "Sales - Fact Sales"."Products"."Product Name" IN ('Arabica Beans','Arabica Ground','Robustica Beans','Robustica Ground','GCBC Special Blend Instant') THEN '3. Coffee Beans' WHEN "Sales - Fact Sales"."Products"."Product Name" IN ('Chai Tea','Chamomile Tea','Earl Grey Tea','Fresh Mint Tea','Jasmine Tea','Spearmint Tea') THEN '4. Tea' WHEN "Sales - Fact Sales"."Products"."Product Name" IN ('Chamomile Tea Bags','Chai Tea Bags','Earl Grey Tea Bags','English Breakfast Tea Bags','Fresh Mint Tea Bags','Jasmine Tea Bags','Spearmint Tea Bags') THEN '5. Tea Bags' ELSE '6. Other' END
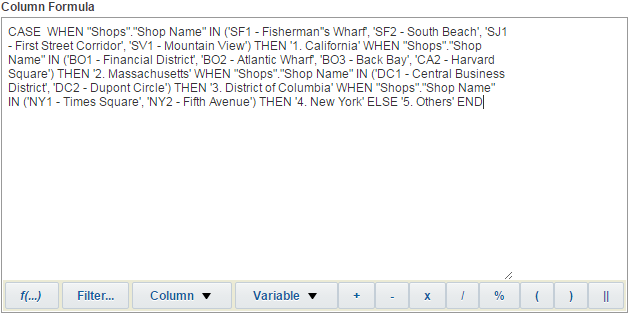
WHEN @{pv_select}['@']{'Products'} = 'Location' THEN
CASE WHEN "Shops"."Shop Name" IN ('SF1 - Fisherman''s Wharf', 'SF2 - South Beach', 'SJ1 - First Street Corridor', 'SV1 - Mountain View') THEN '1. California' WHEN "Shops"."Shop Name" IN ('BO1 - Financial District', 'BO2 - Atlantic Wharf', 'BO3 - Back Bay', 'CA2 - Harvard Square') THEN '2. Massachusetts' WHEN "Shops"."Shop Name" IN ('DC1 - Central Business District', 'DC2 - Dupont Circle') THEN '3. District of Columbia' WHEN "Shops"."Shop Name" IN ('NY1 - Times Square', 'NY2 - Fifth Avenue') THEN '4. New York' ELSE '5. Others' END
ELSE 'Other' END*
I am also going to use the presentation variable in the column heading so that when I make my selection in the prompt, the column heading will reflect the selection as well.
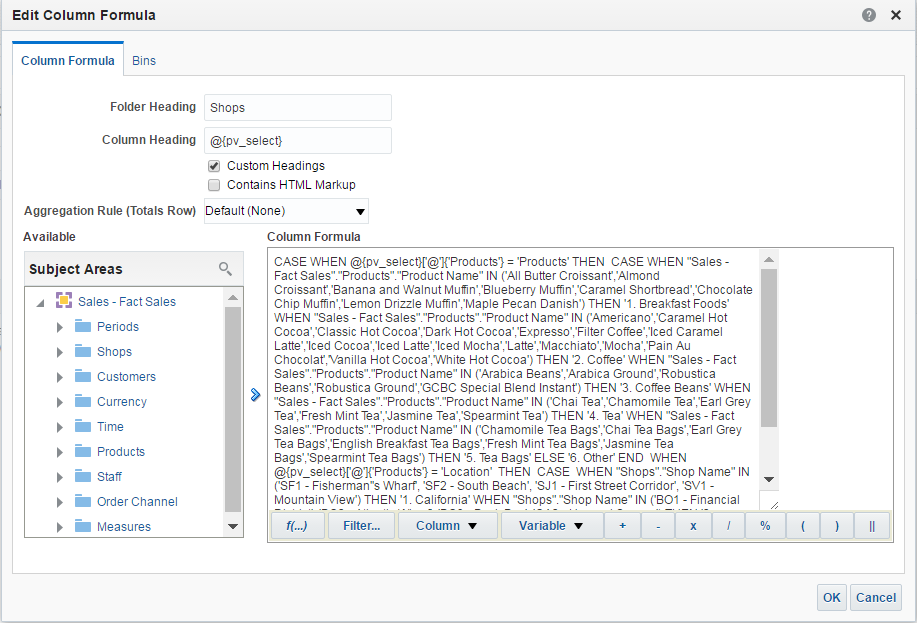
If I go to my results, notice how only the Products column is showing due to the default value I set when defining my presentation variable.
If I go back to my column formula and change the default value to be Location instead of Products, the column values will change to the ones defined in my Locations case statment.

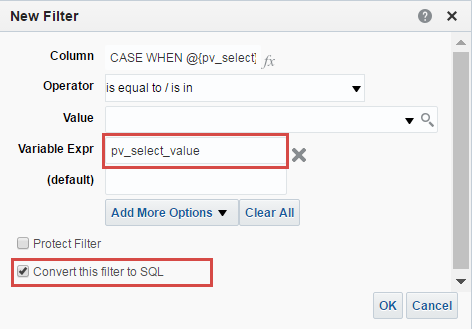
In order for the report to be filtered for individual values, I need to create a filter using a presentation variable. To do this I am going to create a filter for the column I used to define all of my groups and, instead of selecting a value, I am going to put in a new presentation variable which I will define later when I create the dashboard prompt for the values.

I am going to name my new presentation variable pv_select_value.
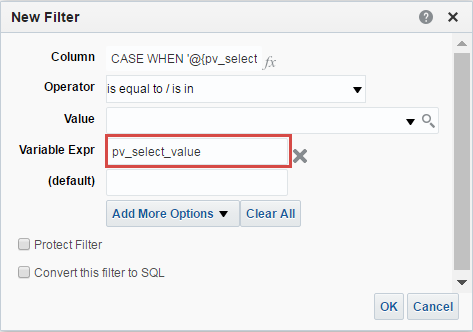
When a Presentation Variable is added to the filter, two new text boxes appear. The Variable Expr box is where you define the variable to be used and the (default) box is used to add a default value. Notice how I am not using the syntax @{presentation_variable_name}. When defining a presentation variable using the presentation variable option in a filter or in a prompt, you only have to define the name. Once I click ok, OBIEE will insert the proper syntax for me. The default value is optional but, when defining a Presentation Variable within a filter, you have to specify a default value in order to get any results within the analysis. If I run the report with just a presentation variable defined with no default value, I will get the error shown below:

This is because, when the report is run, the query issued is trying to use the value of the presentation variable. Since there is no default value specified, it is trying to use the presentation variable name itself as a value. If I specify a default value or a list of default values, the report will use those values in the absence of a value or values in the presentation variable. Because I want all of the values to be shown initially on the dashboard, I am going to use the Convert this filter to SQL option and input all of the values for the product group manually for the list of default values.

If I run the report with the default values specified, I get the results back for the product group.
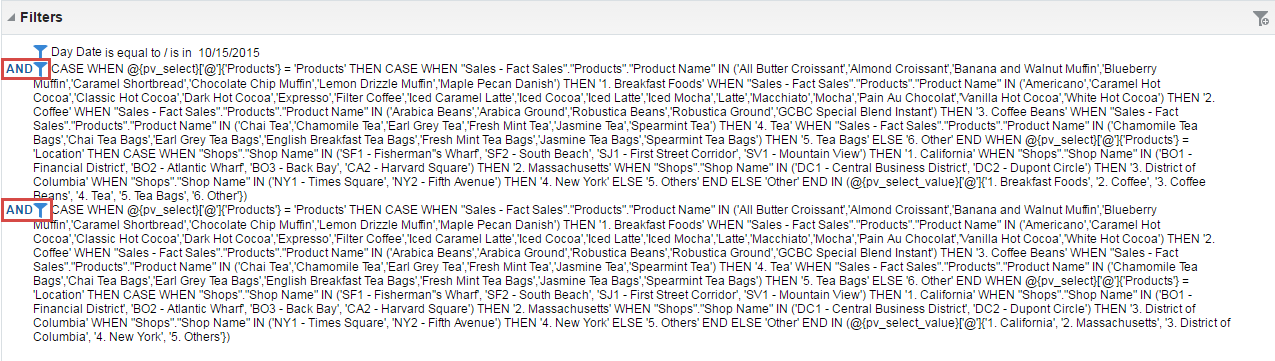
In order for the filter to work with the column prompt I will create later in this example, it requires the [formatting] syntax to be used (@{pv_select_value}['@']{'1. Breakfast Foods', '2. Coffee', '3. Coffee Beans', '4. Tea', '5. Tea Bags', '6. Other'}) for example). This will encapsulate each value passed into the pv_select_value presentation variable with single quotes.
Now I need to add an additional filter on the same column using the same pv_select_value presentation variable. The reason for this is because I need to define each default value for the location group as well so that all of the values for location will be shown on the dashboard. To do this, I am going use the same process that I used for the product group filter.

There is one additional step that I need to do in order to make the filter work for both products and locations. When you initially create report filters, OBIEE assumes that you want to use all filters together at the same time therefore it uses 'AND' for each filter created after the initial filter.
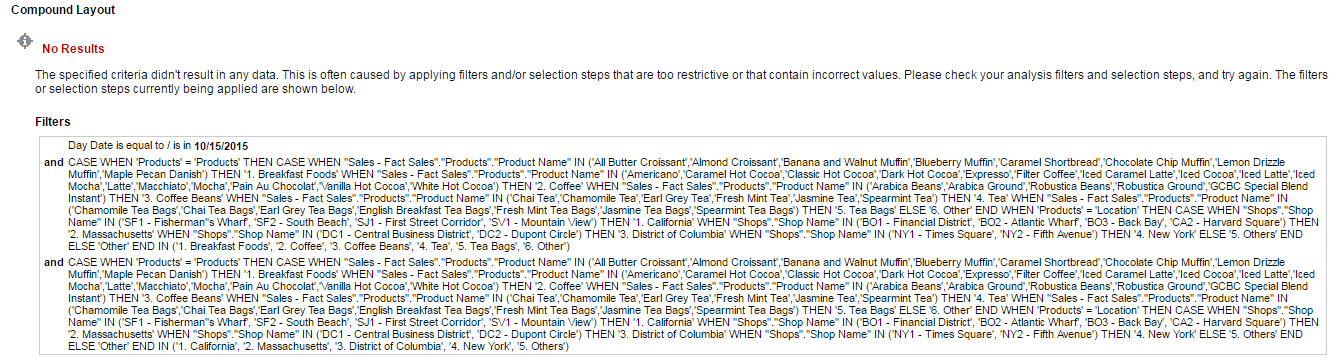
If I run the report, I will get an error because the filter is being applied for both the products and location values. Because the case statment is defined for products and locations independently, I can not use all values in a filter at the same time.
To fix this, I need to change the operator for the location filter from 'AND' to 'OR'. I can do this by simply clicking on the 'AND' icon.
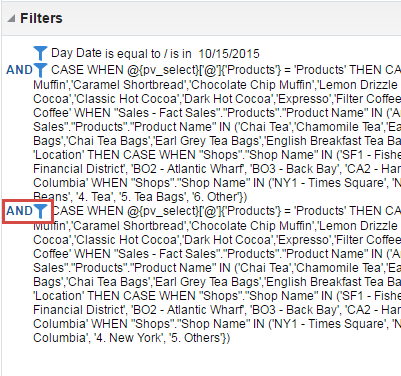
Now the report will run because only the first set of conditions for the product group filter is applied.
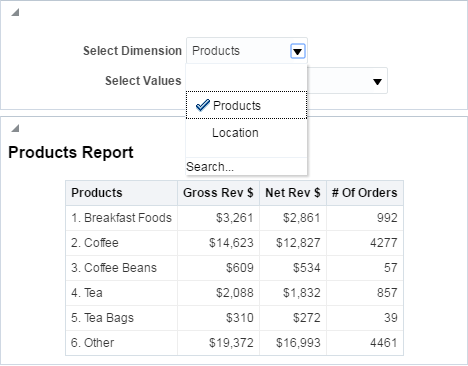
Now I need to create my two dashboard prompts: One for the initial selection between my two case statements for Products and Locations and one for the values.
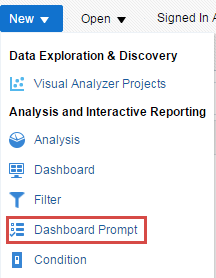
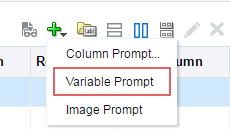
I start by creating a new dashboard prompt and create a new Variable Prompt.
Because this is a variable prompt, I have to manually specify the values I want the user to be able to select from as well as define the presentation variable. Since I am creating the prompt for switching between the two case statements for Products and Locations, I am going to make the following selections and input the following values.
Prompt for: Presentation Variable > pv_select
User Input: Choice List
Choice List Values: Custom Values
Values: Products and Location
Default Selection: Specific Custom Value > Products
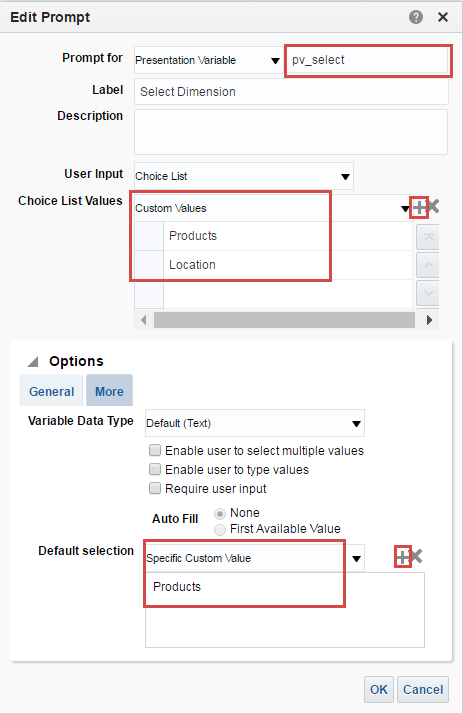
As you can see, I have defined the variable that we used in the column formula for the case statements. By defining the two custom values (Products and Location), I can select between the two case statements at will and, as far as the user is concerned, it will be just like using a column prompt within a report. Also, the default value needs to be specified for reasons I will explain when creating the next prompt for the values.
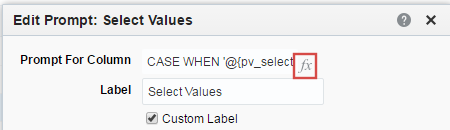
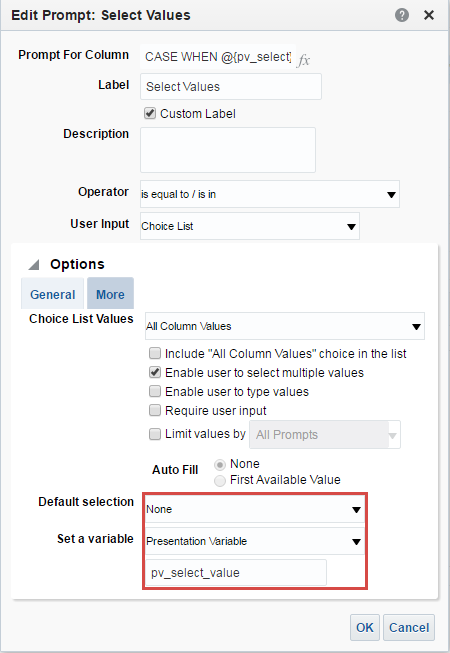
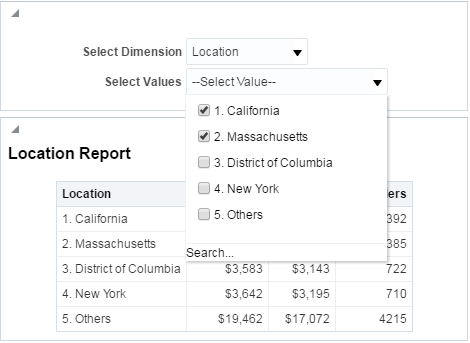
Now I am going to create a column prompt for the values.
First, I need to create a new column prompt and put in the same column formula that I used earlier in my report. I can do that by clicking on the fx icon and pasting in the column formula.
Essentially what I am doing is making the column values populate for the prompt by using the same case statement definitions and they will also change depending on the value selected in the prompt we created previously.
For the choice list of values, I can simply leave the default of All Column Values. Since the values will dynamically change depending on the initial prompt value in the variable prompt, it will only show values corresponding to each selection.
I do not need to define a default selection because I set the default values in the two filters I created in my report.
Finally, all that is left to do is define the pv_select_value presentation variable I defined for the filter of the case statement column in the report. This is how I will get all of the values to be shown for each initial prompt selection and also how I will select individual values. The default values will be passed into the filter via the pv_select_value presentation variable initially which will prompt all the values to be shown and then individual selections will be passed in the same way.
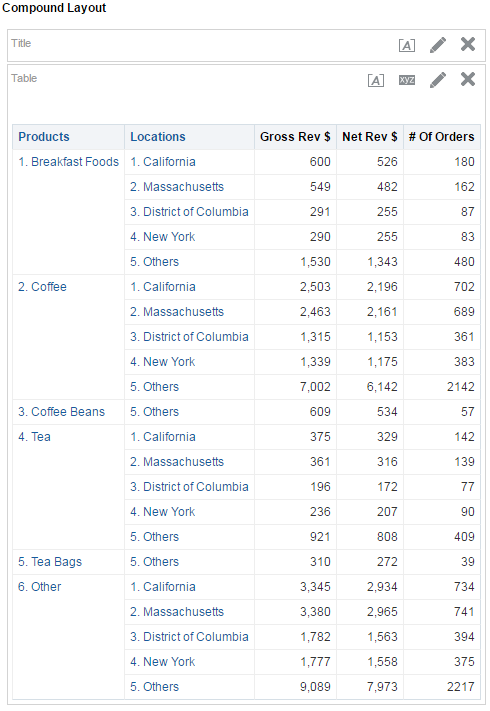
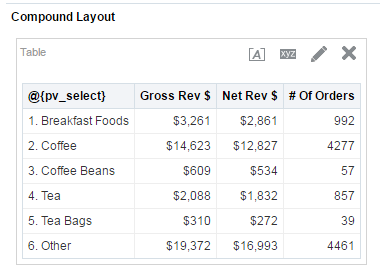
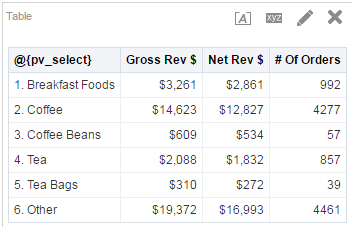
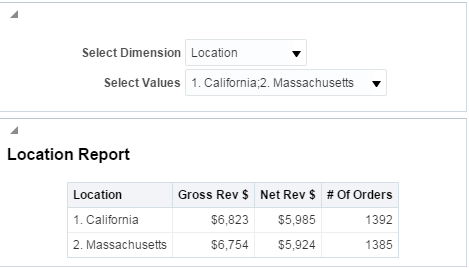
Here are the results when placed on the dashboard.

So that concludes part 1 of Demystification of Variables. Please feel free to ask questions or leave me a comment! In part 2, I am going to talk about using Repository, System and Presentation Variables to make reports dynamic for any series of time. Until next time.