Odi2Package tool - auto-generates ODI Packages

Introducing Odi2Package
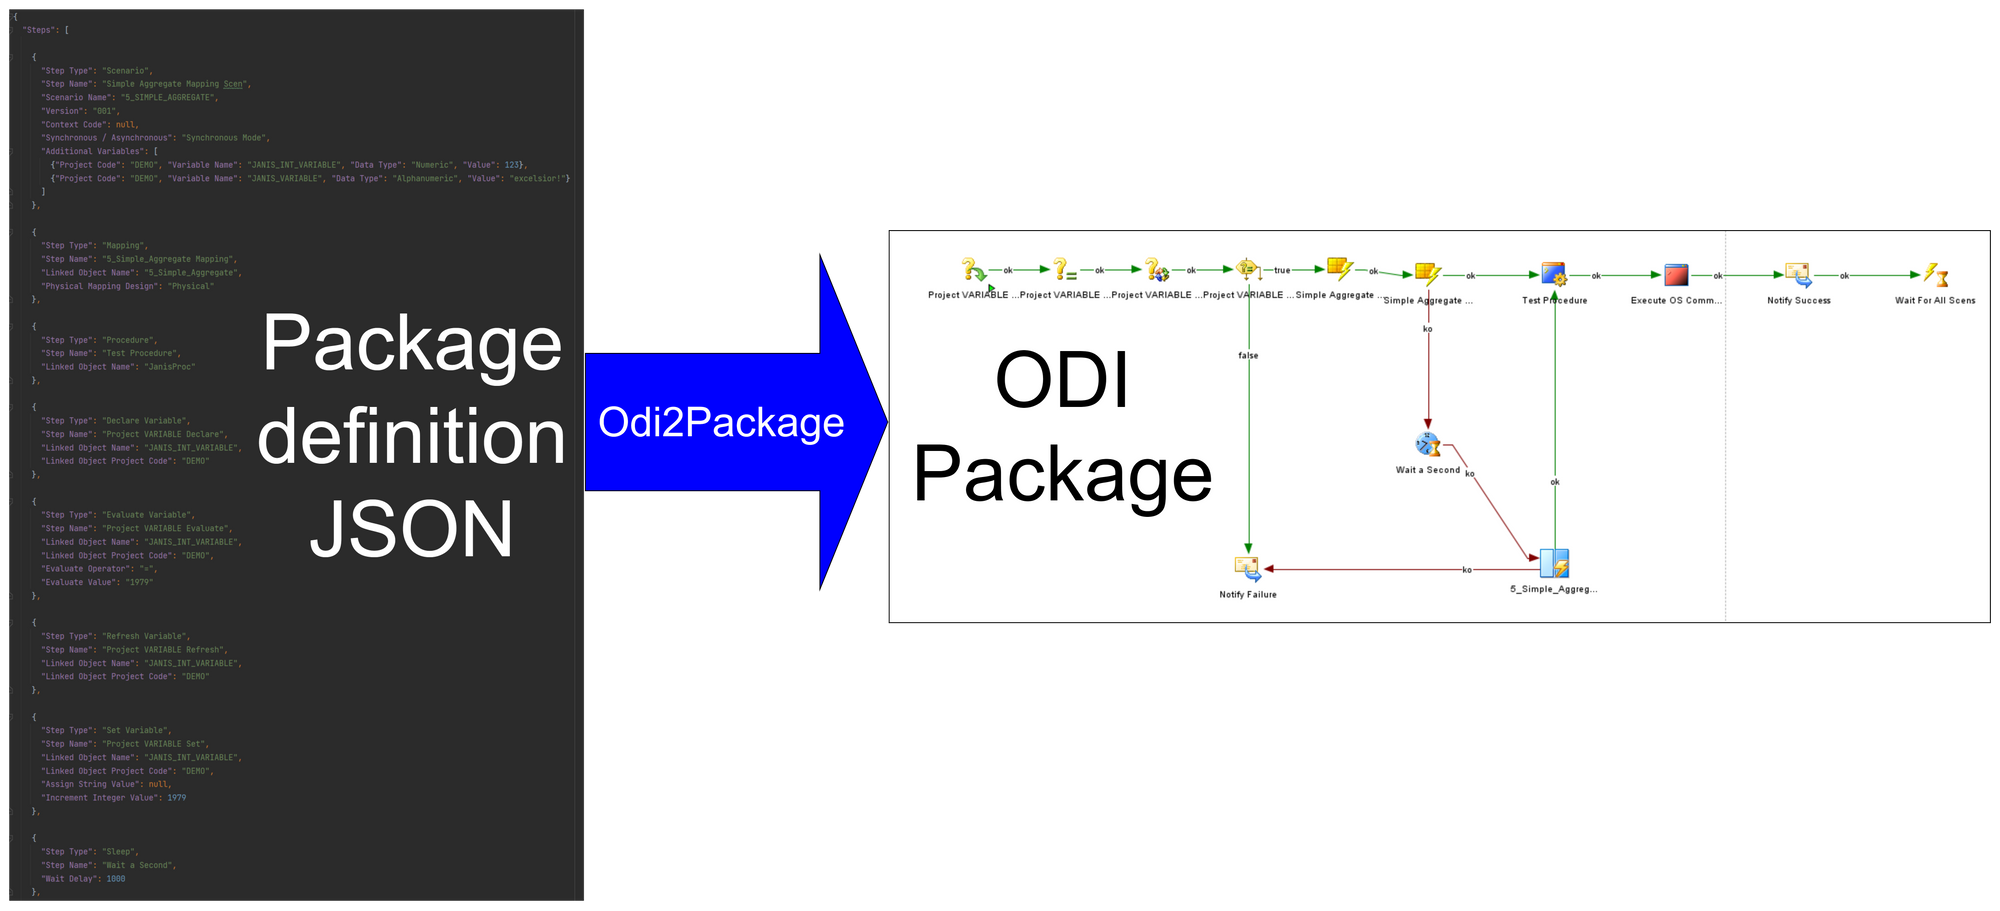
We have added a new tool to our arsenal - Odi2Package. It auto-generates ODI Packages based on a template.
In combination with our Sql2Odi tool, we are now one step closer to the utopian dream of generating ETL straight from Low-level Design. Generating DDL statements (CREATE TABLE, CREATE INDEX, CREATE VIEW, etc.) from a data model design, usually a spreadsheet, is usually the first step towards that. Our second step beyond that was our Sql2Odi tool that converts SELECT (and WITH) statements into ODI Mappings. We have just taken the next step - we have automated ODI Package generation.
Generating ODI Repository content is easy once you have become comfortable with calling ODI SDK from a Groovy script. In fact, creating a Package via the SDK is way easier than a Mapping. The biggest challenge for us was to design a metadata layer that defines what Repository content needs to be created, is flexible and is easier and faster to use than creating Packages in ODI Studio. Our goal was never to replace Package creation in ODI Studio, which remains the tool of choice for unique, one-off Package creation. However, when there is a requirement for a significant number of Packages to be created that follow a similar design pattern (e.g. extracting tables from an OLTP source), that is where our Odi2Package tool comes in.
Auto-generating Repository content not only accelerates the development process, ensures 100% consistency across all generated entity instances (meaning less unit testing) but also allows for quick changes and full regeneration of all auto-generated content with one press of a button. Imagine your architect asking for a change to be implemented in all 300 of your source extract Packages - when using Odi2Package, you could change the template and regenerate all 300 Packages and test one (ok, maybe a couple) of them in less than half an hour.
Making Odi2Package Work
Telling the Sql2Odi tool what to do was easy - our bread and butter, the SELECT statement, was the obvious first choice for defining Mapping behaviour. In case of an ODI Package, Control-flow Diagram (CFD) comes to mind. However, as discussed above, the most likely use for the Odi2Package will be generation of multiple Packages based on a single design and a CFD is not the best option for that. Therefore a decision was made to define the Package design template in JSON format and the parts in it, which will be unique to each individual Package, will be replaced with <TAGS>. Each individual Package will have values defined for all the tags, thus ensuring minimal effort to customise each Package. (Generating its own template for each Package is an option, but unlikely to be a practical one.)
In a Package template, we need to define Package Steps (Scenario calls, Variable Declaration, Variable Refresh, Sending Emails, etc.), Links between Steps and specify which Step is the first one.
Let us look examples of Step definitions and how to use tags in them:
    {
      "Step Type": "Scenario",
      "Step Name": "Extract Mapping Scen - <DEMO__STEP_NAME>",
      "Scenario Name": <DEMO__SCENARIO_NAME>,
      "Version": "001",
      "Context Code": null,
      "Synchronous / Asynchronous": "Synchronous Mode",
      "Additional Variables": [
        {"Project Code": "DEMO", "Variable Name": "DEMO_INT_VARIABLE", "Data Type": "Numeric", "Value": <DEMO__INT_VALUE>},
        {"Project Code": "GLOBAL", "Variable Name": "DEMO_STR_VARIABLE", "Data Type": "Alphanumeric", "Value": "<DEMO__STRING_VALUE>"}
      ]
    }
In the above example we choose to parameterise the name of the Scenario Step (actually - only a part of it), the name of the Scenario to be called and the two input Variable values.
Variable Declaration, Refresh, Set and Evaluation are as common in Packages as Scenario calls:
    {
      "Step Type": "Evaluate Variable",
      "Step Name": "Project VARIABLE Evaluate",
      "Linked Object Name": "DEMO_INT_VARIABLE",
      "Linked Object Project Code": "DEMO",
      "Evaluate Operator": "=",
      "Evaluate Value": "<DEMO__EVALUATE_VALUE>"
    }
In the above example we only parameterise the value to evaluate against but could have parameterised the name of the variable as well. (In fact, the whole JSON block could be replaced with a tag.)
Sending email is another example, where we can use tags to customise the behaviour:
    {
      "Step Type": "Email",
      "Step Name": "Notify Failure",
      "Mail Server": "127.0.0.1",
      "Port": "80",
      "Protocol": "smtp",
      "Use Authentication": "Yes",
      "Username for Authentication": "<DEMO__EMAIL_LOGIN>",
      "Password for Authentication": "<DEMO__EMAIL_PASSWORD>",
      "From": "DataLoad-Notification",
      "To": [<DEMO__SUCCESS_EMAIL_RECIPIENTS>],
      "Cc": [],
      "Subject": "Data Load Failed",
      "Message Body": "Data Load failed, #DEMO.REC_COUNT records failed to load."
    }
Once the Steps are defined, we are pretty much there. Next we need to define Links between Steps and that is quite easy:
  "Links": [
    {"type":  "ok", "from": "Project VARIABLE Evaluate", "to": "Extract Mapping Scen - <DEMO__STEP_NAME>"},
    {"type":  "ko", "from": "Extract Mapping Scen - <DEMO__STEP_NAME>", "to": "Notify Failure"},
    ...
  ]
In Link definitions, just like in those for Steps, we can use tags. We reference both the Steps from which we draw arrows and the ones the arrows point to by name. One more value there is the Link type: either "ok" (success) or "ko" (failure).
Now the last thing left is to define the first Step:
"First Step Name": "Project VARIABLE Declare"Our JSON template that defines ODI Package content is now ready. Next we need to set up the content of the Odi2Package's metadata tables.
We start by adding the newly created template to the Templates table, name it TEST_TEMPLATE. In the Notes section I have listed described the tags that are used in the template.

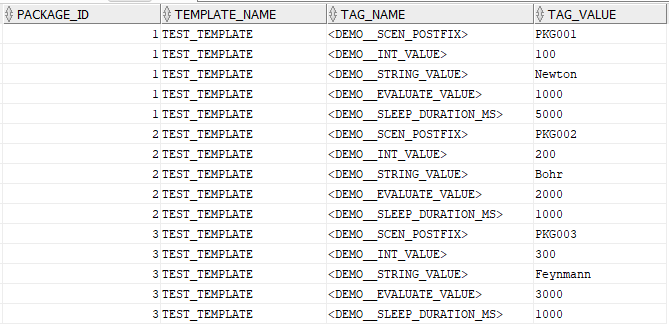
To generate 3 Packages based on a template that uses 5 tags, we need 15 records in the Package Tags metadata table. When the template is processed for each Package to be generated, tags will be replaced with these values:
In the main Package metadata table we will have one record per Package to be created (shown here are 3 records but split in two because of the number of columns):


Our setup is now done.
Using Odi2Package
When the above metadata is defined, the Odi2Package Groovy script can be opened and run in ODI Studio. Run time depends on whether Package Scenarios are being created - when skipping Scenario creation, I am generating about 5 Packages a second on my test environment. With Scenario creation, a single Package creation typically takes a bit more than a second.
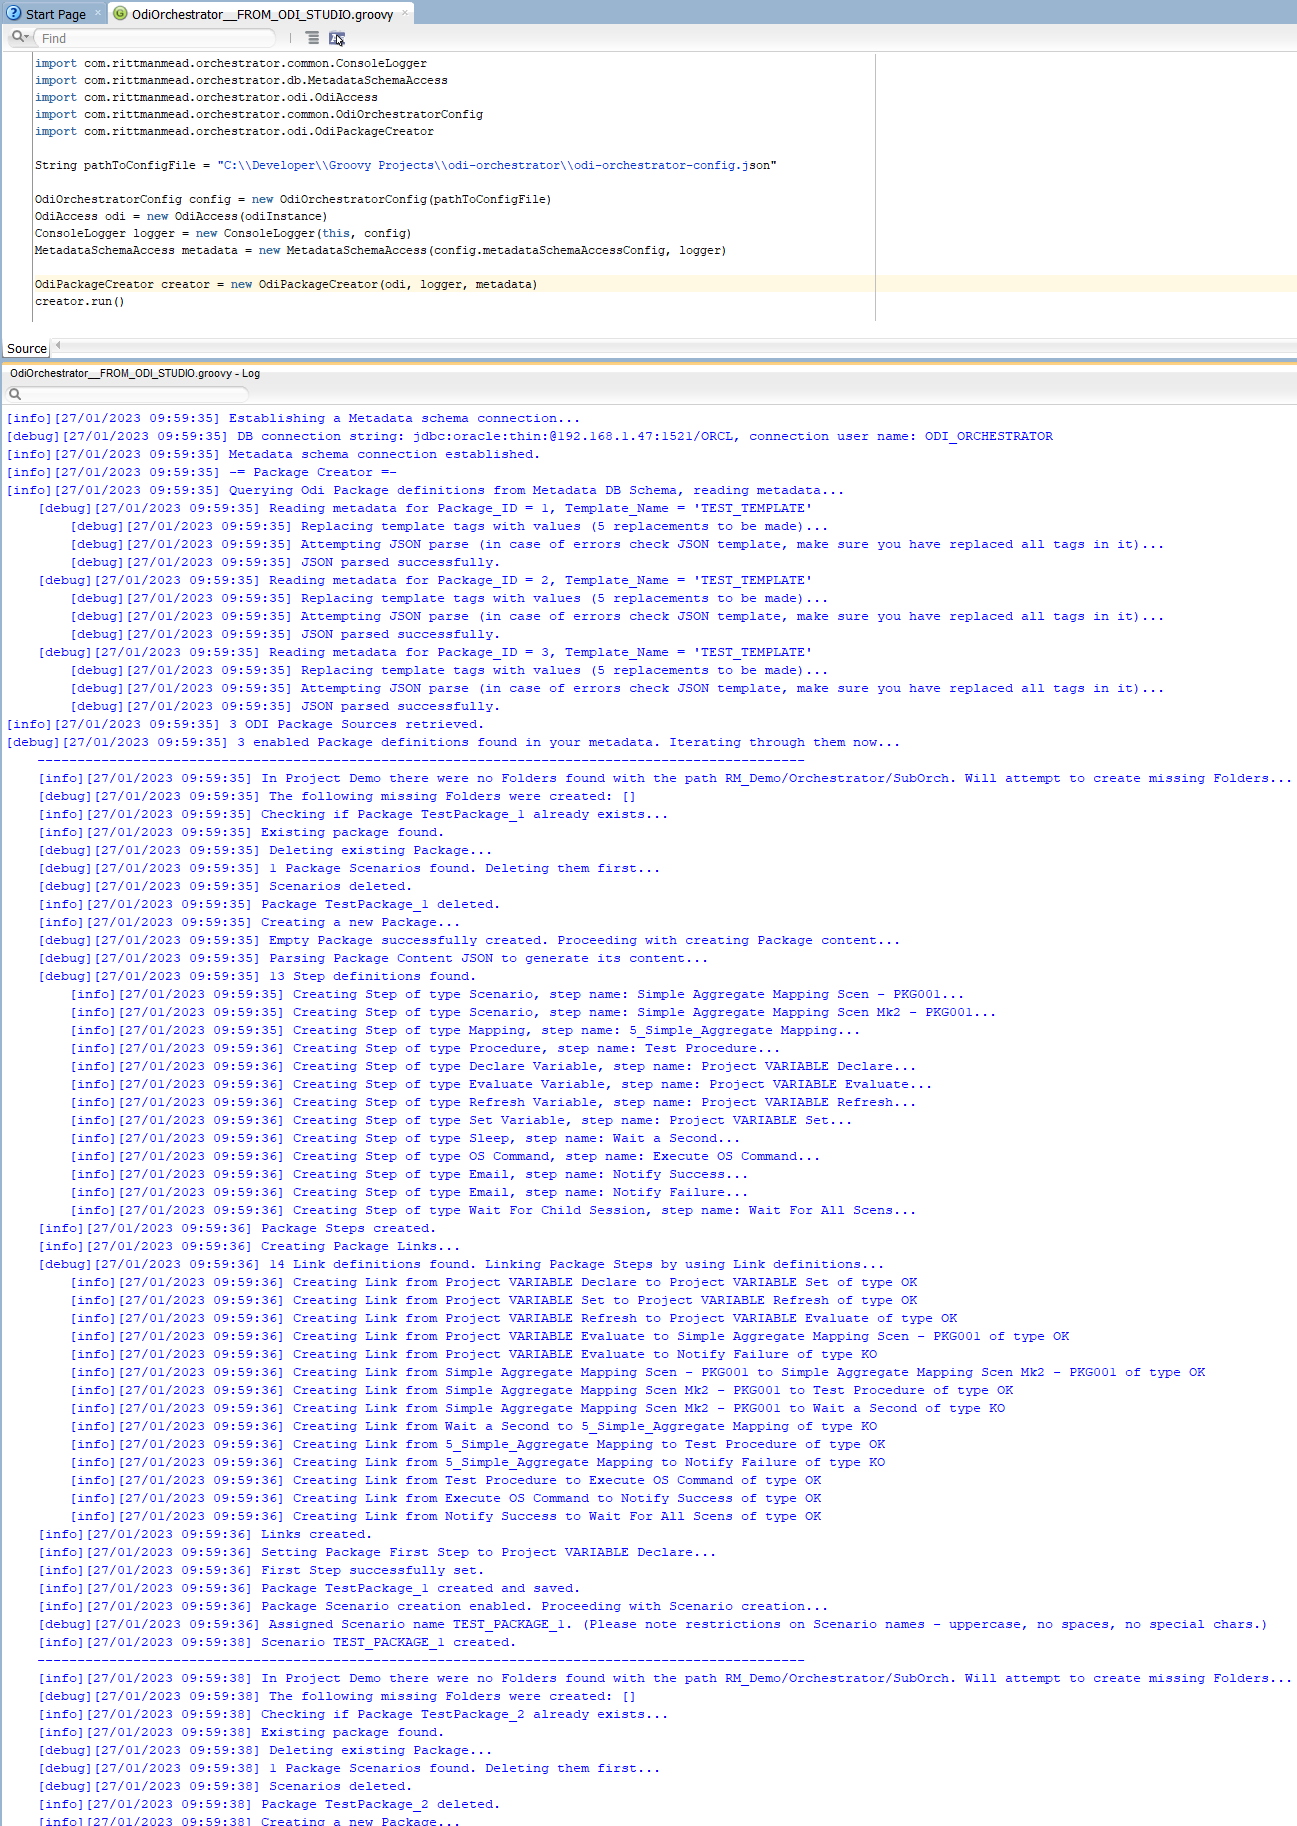
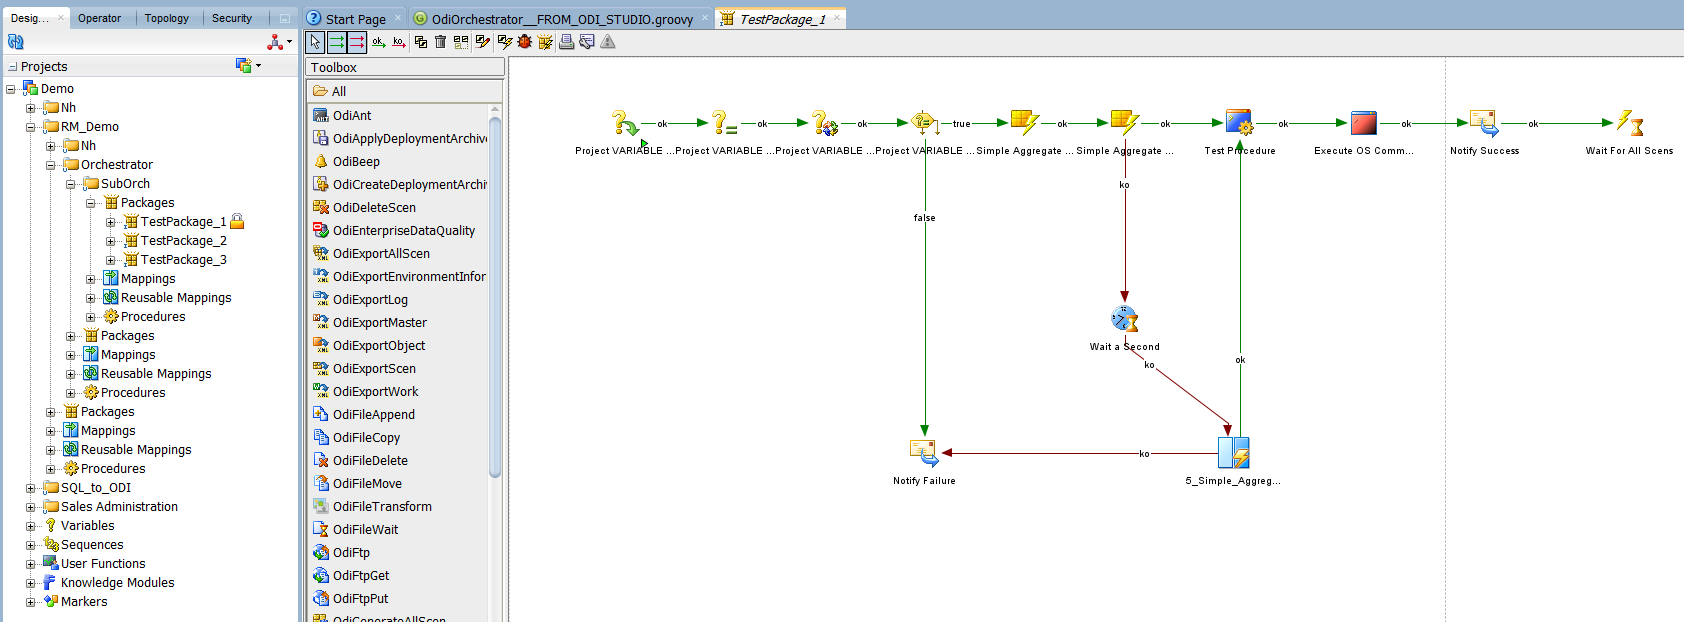
It is as simple as that! In case of a successful run, we can see the newly generated Packages and their Scenarios in our Work Repository.
With tools like Sql2Odi and Odi2Package, the need to manually implement the same Mapping and Package for hundreds of source tables can be reduced or even eliminated, allowing us to focus on the design. Tools like these can enable a truly agile ODI implementation, where frequent changes to design do not come at a big cost.