Oracle BI Apps 11.1.1.7.1 – GoldenGate Integration - Part 3: SDS and Parameter File Setup

This is the third post in the four part series on Oracle BI Applications 11.1.1.7.1 and Oracle GoldenGate 11g. Last time, we made it through the initial setup of GoldenGate and created the necessary schemas for the Source Dependent Data Store (SDS) and GoldenGate on the source and target. Now it's time to configure Oracle Business Intelligence Applications (OBIA) to use the SDS schema, setup the tables in the SDS schema, and generate the GoldenGate parameter files.
Enable the SDS
Set the SDS Parameter
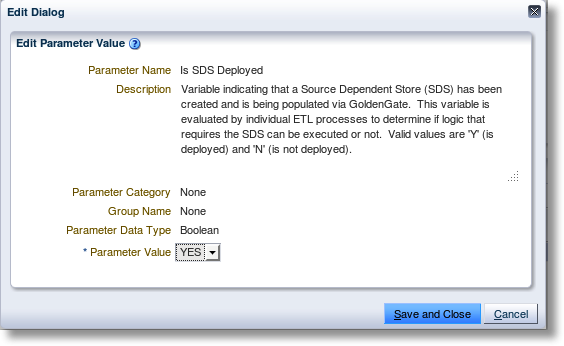
The first step in configuration is to enable the SDS in the OBIA Configuration Manager. This indicator, set for each source instance, will be used throughout the Oracle Data Integrator (ODI) ETL processing to determine whether to connect directly to the source or to the SDS. Choose "Manage Data Load Parameters" from the Tasks list. In the Manage Data Load Parameters window, select the appropriate Source Instance (in this example we are using PeopleSoft Campus Solutions - so PS_CS is chosen) and search for the Parameter name IS_SDS_DEPLOYED.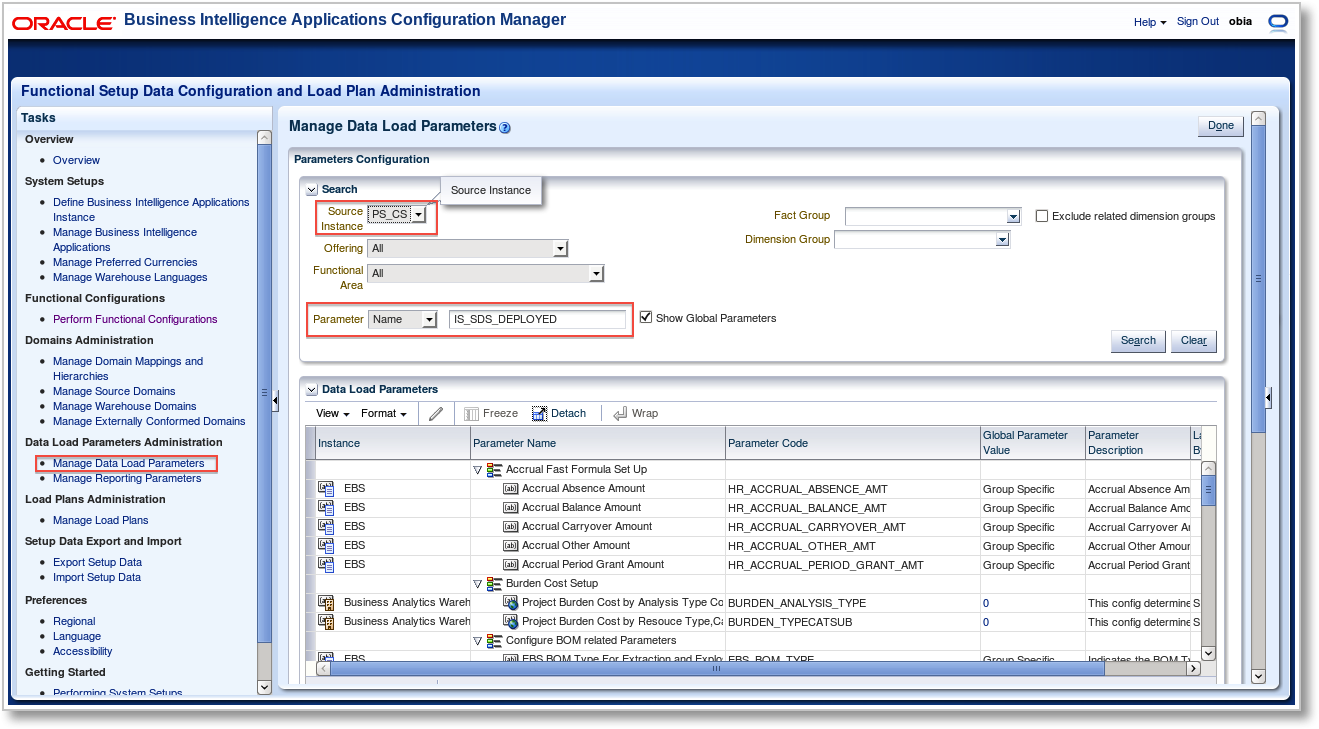
Create the SDS Physical Schema
Now we need to create the Physical Schema for the SDS schema in the Oracle Data Integrator Topology metadata. Open ODI Studio and select the Topology Navigator. Under Physical Architecture, drill-down into Oracle and find the Data Server that corresponds to the data warehouse target for OBIA. Right-click and choose "New Physical Schema". Set both the Schema and Work Schema values to the SDS database schema that we created in the previous post.

Next, click on the FlexFields tab. We need to set the DATASOURCE_NUM_ID FlexField to match that of the source instance for which the SDS schema is a target. If you recall from the previous post, the DataSource Number, or DSN, was set to 20 for my OBIA setup of the PeopleSoft Campus Solutions source instance. Set this value to the DSN and save the Physical Schema.
How It Works...
It's great that once the SDS parameter is set in the Configuration Manager and the SDS schema is created in ODI, both steps we just completed, the Load Plans will just "know" to extract data from the SDS rather than the source itself. But I like to dig a little deeper to find out what's really going on behind the scenes - especially when it comes to Oracle Data Integrator.Thinking about how I would implement this feature in ODI, I first started looking for an ODI Variable...and sure enough, I found one named IS_SDS_DEPLOYED. The Variable refresh code calls a procedure which accepts a DSN and returns a true or false. Next, I checked the Loading Knowledge Module used in the Interfaces that extract from PeopleSoft Campus Solutions, "LKM BIAPPS SQL to Oracle (Multi Transport)", as this is where the connection to the source is made during execution. In the list of LKM steps is one titled "Get SDS Schema". The code checks to ensure the IS_SDS_DEPLOYED variable is true, then runs a SQL query against the ODI repository to lookup the SDS schema name based on the DSN in the physical schema flexfield.
String sqlSelSDSSchema="SELECT PS.SCHEMA_NAME ,PS.I_PSCHEMA, PS.EXT_NAME , FFV.SHORT_TXT_VALUE "
+ " FROM SNP_PSCHEMA PS INNER JOIN SNP_FF_VALUEM FFV ON FFV.I_INSTANCE = PS.I_PSCHEMA "
+ " INNER JOIN SNP_FLEX_FIELD FF ON FF.FF_CODE=FFV.FF_CODE AND FF.I_OBJECTS=FFV.I_OBJECTS "
+ " INNER JOIN SNP_CONNECT C ON C.I_CONNECT =PS.I_CONNECT "
+ " WHERE FF.FF_CODE='DATASOURCE_NUM_ID' AND FF.I_OBJECTS=1500 "
+ " AND C.CON_NAME='" + tgtDataServerName + "' and FFV.SHORT_TXT_VALUE='" + "#DATASOURCE_NUM_ID" + "'";
The SDS schema is then used in the next step, "Create SDS work view", to generate the C$ view code against the SDS schema rather than the source instance schema. A bit of Java pattern matching is used on the standard "odiRef.getFrom()" substitution API call to perform the replacement.
String fromClause=odiRef.getFrom();
String sdsSchema = "[_SDS_]";

Pattern pattern = Pattern.compile("(=snpRef.getObjectName([^,]*),\s*\x22([^,]*)\x22,([^\)]*)\))");
Matcher matcher = pattern.matcher(fromClause);

String squote = new Character((char)34).toString();
String replacefromClause = matcher.replaceAll("out.print("+squote + sdsSchema  +".$3 " + squote + ");");

//Replace for Qualify function since this runs on target
pattern = Pattern.compile("(\bQUALIFY\(([^\)\s]*)\))");
matcher = pattern.matcher(replacefromClause);

replacefromClause = matcher.replaceAll(sdsSchema  +".$2 “);
%>

create or replace view  <%=odiRef.getTable("L", "COLL_NAME", "A")%> as
…
from     <%=replacefromClause.replace("[_SDS_]","<$=sdsSchemaName$>")%>
…
It looks as though the variable is also used many other places, but now we know exactly how the ODI Interfaces used in the Load Plans for OBIA's extract can so easily switch to using the Source Dependent Data Store. The customized code written in ODI specifically for the SDS is definitely worth a look.
Generate and Execute SDS DDL Scripts
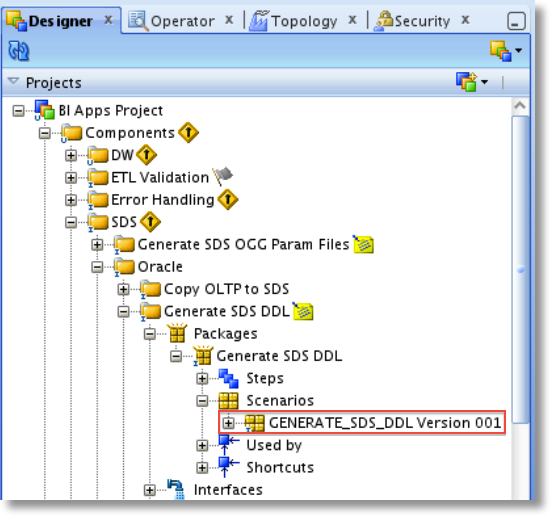
Now we have Oracle BI Apps configured to use the SDS schema as a source rather than the actual source. GoldenGate will keep the SDS schema up-to-date with the latest source changes in real-time. Next, we will execute an ODI Procedure to generate the DDL scripts for the SDS schema tables and indexes, as well as the grants on the source tables for the GoldenGate user. I like how the OBIA developers made this easy. The only way to make it even simpler would be to call this procedure from the Configuration Manager (maybe in the next release?).To execute the Scenario, open ODI Studio, go to the Designer Navigator, and in the Projects browse to BI Apps Project > Components > SDS > Oracle > Generate SDS DDL. Expand Packages > Generate SDS DDL > Scenarios and you will find Scenario "GENERATE_SDS_DDL Version 001".
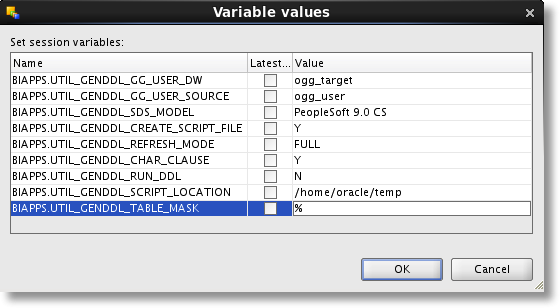
- BIA_SDS_Schema_Table_DDL_<session_no>.sql and BIA_SDS_Schema_Index_DDL_<session_no>.sql, which can now be executed against the SDS schema to create the SDS tables and apply indexes
- BIA_SDS_Schema_Source_Grants_DDL_<session_no>.sql, which can be run against the source schema to apply grants to the source GoldenGate user
Generate the Initial Load Script
The OBIA-GoldenGate documentation describes the setup and configuration of the initial load process next. But, since I plan on doing this a slightly different way, I'll hold off on describing it until the next post.Generate GoldenGate Parameter Files and Perform Configuration
Generate Parameter Files
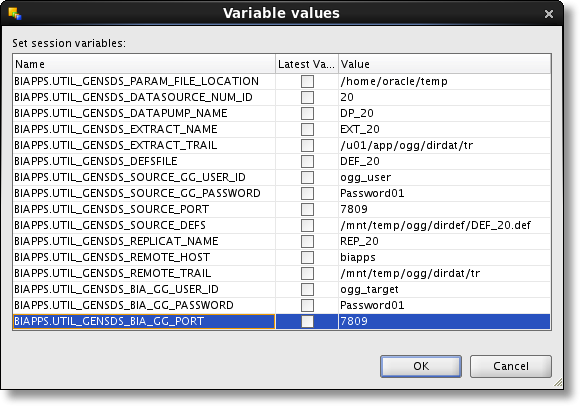
Finally we're at the point of generating the parameter files for the GoldenGate extract, pump, and replicat processes that we setup in the previous post. Here is where we might expect to see the "JKM Oracle to Oracle Consistent (OGG)" Journalizing Knowledge Module and the ODI CDC Framework put to use...but, that is not the case. For starters, the CDC Framework is not a part of the OBIA implementation for change data capture. OBIA developers did it a different way, by comparing the "Last Extract Date" to the "Last Update Date" for new and changed records, always pulling from the fully replicated table in the SDS. Next, they created an ODI Procedure to generate the parameter files rather than using a JKM.
GoldenGate Configuration
To begin our configuration, let's first edit our extract, pump, and replicat parameter files to add any options or commands necessary, such as trail file encryption. This can be done using the local system text editor or via GGSCI (the GoldenGate Software Command Interpreter). If there are no special options to add to the parameter files, they will work just fine without any modification.Next, we'll add the table-level supplemental logging on the source by running the ADD_TRANDATA.txt script file. This script file is just a list of GoldenGate commands that can be executed as a batch by calling the obey command. Log-in to GGSCI and run the following:
GGSCI (pssrc) 3> obey ADD_TRANDATA.txt
Once completed, remember to revoke the ALTER TABLE privilege from the source GoldenGate user.
REVOKE ALTER ANY TABLE FROM ogg_user;
The final piece of configuration is to generate the source definitions file. This file provides the GoldenGate replicat process on the target the definitions of the source tables so it can interpret the table and column mappings in the replicat parameter file. The reason it must be used for replication to the SDS is because there are 3 additional columns mapped to each target table.
CDC$_RPL_LAST_UPDATE_DATE = @DATENOW (),
CDC$_SRC_LAST_UPDATE_DATE = @GETENV ("GGHEADER", "COMMITTIMESTAMP"),
CDC$_DML_CODE = "I" --"U" or "D"
The replicat last update date (CDC$_RPL_LAST_UPDATE_DATE) will be the timestamp when the record is updated in the target table. The source last update date (CDC$_SRC_LAST_UPDATE_DATE) is the timestamp when the change occurred in the source. And finally the DML code (CDC$_DML_CODE) represents the type of change; insert, update, or delete.
To generate the source definitions file, exit GGSCI and run the following command:
./defgen paramfile ./dirprm/DEFGEN.prm
Once completed, copy the source definitions file from the source server to the target server dirdef directory.
We've now configured the GoldenGate parameter files on both the source and target. In the next, and final, post in the series, I'll discuss the initial load process and we will finally start the source to SDS GoldenGate replication.
Oracle BI Apps 11.1.1.7.1 – GoldenGate Integration
1. Introduction
2. Setup and Configuration
3. SDS and Parameter File Setup
4. Initial Load and Replication