Linux cluster sysadmin -- SSH keys

In this short series of blog posts I'm going to take a look at a few very useful tools that can make your life as the sysadmin of a cluster of Linux machines easier. This may be a Hadoop cluster, or just a plain simple set of 'normal' machines on which you want to run the same commands and monitoring.
To start with, we're going to use the ever-awesome ssh keys to manage security on the cluster. After that we'll look at executing the same command across multiple machines at the same time using PDSH, and then monitoring OS metrics across a cluster with colmux.
In a nutshell, ssh keys enable us to do password-less authentication in a secure way. You can find a detailed explanation of them in a previous post that I wrote, tips and tricks for OBIEE Linux sysadmin. Beyond the obvious time-saving function of not having to enter a password each time we connect to a machine, having SSH keys in place enable the use of the tools we discuss later, pdsh and colmux.
Working with SSH keys involves taking the public key from a pair, and adding that to another machine in order to allow the owner of the pair’s private key to access that machine. What we’re going to do here is generate a unique key pair that will be used as the identity across the cluster. So each node will have a copy of the private key, in order to be able to authenticate to any other node, which will be holding a copy of the public key (as well as, in turn, the same private key).
In this example I’m going to use my own client machine to connect to the cluster. You could easily use any of the cluster nodes too if a local machine would not be appropriate.
As a side-note, this is another reason why I love the fact that Rittman Mead standard-issue laptop is a MacBook, and just under the covers of Mac OS is a *nix-based command-line meaning that a lot of sysadmin work can be done natively without needing additional tools that you would on Windows (e.g. PuTTY, WinSCP, Pageant, etc etc).
SSH key strategy
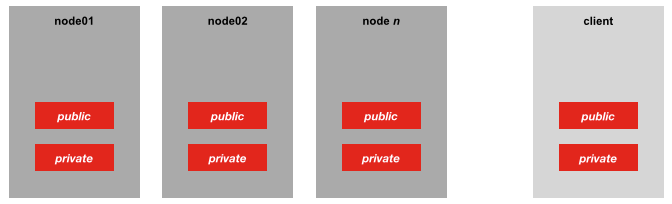
We’ve several ways we could implement the SSH keys. Because it’s a purely sandbox cluster, I could use the same SSH key pair that I generate for the cluster on my machine too, so the same public/private key pair is distributed thus:
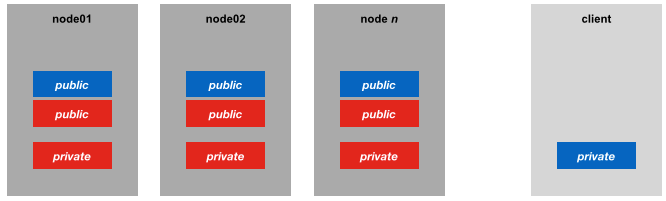
If we wanted a bit more security, a better approach might be to distribute my personal SSH key’s public key across the cluster too, and leave the cluster’s private key to truly identify cluster nodes alone. An additional benefit of this approach is that is the client does not need to hold a copy of the cluster’s SSH private key, instead just continuing to use their own.
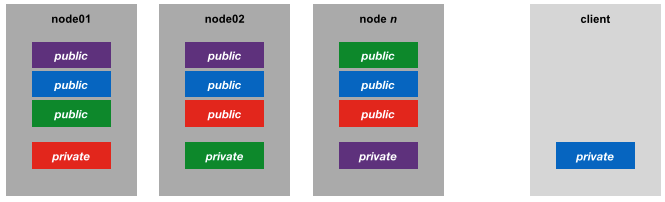
For completeness, the extreme version of the key strategy would be for each machine to have its own ssh key pair (i.e. its own security identity), with the corresponding public keys distributed to the other nodes in the cluster:
But anyway, here we’re using the second option - a unique keypair used across the cluster and the client’s public ssh key distributed across the cluster too.
Generating the SSH key pair
First, we need to generate the key. I’m going to create a folder to hold it first, because in a moment we’re going to push it and a couple of other files out to all the servers in the cluster and it’s easiest to do this from a single folder.
mkdir /tmp/rnmcluster02-ssh-keys
Note that in the ssh-keygen command below I’m specifying the target path for the key with the -f argument; if you don’t then watch out that you don’t accidentally overwrite your own key pair in the default path of ~/.ssh.
The -q -N "" flags instruct the key generation to use no passphrase for the key and to not prompt for it either. This is the lowest friction approach (you don’t need to unlock the ssh key with a passphrase before use) but also the least secure. If you’re setting up access to a machine where security matters then bear in mind that without a passphrase on an ssh key anyone who obtains it can therefore access any machine to which the key has been granted access (i.e. on which its public key has been deployed).
ssh-keygen -f /tmp/rnmcluster02-ssh-keys/id_rsa -q -N ""
This generates in the tmp folder two files - the private and public (.pub) keys of the pair:
robin@RNMMBP ~ $ ls -l /tmp/rnmcluster02-ssh-keys
total 16
-rw-------  1 robin  wheel  1675 30 Nov 17:28 id_rsa
-rw-r--r--  1 robin  wheel   400 30 Nov 17:28 id_rsa.pub
Preparing the authorized_keys file
Now we’ll prepare the authorized_keys file which is where the public SSH key of any identity permitted to access the machine is stored. Note that each user on a machine has their own authorized_keys file, in ~/.ssh/. So for example, the root user has the file in /root/.ssh/authorized_keys and any public key listed in that file will be able to connect to the server as the root user. Be aware the American [mis-]spelling of “authorized” - spell it [correctly] as “authorised” and you’ll not get any obvious errors, but the ssh key login won’t work either.
So we’re going to copy the public key of the unique pair that we just created for the cluster into the authorized_keys file. In addition we will copy in our own personal ssh key (and any other public key that we want to give access to all the nodes in the cluster):
cp /tmp/rnmcluster02-ssh-keys/id_rsa.pub /tmp/rnmcluster02-ssh-keys/authorized_keys
# [optional] Now add any other keys (such as your own) into the authorized_keys file just created
cat ~/.ssh/id_rsa.pub >> /tmp/rnmcluster02-ssh-keys/authorized_keys
# NB make sure the previous step is a double >> not > since the double appends to the file, a single overwrites.
Distributing the SSH artefacts
Now we’re going to push this set of SSH files out to the .ssh folder of the target user on each node, which in this case is the root user. From a security point of view it’s probably better to use a non-root user for login and then sudo as required, but we’re keeping things simple (and less secure) to start with here. So the files in our folder are:
id_rsa– the private key of the key pairid_rsa.pub– the public key of the key pair. Strictly speaking this doesn’t need distributing to all nodes, but it’s conventional and handy to hold it alongside the private key.authorized_keys– this is the file that the sshd daemon on each node will look at to validate an incoming login request’s offered private key, and so needs to hold the public key of anyone who is allowed to access the machine as this user.
To copy the files we’ll use scp, but how you get them in place doesn’t really matter so much, so long as they get to the right place:
scp -r /tmp/rnmcluster02-ssh-keys root@rnmcluster02-node01:~/.ssh
At this point you’ll need to enter the password for the target user, but rejoice! This is the last time you’ll need to enter it as subsequent logins will be authenticated using the ssh keys that you’re now configuring.
Run the scp for all nodes in the cluster. If you’ve four nodes in the cluster your output should look something like this:
$ scp -r /tmp/rnmcluster02-ssh-keys/ root@rnmcluster02-node01:~/.ssh
root@rnmcluster02-node01's password:
authorized_keys                                                  100%  781     0.8KB/s   00:00
id_rsa                                                           100% 1675     1.6KB/s   00:00
id_rsa.pub                                                       100%  400     0.4KB/s   00:00
$ scp -r /tmp/rnmcluster02-ssh-keys/ root@rnmcluster02-node02:~/.ssh
Warning: Permanently added the RSA host key for IP address '172.28.128.7' to the list of known hosts.
root@rnmcluster02-node02's password:
authorized_keys                                                  100%  781     0.8KB/s   00:00
id_rsa                                                           100% 1675     1.6KB/s   00:00
id_rsa.pub                                                       100%  400     0.4KB/s   00:00
$ scp -r /tmp/rnmcluster02-ssh-keys/ root@rnmcluster02-node03:~/.ssh
root@rnmcluster02-node03's password:
authorized_keys                                                  100%  781     0.8KB/s   00:00
id_rsa                                                           100% 1675     1.6KB/s   00:00
id_rsa.pub                                                       100%  400     0.4KB/s   00:00
$ scp -r /tmp/rnmcluster02-ssh-keys/ root@rnmcluster02-node04:~/.ssh
root@rnmcluster02-node04's password:
authorized_keys                                                  100%  781     0.8KB/s   00:00
id_rsa                                                           100% 1675     1.6KB/s   00:00
id_rsa.pub                                                       100%  400     0.4KB/s   00:00
Testing login authenticated through SSH keys
The moment of truth. From your client machine, try to ssh to each of the cluster nodes. If you are prompted for a password, then something is not right – see the troubleshooting section below.
If you put your own public key in authorized_keys when you created it then you don’t need to specify which key to use when connecting because it’ll use your own private key by default:
robin@RNMMBP ~ $ ssh root@rnmcluster02-node01
Last login: Fri Nov 28 17:13:23 2014 from 172.28.128.1


[root@localhost ~]#
There we go – logged in automagically with no password prompt. If we’re using the cluster’s private key (rather than our own) you need to specify it with -i when you connect.
robin@RNMMBP ~ $ ssh -i /tmp/rnmcluster02-ssh-keys/id_rsa root@rnmcluster02-node01
Last login: Fri Nov 28 17:13:23 2014 from 172.28.128.1


[root@localhost ~]#
Troubleshooting SSH key connections
SSH keys are one of the best things in a sysadmin’s toolkit, but when they don’t work can be a bit tricky to sort out. The first thing to check is that on the target machine the authorized_keys file that does all the magic (by listing the ssh keys that are permitted to connect inbound on a host to the given user) is in place:
[root@localhost .ssh]# ls -l ~/.ssh/authorized_keys
-rw-r--r-- 1 root root 775 Nov 30 18:55 /root/.ssh/authorized_keys
If you get this:
[root@localhost .ssh]# ls -l ~/.ssh/authorized_keys
ls: cannot access /root/.ssh/authorized_keys: No such file or directory
then you have a problem.
One possible issue in this specific instance could be that the above pre-canned scp assumes that the user’s .ssh folder doesn’t already exist (since it doesn’t, on brand new servers) and so specifies it as the target name for the whole rnmcluster02-ssh-keys folder. However if it does already exist then it ends up copying the rnmcluster02-ssh-keys folder into the .ssh folder:
[root@localhost .ssh]# ls -lR
.:
total 12
-rw------- 1 root root 1675 Nov 22  2013 id_rsa
-rw-r--r-- 1 root root  394 Nov 22  2013 id_rsa.pub
drwxr-xr-x 2 root root 4096 Nov 30 18:49 rnmcluster02-ssh-keys

./rnmcluster02-ssh-keys:
total 12
-rw-r--r-- 1 root root  775 Nov 30 18:49 authorized_keys
-rw------- 1 root root 1675 Nov 30 18:49 id_rsa
-rw-r--r-- 1 root root  394 Nov 30 18:49 id_rsa.pub
[root@localhost .ssh]#
To fix this simply move the authorized_keys from rnmcluster02-ssh-keys back into .ssh:
[root@localhost .ssh]# mv ~/.ssh/rnmcluster02-ssh-keys/authorized_keys ~/.ssh/
Other frequent causes of problems are file/folder permissions that are too lax on the target user’s .ssh folder (which can be fixed with chmod -R 700 ~/.ssh) or the connecting user’s ssh private key (fix: chmod 600 id_rsa). The latter will show on connection attempts very clearly:
robin@RNMMBP ~ $ ssh -i /tmp/rnmcluster02-ssh-keys/id_rsa root@rnmcluster02-node01
@@@@@@@@@@@@@@@@@@@@@@@@@@@@@@@@@@@@@@@@@@@@@@@@@@@@@@@@@@@
@         WARNING: UNPROTECTED PRIVATE KEY FILE!          @
@@@@@@@@@@@@@@@@@@@@@@@@@@@@@@@@@@@@@@@@@@@@@@@@@@@@@@@@@@@
Permissions 0777 for '/tmp/rnmcluster02-ssh-keys/id_rsa' are too open.
It is required that your private key files are NOT accessible by others.
This private key will be ignored.
bad permissions: ignore key: /tmp/rnmcluster02-ssh-keys/id_rsa
Another one that has bitten me twice over time – and that eludes the troubleshooting I’ll demonstrate in a moment – is that SELinux gets stroppy about root access using ssh keys. I always just take this as a handy reminder to disable selinux (in /etc/selinux/config, set SELINUX=disabled), having never had cause to leave it enabled. But, if you do need it enabled you’ll need to hit the interwebs to check the exact cause/solution for this problem.
So to troubleshoot ssh key problems in general do two things. Firstly from the client side, specify verbosity (-v for a bit of verbosity, -vvv for most)
ssh -v -i /tmp/rnmcluster02-ssh-keys/id_rsa root@rnmcluster02-node01
You should observe ssh trying to use the private key, and if the server rejects it it’ll fall back to any other ssh private keys it can find, and then password authentication:
[...]
debug1: Offering RSA public key: /tmp/rnmcluster02-ssh-keys/id_rsa
debug1: Authentications that can continue: publickey,gssapi-keyex,gssapi-with-mic,password
debug1: Next authentication method: password
Quite often the problem will be on the server side, so assuming that you can still connect to the server (eg through the physical console, or using password authentication) then go and check /var/log/secure where you’ll see all logs relating to attempted connections. Here’s the log file corresponding to the above client log, where ssh key authentication is attempted but fails, and then password authentication is used to successfully connect:
Nov 30 18:15:05 localhost sshd[13156]: Authentication refused: bad ownership or modes for file /root/.ssh/authorized_keys
Nov 30 18:15:15 localhost sshd[13156]: Accepted password for root from 172.28.128.1 port 59305 ssh2
Nov 30 18:15:15 localhost sshd[13156]: pam_unix(sshd:session): session opened for user root by (uid=0)
Now we can see clearly what the problem is – “bad ownership or modes for file /root/.ssh/authorized_keys”.
The last roll of the troubleshooting dice is to get sshd (the ssh daemon that runs on the host we’re trying to connect to) to issue more verbose logs. You can either set LogLevel DEBUG1 (or DEBUG2, or DEBUG3) in /etc/ssh/sshd_config and restart the ssh daemon (service sshd restart), or you can actually run a (second) ssh daemon from the host with specific logging. This would be appropriate on a multi-user server where you can’t just go changing sshd configuration. To run a second instance of sshd you’d use:
/usr/sbin/sshd -D -d -p 2222
You have to run sshd from an absolute path (you’ll get told this if you try not to). The -D flag stops it running as a daemon and instead runs interactively, so we can see easily all the output from it. -d specifies the debug logging (-dd or -ddd for greater levels of verbosity), and -p 2222 tells sshd to listen on port 2222. Since we’re doing this on top of the existing sshd, we obviously can’t use the default ssh port (22) so pick another port that is available (and not blocked by a firewall).
Now on the client retry the connection, but pointing to the port of the interactive sshd instance:
ssh -v -p 2222 -i /tmp/rnmcluster02-ssh-keys/id_rsa root@rnmcluster02-node01
When you run the command on the client you should get both the client and host machine debug output go crackers for a second, giving you plenty of diagnostics to pore through and analyse the ssh handshake etc to get to the root of the issue.
Hopefully you’ve now sorted your SSH keys, because in the next article we’re going to see how we can use them to run commands against multiple servers at once using pdsh.
Summary
When working with multiple Linux machines I would first and foremost make sure SSH keys are set up in order to ease management through password-less logins.
We'll see in the next couple of articles some other tools that are useful when working on a cluster:
- pdsh
- colmux
I'm interested in what you think – what particular tools or tips do you have for working with a cluster of Linux machines? Leave your answers in the comments below, or tweet them to me at @rmoff.