Using a Simple Python Script to Mass-Produce RPD Objects

Introduction
Doing repetitive tasks as a developer can be the bain of your existence, sometimes you get a ticket on a project where you have one of two options; Either bite the bullet and create those 50 aliases for the time dimension, logical tables, and hierarchies…. or come up with a way of completing the ticket whilst also maintaining your sanity. In this particular scenario, I decided to do the latter.
This solution is relatively simple, and takes advantage of a nice feature in the Administration Tool that not many people seem to know about - The ability to copy/paste objects from the RPD into a text editor. When you do this you will get a block of XUDML that can then be manipulated in a text editor and then pasted back into the RPD to create a new object.
If we want to take this feature to the next level, then we can introduce a simple Python script to take that XUDML that we pasted into our notepad and burst out multiple copies of a given object. Lets go through the steps to do this:
Step 1: Creating the Template
So, let's run through an example to illustrate. We have a Logical Table, called “Dim - Date”, we want to be able to create 10 logical tables with an identical structure but with different aliases on the physical side acting as role-playing dimensions. For this example, we will just call these Dim_Date_1 to Dim_Date_10, but in the real world, this may be something like Sold_Date, Rebate_Date, Cancelled_Date, etc.
The first step is to create our object template, this will be one of the parameters of our python script and will dictate the structure of the object we want to replicate. To create this template, we need to open up the Administration Tool and Copy our object to a text file to produce the XUDML:
- Choose an object you want to template
- Right Click on the object in the RPD
- Select Copy
- Open up you Text Editor
- Paste what is on your clipboard into the editor
Let's take a look at some of the XUDML and see how we can turn this into a template. In the example above, we can see a few important lines of code:
DECLARE ATTRIBUTE "Usage Tracking"."Dim - Date"."Date Display" AS "Date Display"
ATTRIBUTE MAP EXPRESSION  {"BI Platform".""."dbo"."DIM_DATE"."DATE_DISPLAY"}
This is made up of a series of “Declarations” that show the Administration Tool how to create any given object. So we can see that we have the following:
Object Name | Type |
|---|---|
| Business Model Name |
| Logical Table Name |
| Logical Column Name |
| Physical Database |
| Physical Schema Name |
| Physical Table/Alias Name |
| Physical Column Name |
What we need to do now is replace the names of certain objects with a <Tag>. For example, I will do a find and replace on the word Dim - Date and swap it to <LTS Name>, DIM_DATE will be replaced by,<ALIAS Name>, etc.
So now, the line of XUDML above becomes:
DECLARE ATTRIBUTE "Usage Tracking"."<LTS Name>"."Date Display" AS "Date Display"
ATTRIBUTE MAP EXPRESSION  {"BI Platform".""."dbo"."<ALIAS Name>"."DATE_DISPLAY"}
Once we have done this, we will have a template file for that object type, so in the future should we need to create another 20 date dimensions, we can reuse the template.
These templates can be created for any object type in the RPD, some examples are:
- Physical Alias
- Logical Table
- Logical Table Source
- Logical Column
- Hierarchies
- Presentation Folders
- Presentation Sub-Folders
Step 2: Defining what we want to replicate
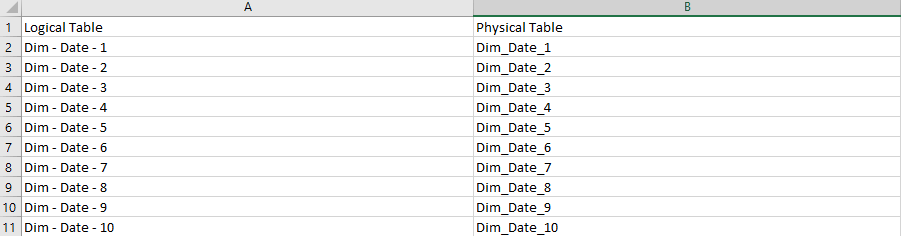
The second parameter to the script is a list of objects we need to replicate, I often find the easiest way to do this is to have a CSV file with all the permutations that I need to create. We can use all of the clever functionality within Excel to quickly put together the names of the objects we want to create. Here is an example of what our spreadsheet might look like:
Step 3: The Script
We now have the parameters for our script, our template file, and our CSV file with a list of objects we want to copy. We now can use a Python script to read our CSV file and then make a copy of the template and find/replace the <Tags> we created with the values in our spreadsheet:
import os
import shutil

destination_directory = 'C:\\Developer\\obi-rpd-object-clone\\automate_rpd_objects'

csv_file = rf'rpd_date_objects_to_clone.csv'
rpd_template = rf'dim_date_template.txt'

## Clean Up Destination Directory First

file_list = os.listdir(destination_directory)
for file_name in file_list:
    file_path = os.path.join(destination_directory, file_name)
    # Check if the item is a file and not a directory
    if os.path.isfile(file_path):
        # Remove the file
        os.remove(file_path)


with open(csv_file, 'r') as cfile:
    for line in cfile:
        parts = line.split(',')
        print(parts)
        print(parts[0])
        print(parts[1].replace('\n',''))

        with open(rpd_template, 'r') as template_file:
            template_data = template_file.read()

            template_data = template_data.replace('<LTS Name>', parts[1])
            template_data = template_data.replace('<ALIAS Name>', parts[0])
            template_data = template_data.replace('\n','')
            template_data = template_data.strip()

            with open(parts[0]+'.txt', 'w') as file:
                file.write(template_data)

            shutil.move(parts[0]+'.txt', destination_directory)
Step 4 - Getting the Objects back into the RPD
This script above would have produced a new file for each one of the rows in our CSV file. All we need to do now is copy and paste these back into the RPD. There is a nuance to this, which is that you will need to paste them onto the parent object that your new object belongs to. So for example, if we have created 10 iterations of a Logical Table, we will need to paste our XUDML onto the Business Model that the Logical Table belongs to. Let's take a look at this in action:
- Select everything from your XUDML output file
- Copy the XUDML to your clipboard
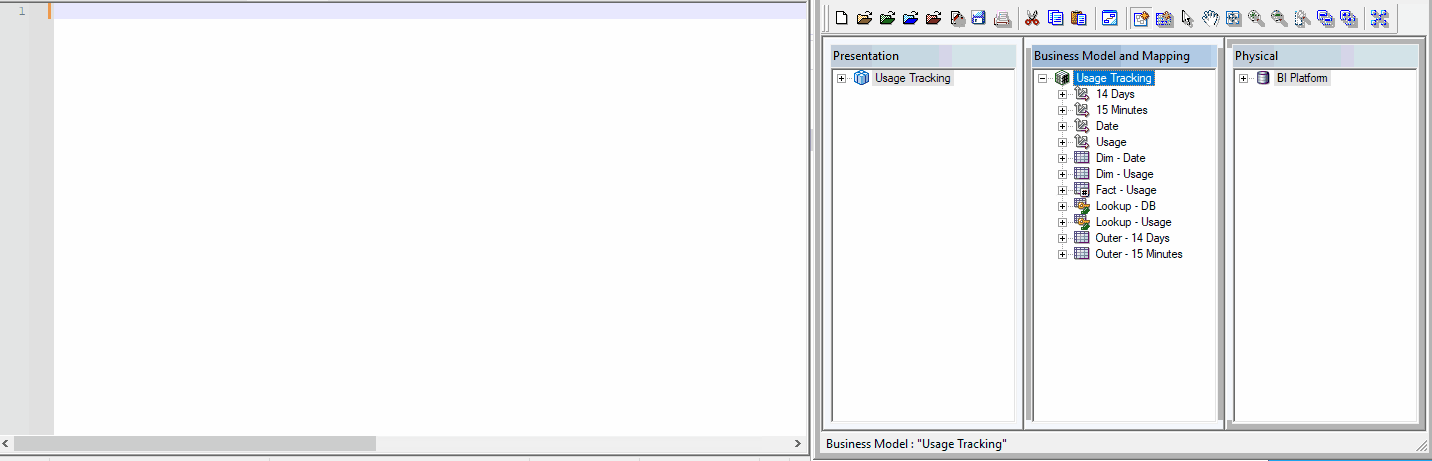
- Right Click on the object's parent in the RPD (in the example below it would be the Business Model called “Usage Tracking”)
- Paste what is on your clipboard into the RPD

Now we have our logical table inside our business model. The only thing left to do is to create the logical join between our new logical table and our dimension.
This process can be repeated again for the dimension objects, presentation folders etc.
Conclusion
We’ve seen in this blog post how we can use a simple copy-and-paste technique, and a small piece of code to accelerate the development of complex RPD objects. I’ve personally used this in the “real world” multiple times, saving quite literally hundreds of hours of work and more importantly, my mental health!
This technique also highlights the importance of having development standards. If your developers build in the same way, the solution is easier to maintain as the work style is predictable. If the work is predictable and follows a pattern then there is always room for scripts and accelerators.
If you would like us to help with your Oracle Analytics development, or help with other accelerators, development standards and ways of working do not hesitate to contact us.