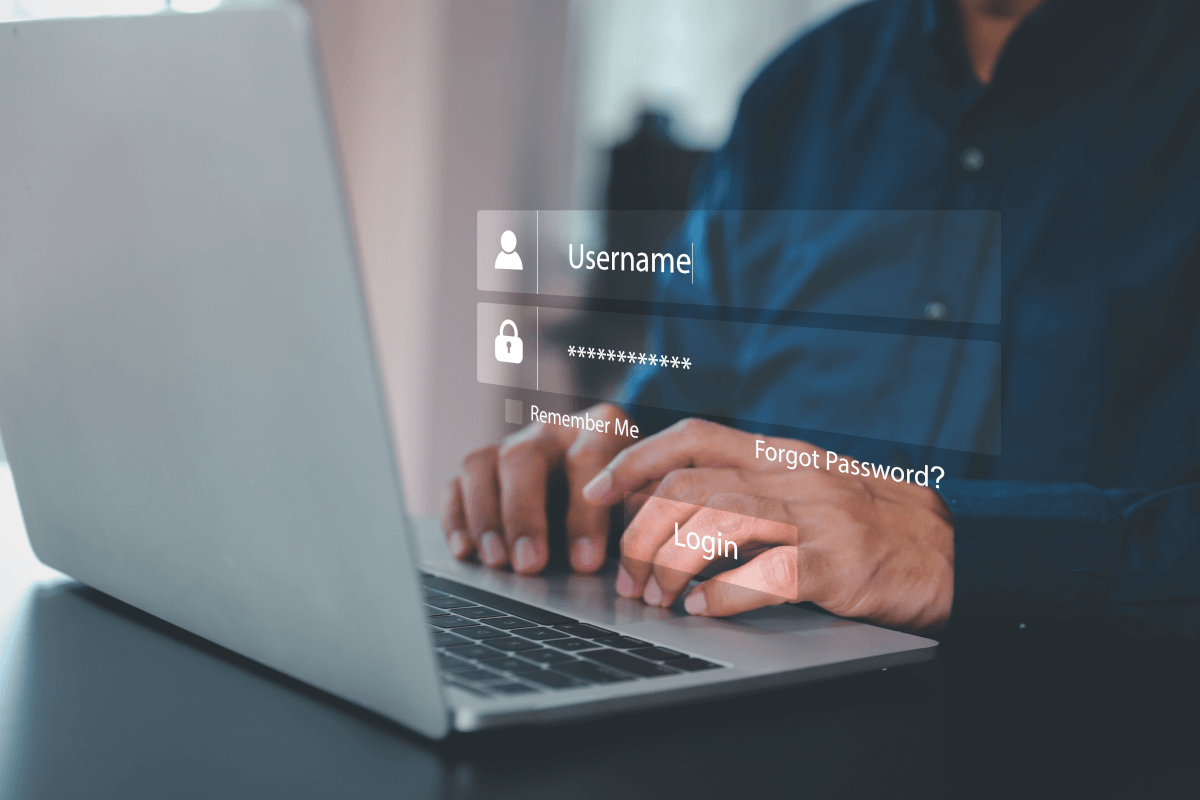
Oracle APEX - Social Login

I looked into Social Sign-in as an option for Oracle APEX a few years ago. This was pre APEX 18.1 and, at this time, it was not simple to configure (in fact it would have taken a considerable amount of code to implement)
Fortunately, since 18.1 APEX offers natively functionality to integrate with Single (Social) Sign on providers and makes the whole process much easier.
This blog will describe the process of getting it up and running and why this might make life easier for both the developer and as an end-user.
Why rely on a 3rd party identity provider (IdP)?
Using a 3rd party to manage and authenticate the users that will be accessing your APEX application offers several potential advantages.
Firstly, delegating such a crucial task as security to an expert in the field in authentication is an inherently sensible idea. It eliminates the need to support (and possibly code for) a password management system inside the APEX application itself. This relieves an APEX developer of time spent managing users and worrying about the innate security risks that go hand in hand with storing this type of data. Not to mention trying to implement Two-Factor-Authentication (2FA)!
Secondly, from a user's perspective it should provide a better experience, especially if the IdP is chosen carefully based on the application's use. For example, if the application is to reside within an enterprise environment where users are already using Microsoft Azure to authenticate into various services (such as email) then, using the Azure IdP APIs, users could login into APEX with the same username / password. If the APEX application is deployed in a more publicly accessible space on the web, then using a generic IdP like google / facebook will allow you to capture user details more simply, without exposing users to the tedious experience of having to type in (and remember) their details for yet another website to enable them register or pay for something.
Allowing users to login to many systems using a single 3rd party system is sometimes know as federated authentication or single sign on (SSO) and the choice now includes many providers
- Microsoft
- Oracle IDCS, Ping, Okta etc
 Contributors to Wikimedia projects
How do they work?
The protocols IdPs use to authenticate users into client applications (such as APEX) have their roots in Oauth2, which is a standard developed by the web community in 2012 to help websites share users' resources securely. A typical example of a requested resource is when a website (the client) you are registering on wants to access the list of contacts you have in your gmail account (the resource holder) so it can email your friends, in an attempt to get them to register too. Oauth2 allows an authorisation flow where the website can redirect you to a google server (the gmail provider) which will subsequently ask you to authorise this request and, with your consent, then provide an access token back to the original client website, which would be then used to query your contact data securely.
With Oauth2 websites could start sharing all sorts of data with each other, including, commonly, simple user profile data itself (eg name, email address, phone numbers). However, it is important to recognise that Oauth2 is an authorisation rather than an authentication protocol. In 2014 the Oauth2 specification was extended to include OpenId, which specifically deals with the authentication of a user. It is these standards that IdPs use to federate users.
The flow in more detail
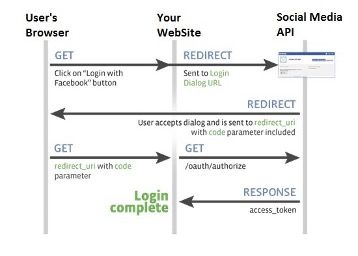
The following diagram / points explain the data flow in more detail. In this example we will use a hypothetical set up a client app using Facebook as its IdP. Note that before this can occur the client app will have needed to register itself with Facebook and obtain a client id and client secret which it will need in some of the authentication steps
- User attempts to log onto the client. The authentication scheme redirects the user to Facebook authentication end point (with its client id)
- User Authenticates onto Facebook (if not logged in already). User prompted to confirm that he trusts the client app (this step is removed the next time the user logs in)
- Facebook redirects back to the application with an authorisation code
- The client application uses the authorisation code (with its client id and secret) to get and identity token about the user (with various meta data) and that is accepted by the client as a valid authentication
Setting up an example in APEX!
OK, so let’s get an example up and running. For simplicity, I shall run through doing this on the Universal Theme application. We will change access from Public to Social Sign in (OAuth 2.0), create a couple of tables to hold who and when they logged into the application, and then add a report page to the application to detail user access.
This assumes you have the following:
- An Oracle APEX Cloud account and have a workspace and the Universal Theme application installed (the latest UT application can be downloaded from here).
- You have created a Google Account which will require a credit card. You may have already used this to create your Free Tier ATP Instance where you have APEX installed and like this scenario, we will need it for Google. Unless you launch your app to a very large community and start using other Google API features it will be free too. Google will send you alerts if and when you approach the end of the free quota, which resets each month. As an example, Google Maps Matrix API allows 28k calls a month for free.
- You have some familiarity with APEX and are not a complete beginner. If you are just starting, I would recommend you use one of the many resources now available online to get started.
Oracle have a lot of information and here is a good starting point.
Overview of what we will build
- Open a developer account with Google & setup the Developer Account
- Register an application into this google account and generate a client id and secret
- Register the client id and secret in an APEX workspace
- Create an APEX app and set up a Google based social sign in Authentication scheme
- Create an APEX Authorisation scheme with a number of steps following your demo with done additional explanations on the way were helpful. Maybe just install UT and change that to require Google Auth
- Extract the user’s name [maybe add gender, locale and picture] from the Google OAuth 2.0 call and store in app items. (Having the image where the APP_USER is located would be really cool)
- Build a few simple tables that hold the user details such as their internal ID, when they last logged in etc
- Discuss roles in the app to secure functions for different user types. Create an Admin page and some reporting on the access from the users. Implement this initially with an Authorisation Scheme such as SQL statement of 1=1
- Introduce IDCS and roles and demonstrate setting this up with the Administration role
(do we need a standard role too for a user who comes in with the Google creds but is not an Admin?) - Moving back to the UT application, we will modify the authentication and authorisation to provide this function
The “How To” Build Steps
Finally! Here is the hands-on fun bit!
Open a developer account with Google & setup the Developer Account
Once you have a Google account (you already may have one if you use Gmail) you will need to navigate to the Google developer console.
If you have not done this already enter your details such as your address and mobile phone number. Use a mobile number as it makes life easier with confirmation text messages.
You will need to agree to Google’s terms and conditions and select whether or not to receive email updates. In terms of billing, it is probably a good idea to receive email updates but, in any case, you can opt out of this later if you want to.
You should now get to the following screen:
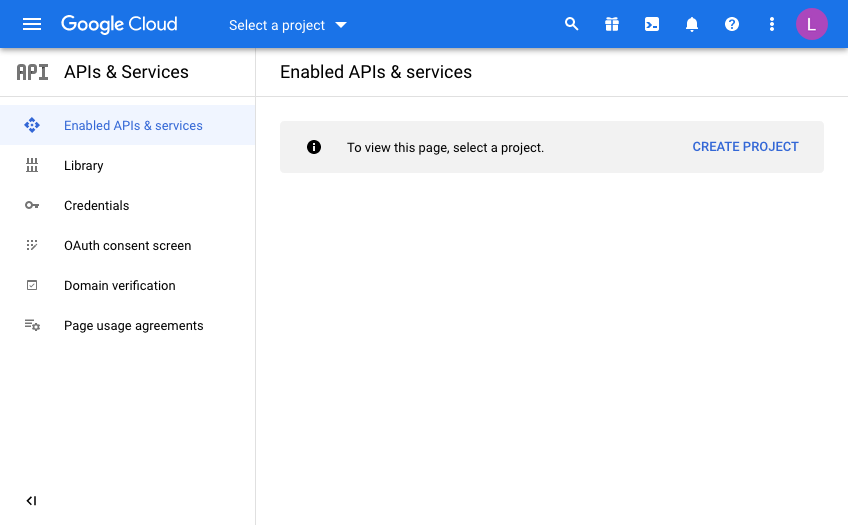
Every Google API call you want to make will be defined from a “Developer Project”. In doing this, Google makes it nice and easy to control and report on where your API useage is, which is important when have more than one project on the go.
This is useful for demos or switching off access to a system independently of others if you need to so that you have the ability to switch off some usage while leaving others unaffected.
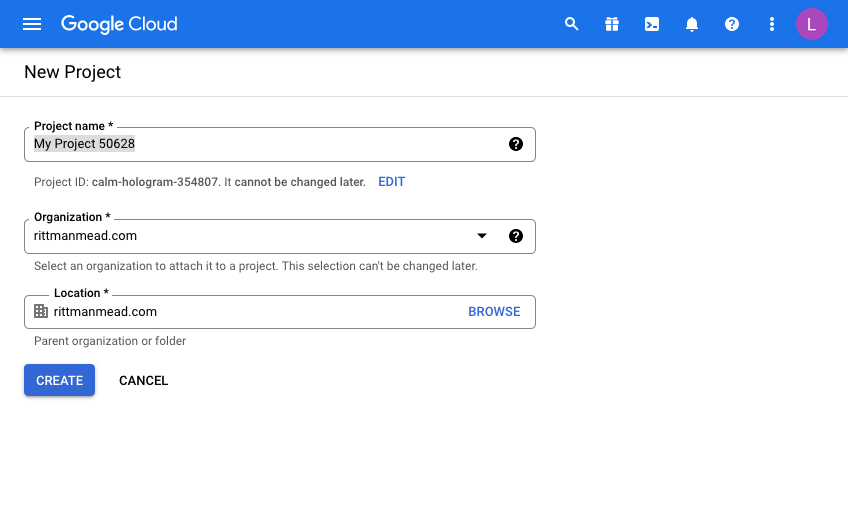
Click “Create Project” and give your project a name. This will be pre-filled and you will need to either be creative or just use the ID as a suffix for example to make it unique.
I’m afraid that now means you can’t use “My Project 50628” as I have below!
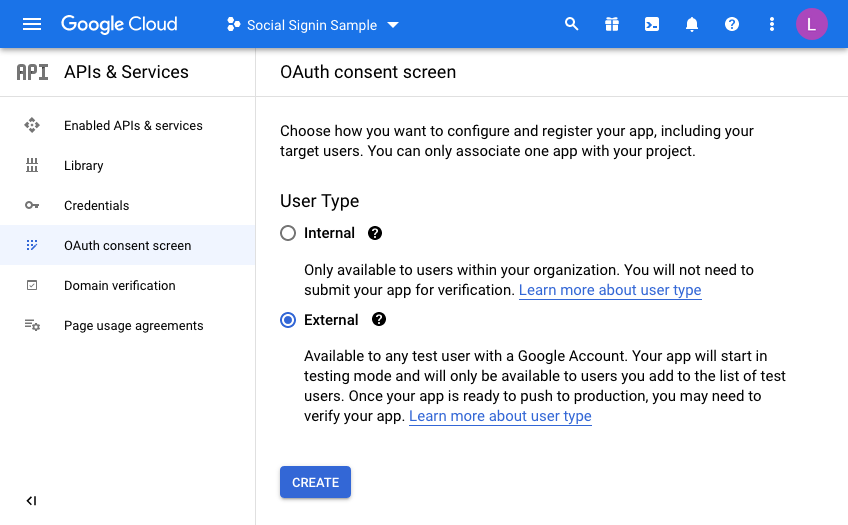
Once you have a project, you will have to configure the consent screen.
We’re going to make this available to all users with a Google account so select “External”
Enter details to match your setup:
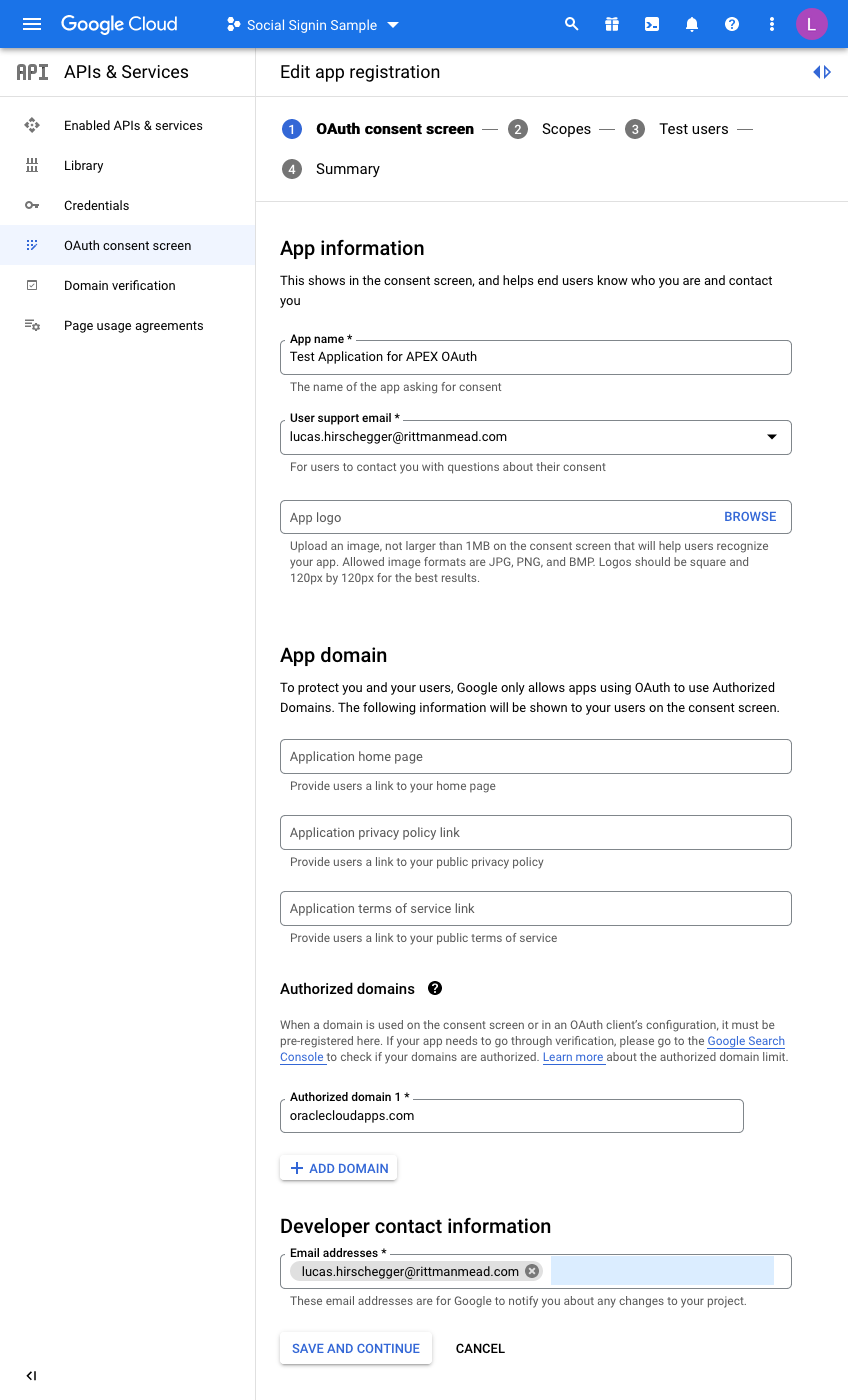
I have just entered the mandatory fields here. For the domain, just enter the base domain for the site so that my ATP Always Free Tier APEX home page is as follows and the base is bold:
https://xxxxxxxx.oraclecloudapps.com/ords/r/development/ut/home
The domain is oraclecloudapps.com in this example.
A Scopes configuration page is then loaded:
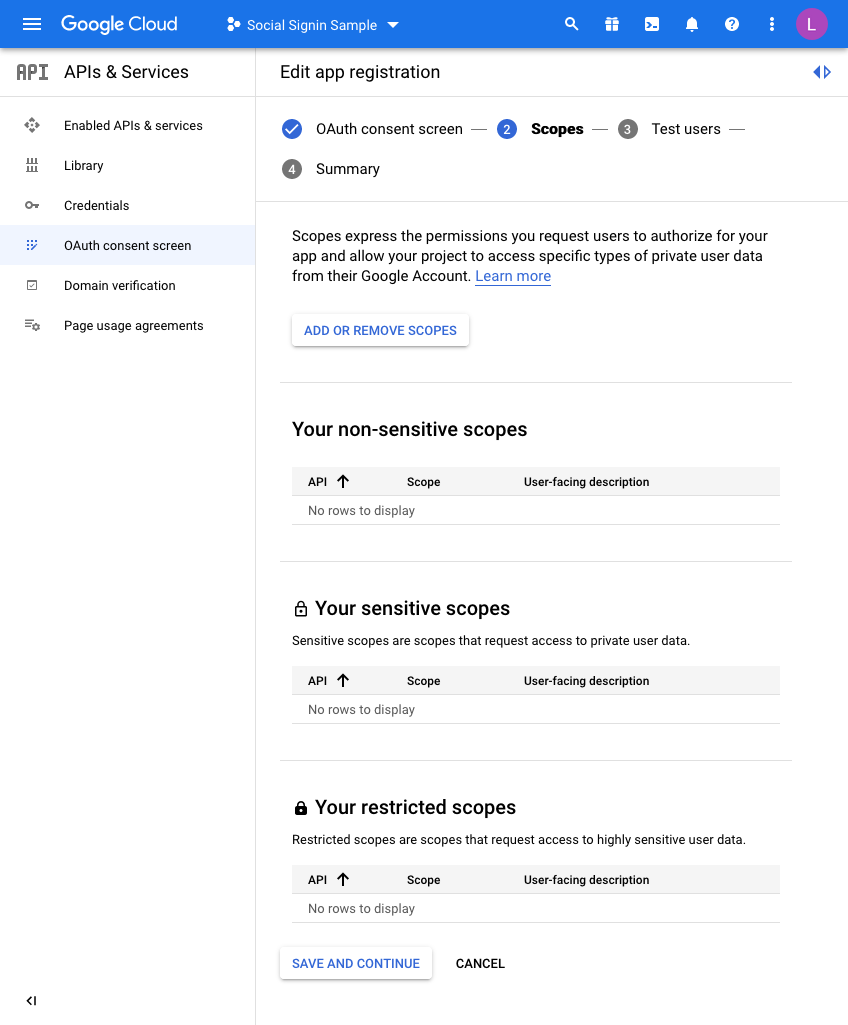
For this example, we are not going to set any scopes here so click
SAVE AND CONTINUE once again.
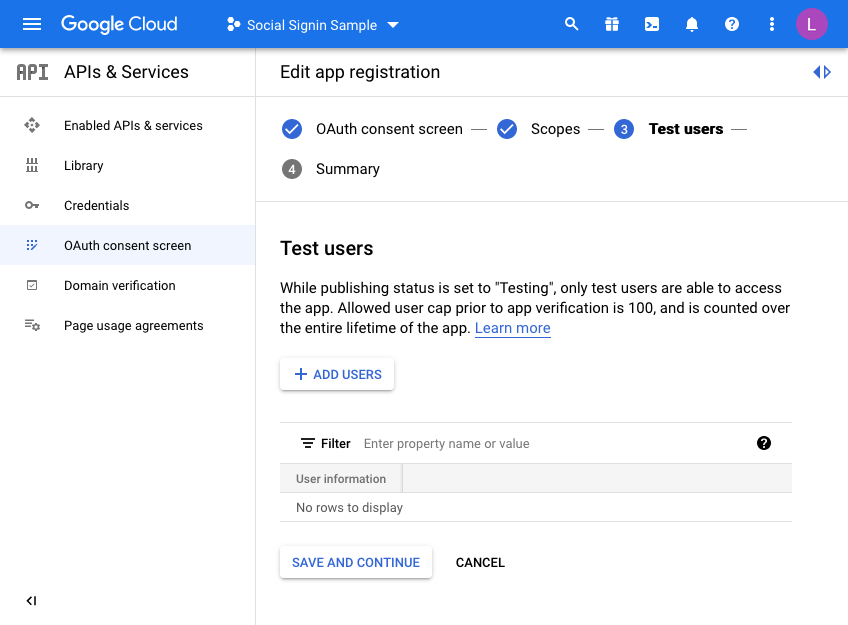
Finally, we are taken to a “Test users” page. Here you may choose to initially set your access to be limited to yourself & and limited set of users.
Unless you want to do this, click the SAVE AND CONTINUE button again. This project is only for the UT application so we do not mind sharing this without any test users defined as access is normally unrestricted (Public access in the APEX authentication scheme).
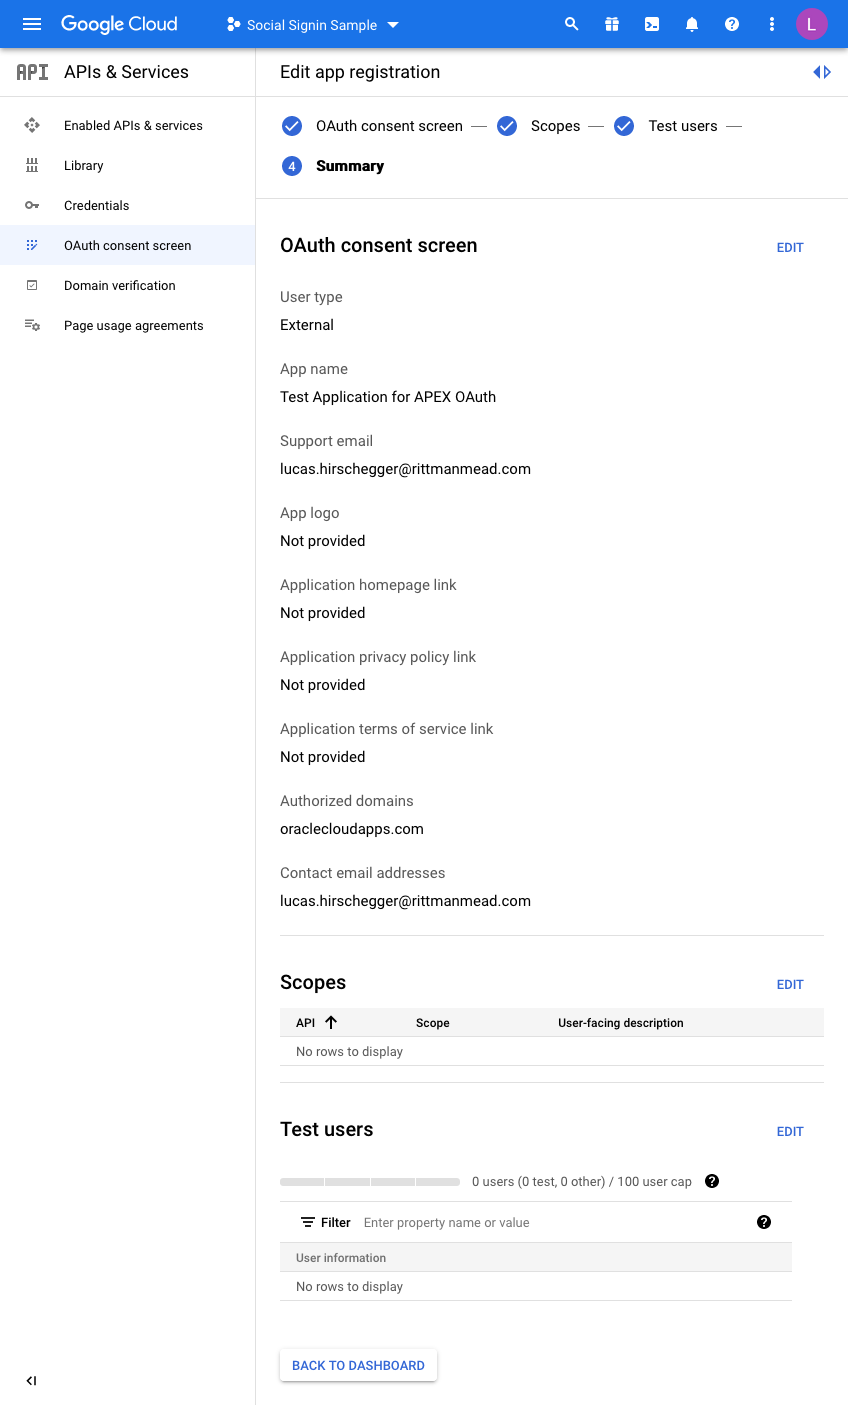
The last step is just the summary of the OAuth consent screen where you can double check the entries you have configured so far:
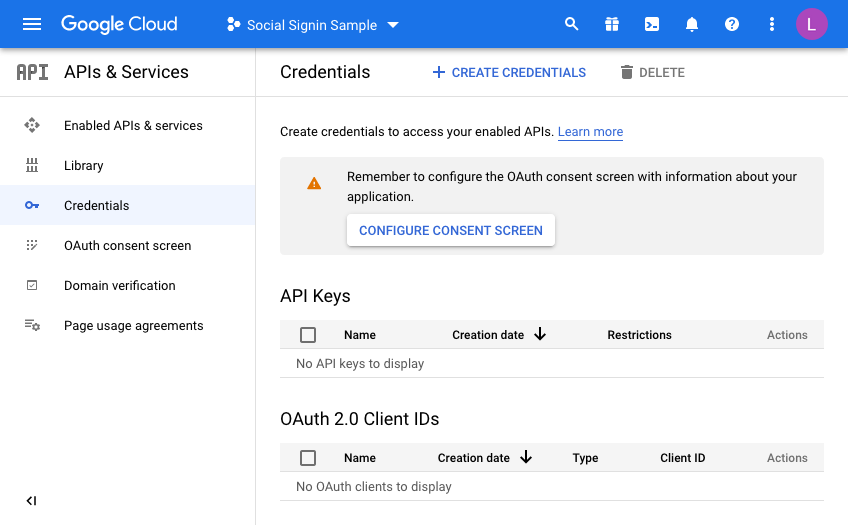
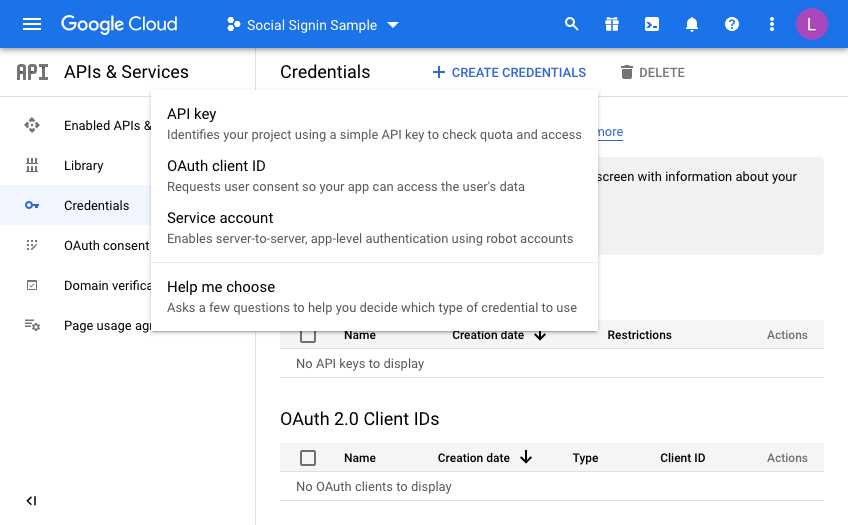
So now we are almost there on the Google side of things. We just need to generate credentials. Click on Credentials and then click CREATE CREDENTIALS, choosing OAuth Client ID in the dropdown menu:
On the next screen we choose a “Web Application” and then fill in the name you wish to assign this set of credentials:
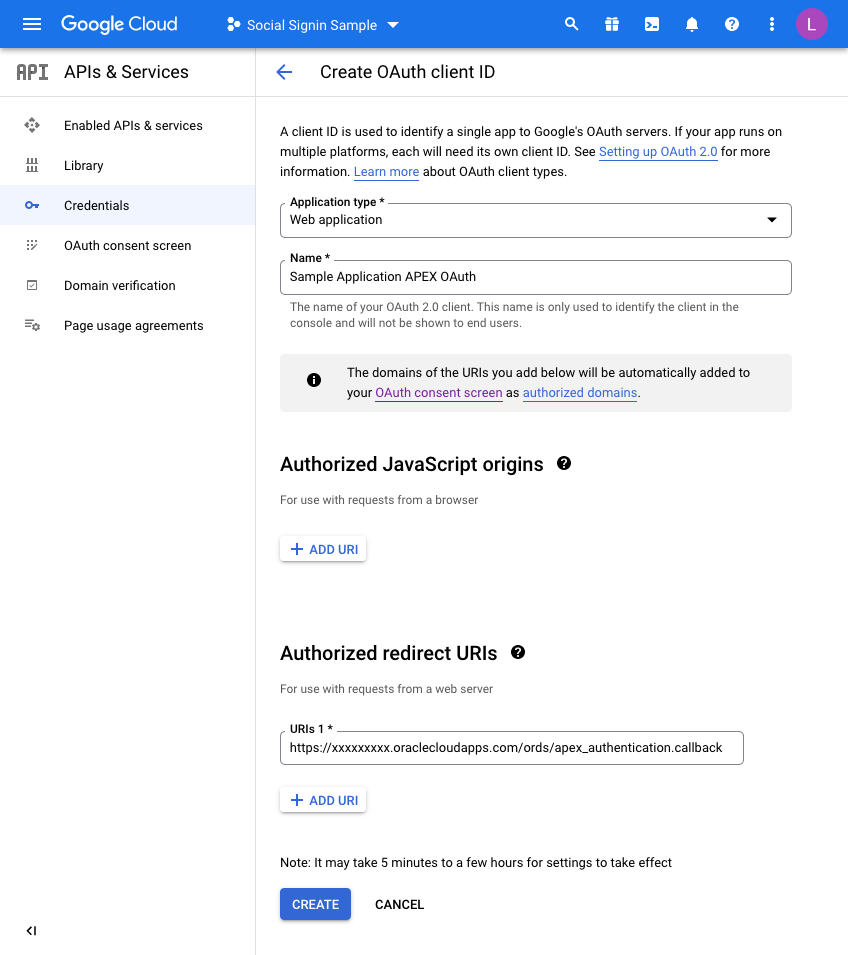
Before you click CREATE, add a redirect URL by pressing the ADD URI button.
All APEX redirects use the same redirect function which is just the part of the URL of your application and then an additional suffix.
Take the URL of any page in your UT Application (you can just run this if you are unsure) and then copy the URL up to the ords section and then add the extra string of:
apex_uthentication.callback
Specifically, in my example this is:
https://xxxxxxxx.oraclecloudapps.com/ords/apex_authentication.callback
Once this is defined, press CREATE and that competes the Google Integration setup.
A dialog will be presented with the following information. This is what we will now set up in APEX for the Universal Theme Application:
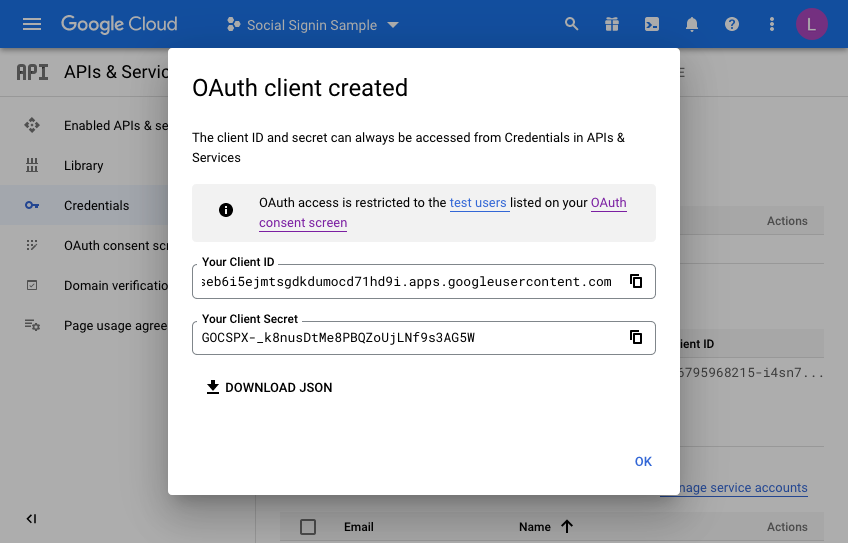
Make a note of the client ID and the Client Secret. We will need these when creating the APEX web credentials in the next section. Press OK a final time and you may now review what you have set up on the Google side of things.
Setting up the APEX environment - Web Credentials
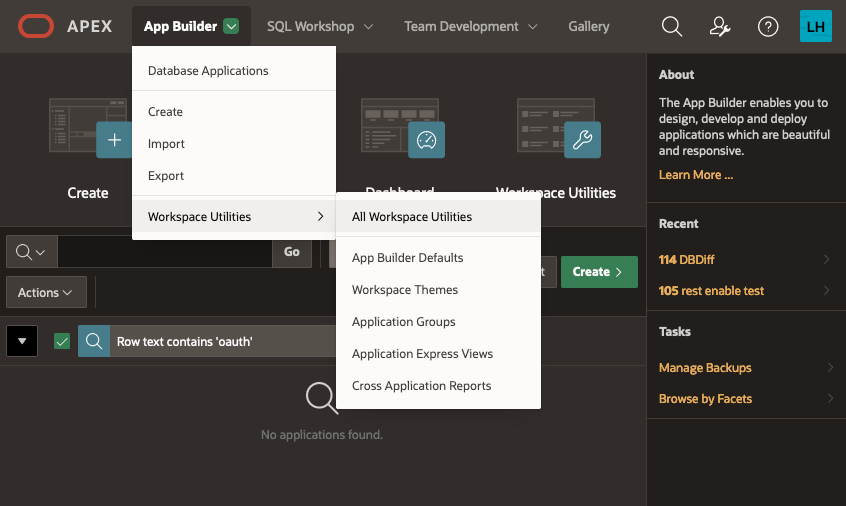
The first step here is to define your web credentials in the APEX Workspace itself. Click on the "App Builder>Workspace Utilities > All Workspace Utilities" menu option:
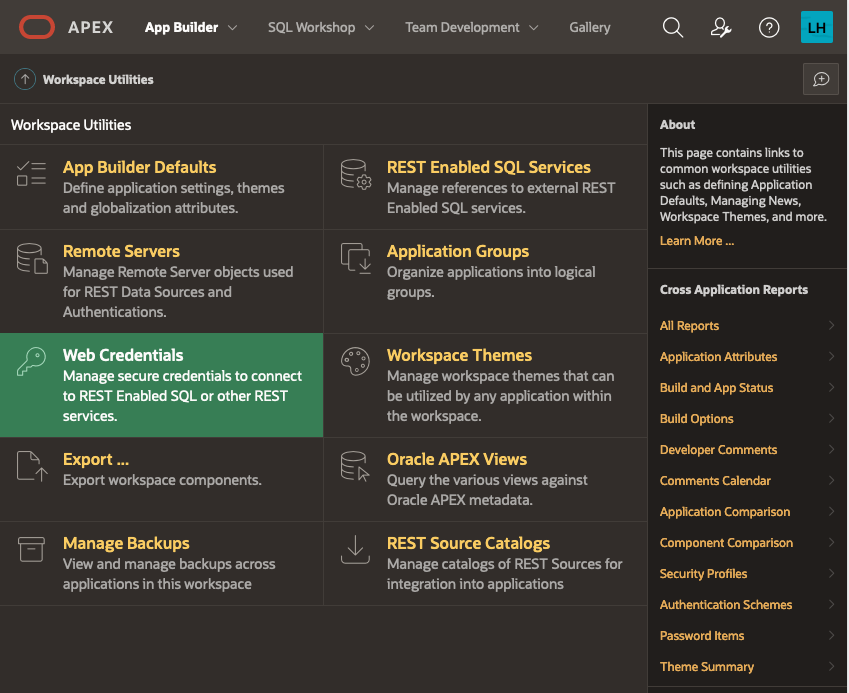
Next, choose “Web Credentials”:
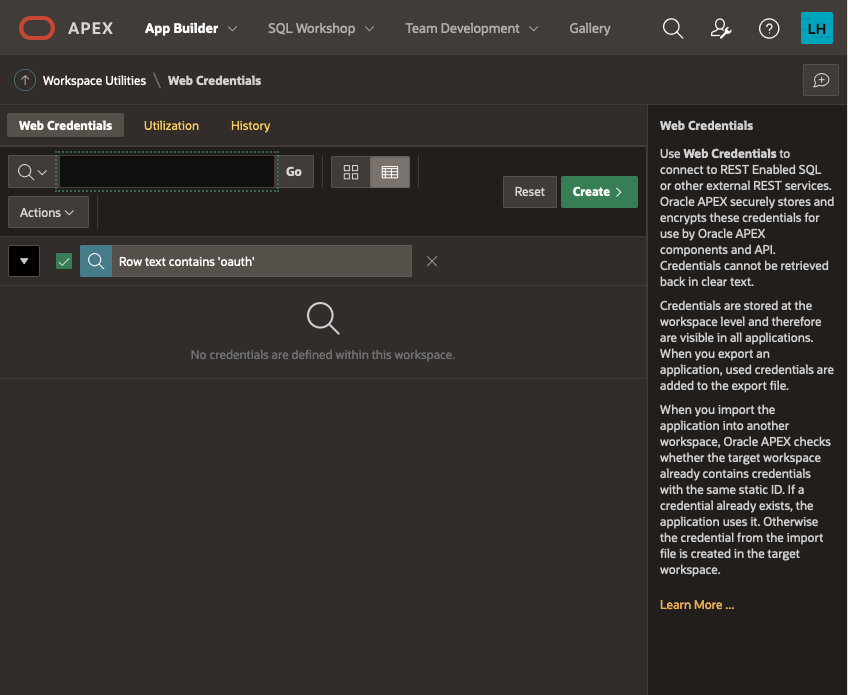
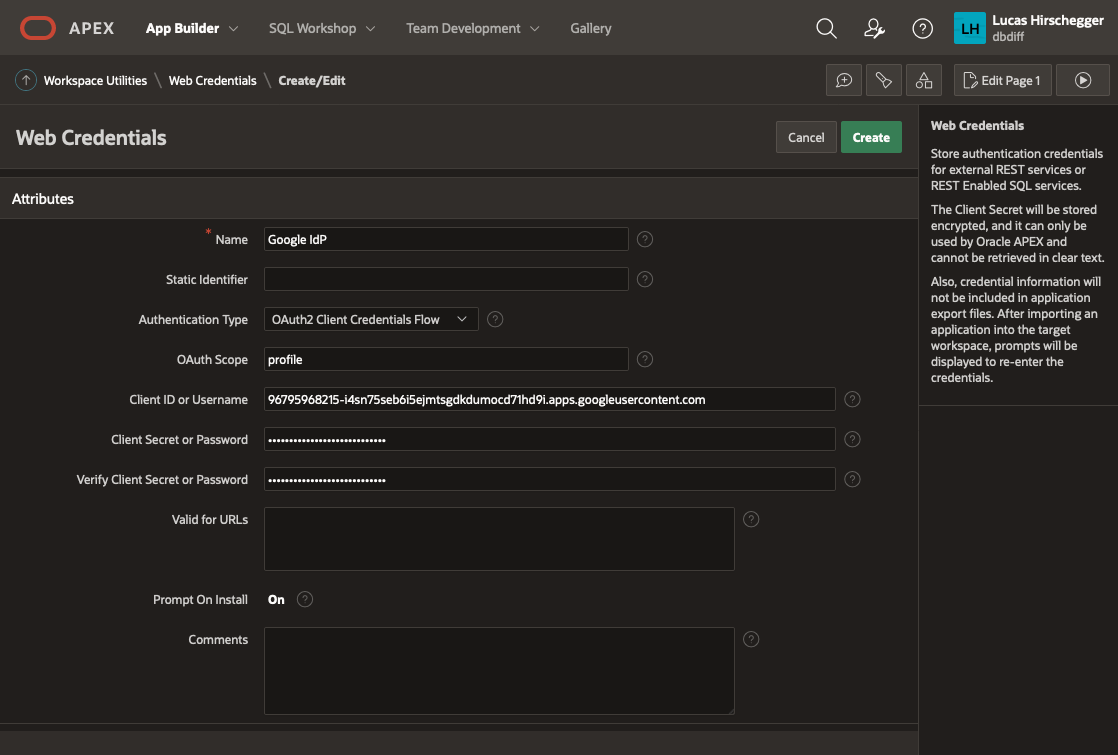
The list of credentials is shown, click on CREATE
Give your Web Credentials a name and enter the Client ID and Client Secret from above repeating the secret in the verify field before saving these details:
This is now available to any application within your APEX workspace. Now we shall use this for our UT application. I am assuming you have installed the UT application or maybe you are setting this up for an application you have developed but you will need an APEX application at this point. If you already have the UT application and use it for reference, you may want to copy it so that you keep one version that does not require authentication via Google OAuth2.
Go to application builder and navigate to the UT application you have installed.
Open it in application builder and then select
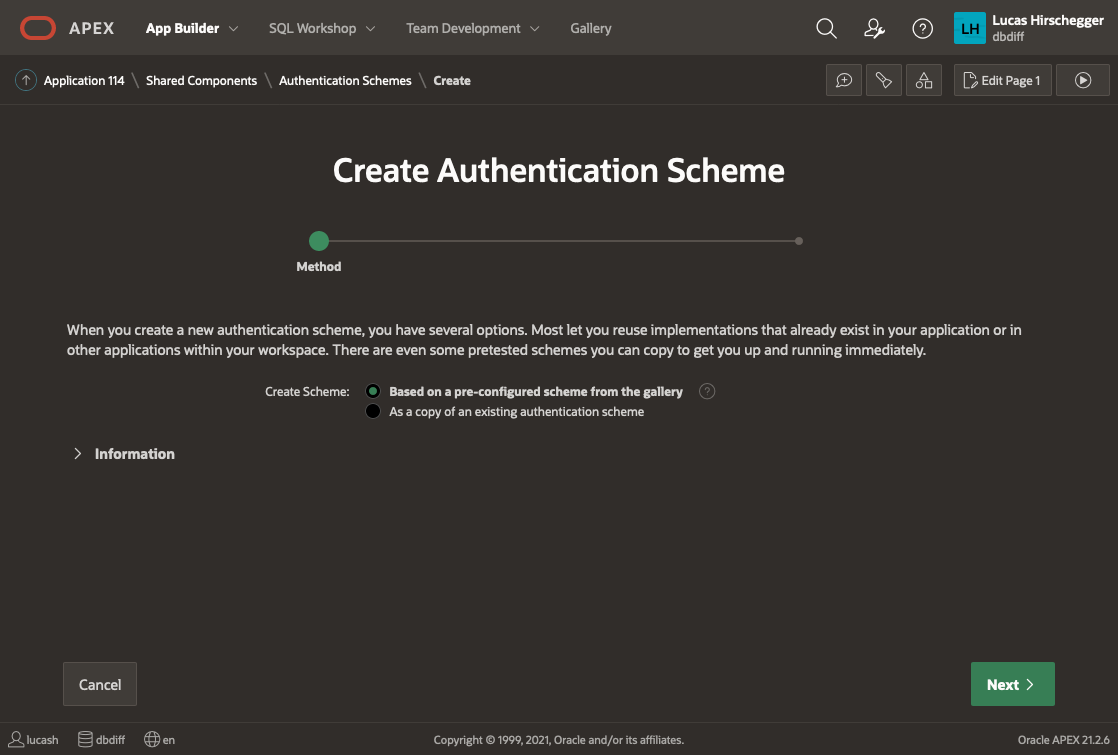
Shared Components>Authentication Schemes and then click CREATE.
Select “Based on a pre-configured scheme from the gallery” from the radio group and press NEXT
Now provide a name of your choice and select “Social Sign-in”:
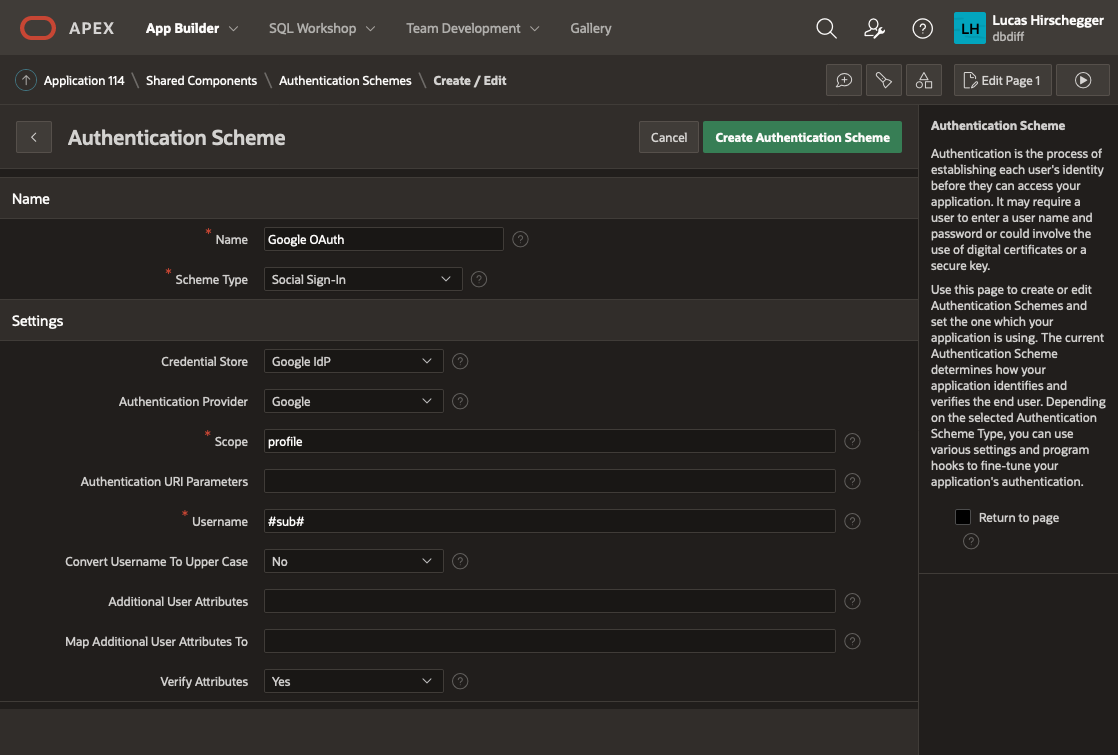
The above page will allow you to specify the following attributes of your Authentication:
- Name – a meaningful name for your scheme
- Scheme Type – select Social Sign-in
- Credential Store – select the one you have just created which is specified at the Workspace level
- Authentication Provider - here select Google. Note that APEX can integrate with any 3rd party IdP as long as they follow the OpenID protocol. Generic Oauth2 providers may be used as well as long as they support OpenId as an inputted scope. In these scenarios you will have to get information on the API end points for authentication / access token and userinfo.
- Scope – we could just use email but enter profile here and I will cover how to extract additional attributes from the JSON that is returned with successful login as an extra feature later on
- Username – here we assign the username to the email address of the Google account user
- Convert Username to upper case. I select yes here so that I lose case sensitivity for usernames but this is just down to what you intend to do with the user name
The discovery URL is not needed here (as it is pre defined by APEX when you select "Google" as then authentication provider, but is worth mentioning. This URL will provide us with JSON that describes this service in detail. You can examine the response by entering it in a browser:
https://accounts.google.com/.well-known/openid-configuration
Of interest to us in particular in the resulting JSON is the section listing claims_supported:
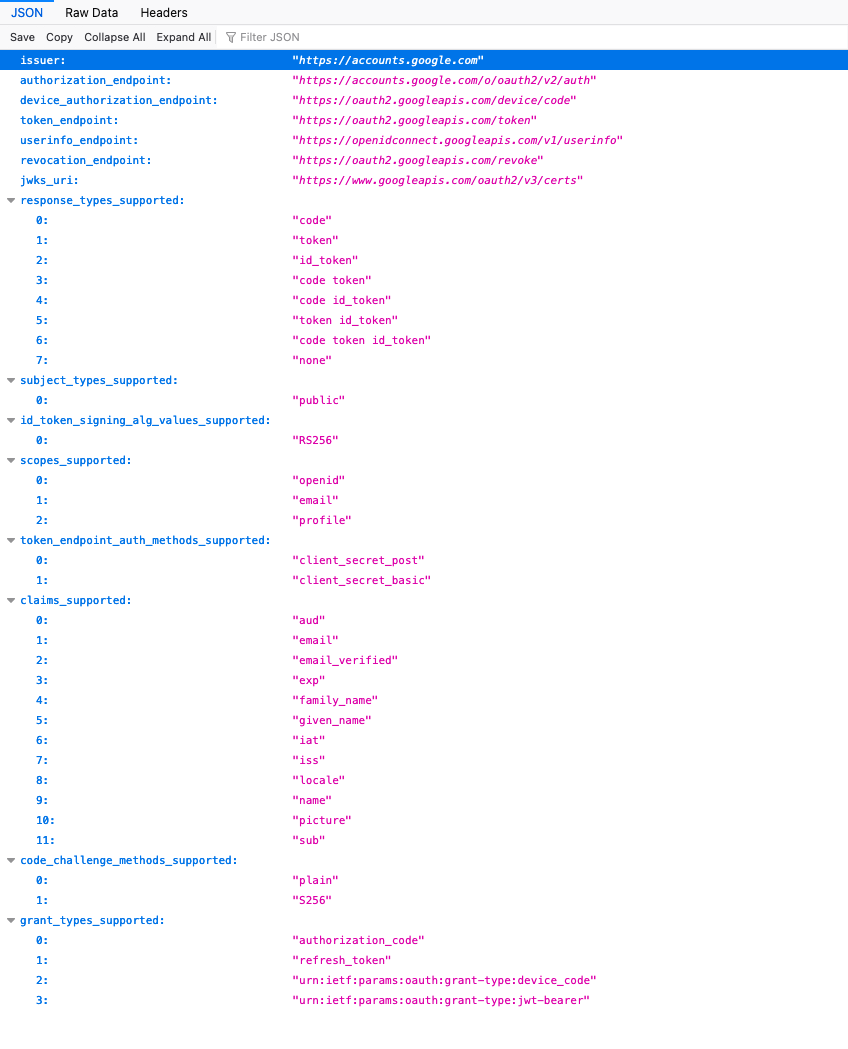
We shall just use email here for the identifier for the username and shall choose the option of making it uppercase in the application.
Click Create and that will complete the creation and switch the default authentication to your Google Authentication.
If you run your application now, you will see no difference. This is because all the pages are currently public and require no authentication or authorizations. We will change page 100 (the Home Page) now to demonstrate how access can be limited to those users you want to authenticate.
Find out more about our APEX services