Oracle APEX – Analytics Publisher REST API Integration


We have produced this blog to describe how to integrate an Oracle Analytics Publisher part of Oracle Analytics (previously called BI Publisher) into APEX without using the latter's built-in reporting features. Seasoned developers of APEX applications will be familiar with its reporting capabilities, which can use uploaded templates created by the Analytics Publisher plug-in for Microsoft Office.
While this provides an easy-to-integrate reporting solution for many applications, the APEX approach to reporting may be a little simplistic when it comes to developing more complex reports. If you have access to a cloud Analytics Publisher server, we have developed a method by which you can make a call out to Analytics Publisher reports and have the results displayed directly in your application.
Limitations of the native APEX Analytics reporting solution
To create reports in APEX you navigate to the Report Queries section of Shared Components.
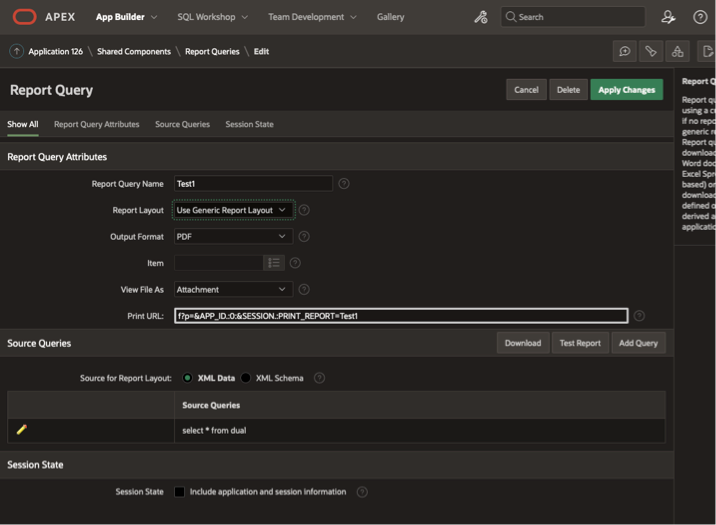
In this section, you define one or more SQL queries which return the data required for your report. Each SQL query produces output in XML format, which is then passed to the Analytics Publisher template you specify in the Report Layout drop-down. You will have uploaded your Publisher template in Shared Components/Report Layouts, or as part of the SQL query creation process.
The limitations of this method are:
- APEX cannot accept a template file that is larger than 5MB. This may prove to be a problem if your template contains a few images.
- The XML data produced is flat, but you may need your data to be displayed in a format that has a more complex hierarchy structure, for example. It may be possible to use an XML formatting function within the SQL, but this is time consuming and may over-complicate the solution. Similarly, you can create groups in the template itself, but this can also create complexity depending on the requirements for the report.
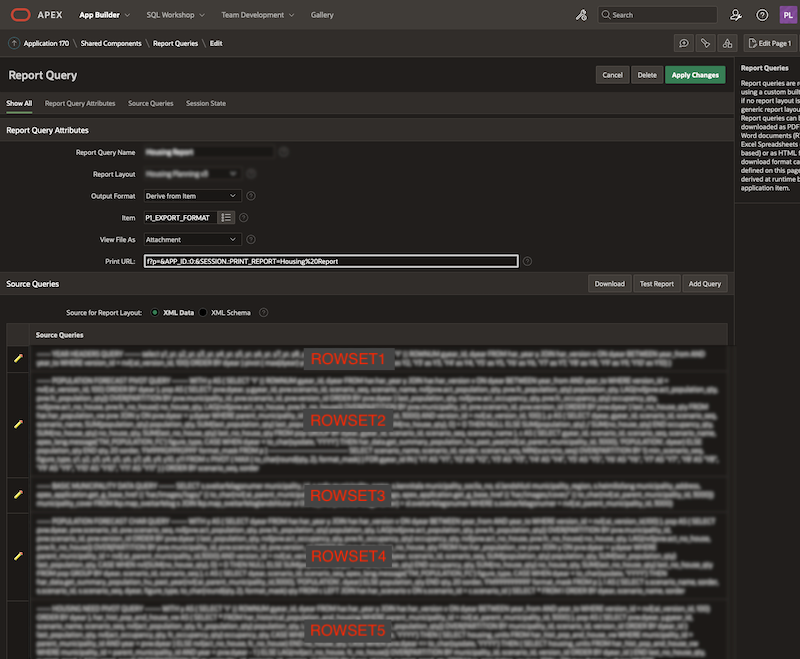
- There is one data group in the XML output per SQL statement in APEX, and the group names are generated by the order in which each SQL is displayed on screen from the top down (<ROWSET1>, <ROWSET2>,… etc.). When an application is exported and subsequently imported, APEX may change the display order of the SQL statements. When this happens, the ROWSET name of each XML data group will change. This causes a problem for the Analytics Publisher template because the name of each data set (group) in the report data model is hard coded in the template. You usually have to modify your template to change all of the group names each time you import the application as a result.
<?xml version="1.0" encoding="UTF-8"?>
<DOCUMENT>
<DATA>
<ROWSET1>
   <ROWSET1_ROW>
      <STATION_ID>195</STATION_ID>
      <STATION_NAME>Waterloo</STATION_NAME>
   </ROWSET1_ROW>
   <ROWSET1_ROW>
      <STATION_ID>213</STATION_ID>
      <STATION_NAME>Manchester Piccadilly</STATION_NAME>
   </ROWSET1_ROW>
</ROWSET1>
<ROWSET2>
   <ROWSET2_ROW>
      <MANAGER_ID>23</MANAGER_ID>
      <MANAGER_NAME>Jane Smith</MANAGER_NAME>
   </ROWSET2_ROW>
   <ROWSET2_ROW>
      <MANAGER_ID>31</MANAGER_ID>
      <MANAGER_NAME>Albert Jones</MANAGER_NAME>
   </ROWSET2_ROW>
</ROWSET2>
</DATA>
</DOCUMENT>We don't know if any of these issues are bugs or features, or whether they will be fixed in a future release. So for now, all of the above issues can be resolved by using a cloud Analytics Publisher server to run the reports for you. APEX can make a call out to the Publisher server using RESTful services to run a report, and have the report return the results back to APEX. This method replaces the need to create queries in your APEX application.
The trick to this is knowing how to connect the Analytics Publisher report to an active APEX session so that the report runs in context of that session, and how to send and receive requests using REST.
General Analytics Publisher configuration
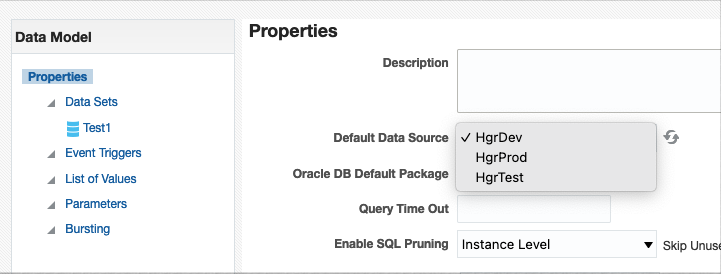
We use a single Analytics Publisher cloud server that contains reports that are deployed to our DEV, TEST and PRODUCTION environments. For this, we have created three Data Sources in the Publisher cloud server configuration, one for each environment, and we simply set the Default Data Source in the data model of each report we create.
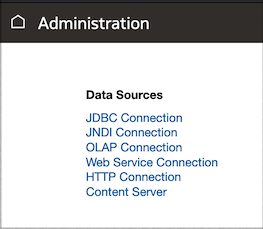
To manage your data sources, open the Administration page of your Analytics Publisher cloud environment, and click the Manage Publisher link in the Publisher section.
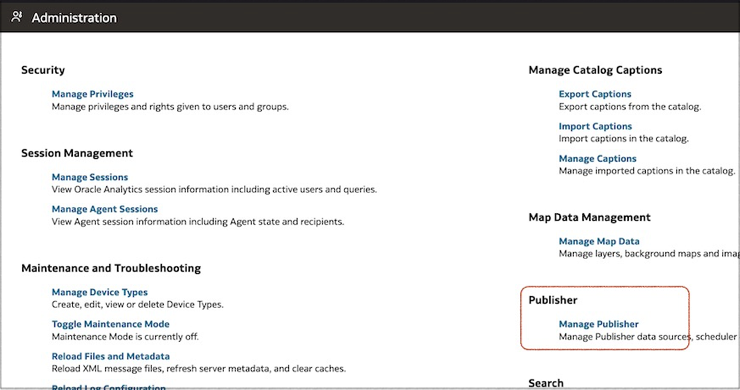
From there, click on the data source type you want to create or manage in the Data Sources section of the page.
For each data source you create for your APEX reports, they must connect to a schema that has the relevant privileges for at least read-only access to the schemas of the associated APEX application.
Analytics Publisher REST API alternative
We use three elements to call out to Analytics Publisher reports from an APEX application.
- A database package containing a function as a wrapper to connect to the current APEX session. The function returns a boolean to the Analytics Publisher report to indicate success or failure.
- The Analytics Report containing the necessary configuration to call the wrapper function, generate the data and produce the output.
- An Application Process in APEX to control the report execution using REST, and then download the report output returned from the REST request.
The Database package
Using your favorite SQL development tool, create a similar package in your chosen schema to the one shown below. This must be the same schema to which your report's default data source connects.
- Public global variables are used to communicate the Analytics Publisher parameter values to the package.
- Every parameter you create in your report must have the corresponding parameter in the package as a public global variable (fig 7).
- Only the first four variables in this example are for the connection to APEX which are described in the APEX configuration section. I will discuss the other two global variables in the Analytics Publisher configuration section.
create or replace package APEX_REPORT_UTIL AS

    ----- Public Global Variables

    p_app_alias         VARCHAR2 (100 CHAR);
    p_page_id           NUMBER;
    p_session_id        NUMBER;
    p_nls_lang          VARCHAR2; -- <language>.<territory>
    p_parent_region_id  NUMBER;
    p_version_id        NUMBER;

    ----- Public Function

    FUNCTION attach_session (
             p_app_alias  VARCHAR2,
             p_session_id NUMBER,
             p_nls_lang   VARCHAR2 DEFAULT NULL,
             p_page_id    NUMBER   DEFAULT 1
    ) RETURN BOOLEAN;

END APEX_REPORT_UTIL;

------ Package Body ------

create or replace package body APEX_REPORT_UTIL AS

    FUNCTION attach_session (
             p_app_alias  VARCHAR2,
             p_session_id NUMBER,
             p_nls_lang   VARCHAR2 DEFAULT NULL,
             p_page_id    NUMBER   DEFAULT 1
    ) RETURN BOOLEAN AS

        l_app_id NUMBER;

    BEGIN

        SELECT
            application_id
        INTO
            l_app_id
        FROM
            apex_applications
        WHERE
            alias = p_app_alias;

        -- Attach to the APEX session
        apex_session.attach(p_app_id => l_app_id,
                            p_page_id => p_page_id,
                            p_session_id => p_session_id);

        -- Check if the language needs to be set
        if p_nls_lang is not null
        then
          execute immediate 'alter session set NLS_LANGUAGE=' ||
                            regexp_substr(p_nls_lang,'[^.]+',1,1);
          execute immediate 'alter session set NLS_TERRITORY=' ||
                            regexp_substr(p_nls_lang,'[^.]+',1,2);
        end if;

        RETURN true;

    END attach_session;

END APEX_REPORT_UTIL;
Our application is multi-lingual, so in this example we are setting the NLS language in context of the current APEX session. The p_nls_lang parameter contains the language and territory of the current application in the format <language>.<territory>.
To pass the NLS information from your APEX session, use the following SQL in your application to retrieve the data which you can subsequently pass to the parameter:
SELECT
    listagg(value,'.')
    within group (order by parameter) language
FROM
    nls_session_parameters
WHERE
    parameter in ('NLS_LANGUAGE', 'NLS_TERRITORY')
The Analytics Publisher report configuration
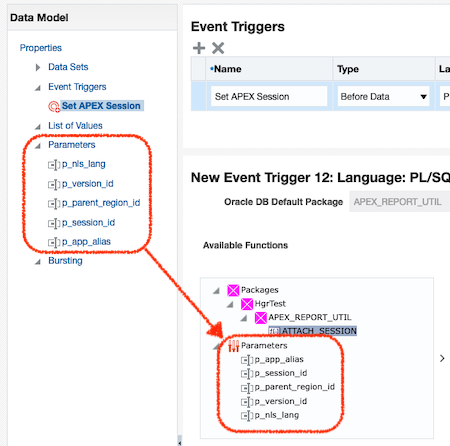
Once you have created your Analytics Publisher report, you must configure it to call the APEX_REPORT_UTIL.attach_session function before the data is queried.
- In the Properties page of your report's data model, enter the name of your package in the Oracle DB Default Package field (Fig 8).
- Create the APEX parameters in your report, plus any parameters required for the report itself. You will notice that we have five parameters in our example.
- Create the Before Data trigger that will call the package and make the connection to the APEX session using the parameters you have created.
- In our report, we have two additional parameters that we need to run the report (
p_parent_region_idandp_version_id), and these must also be included as global variables in our package. p_page_iddoes not need to be included in the report as it has been given a default value in our package. This may differ from your own requirements.
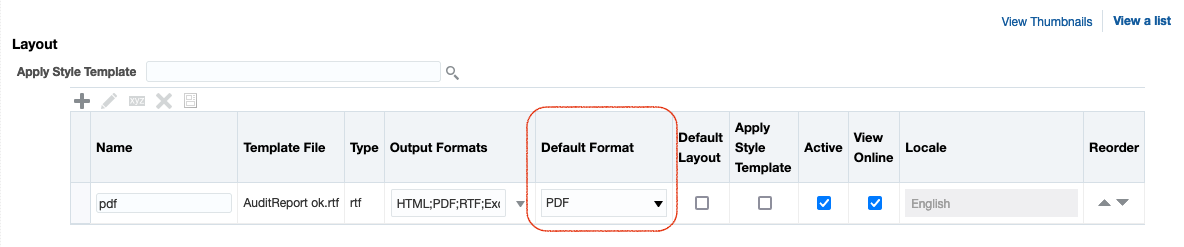
Report output format
In this example we are generating a PDF document from the report. The relevant mime types are defined as part of the call to the REST service, but also make sure that PDF format is configured in your report template options.
REST Consumption
Running a report through REST services requires a few items.
- The function call to the REST service.
- The credentials to connect to the service.
- The URL of the Analytics Publisher report you want to run.
- A JSON payload that describes the output format of the report and the required report parameters.
- A BLOB object into which the report results are returned.
REST service
The APEX web service to make the REST request we need is apex_web_service.make_rest_request_b, which is a function returning a BLOB.
We have created a function to call to the REST web service, which is shown below. l_blob is declared as a BLOB datatype.
FUNCTION execute_rest_request ( lp_url          IN VARCHAR2,
                                lp_JSON_payload IN CLOB )
RETURN blob IS
  l_blob BLOB;
BEGIN

  apex_web_service.g_request_headers(1).name := 'Content-Type';
  apex_web_service.g_request_headers(1).value := 'multipart/form-data; boundary="Boundary_1_1153447573_1465550731355"';

  l_blob := apex_web_service.make_rest_request_b
          (
          p_url                  => lp_url,
          p_http_method          => 'POST',
          p_credential_static_id => 'BI_PUBLISHER_CREDENTIALS',
          p_body                 => lp_JSON_payload
          );

  RETURN l_blob;
END;
Parameters to the REST request
-
p_urlis the URL of the REST service to run your Analytics Publisher report, which in our case comes from thelp_urlparameter of the function. The URL format is
https://<URL of Analytics server>/xmlpserver/services/rest/v1/reports/<report path>/run
<report path> is the path of the report in the Analytics catalog, but excluding the Shared Folders parent folder. e.g Finance/Projects/Summary Report.xdo.
p_credential_static_idpoints to the credentials for connecting to the REST service. These should be set up maually usingapex_credential.create_credentialon the SQL command line. The instructions for this can be found in the Oracle Documentation.
-
p_bodyis a CLOB and contains the JSON payload to pass the report parameters and document output type to the REST service. We are passing the payload in through thelp_JSON_payloadparameter of the function. For our example report, the payload looks like the sample below. Note: Take care when creating this script as the syntax is very precise.
--Boundary_1_1153447573_1465550731355
Content-Type: application/json
Content-Disposition: form-data; name="ReportRequest"

{
    "flattenXML": false,
    "byPassCache": true,
    "reportContentType": "application/pdf",
    "parameterNameValues": {
        "listOfParamNameValues": {
            "item": [

                {
                    "name": "p_nls_lang",
                    "values": {
                        "item": [
                            "<p_nls_lang>"
                        ]
                    }
                },
                {
                    "name": "p_app_alias",
                    "values": {
                        "item": [
                            "<p_app_alias>"
                        ]
                    }
                },
                {
                    "name": "p_parent_region_id",
                    "values": {
                        "item": [
                            "<p_parent_region_id>"
                        ]
                    }
                },
                {
                    "name": "p_version_id",
                    "values": {
                        "item": [
                            "<p_version_id>"
                        ]
                    }
                },
                 {
                    "name": "p_session_id",
                    "values": {
                        "item": [
                             <p_session_id>
                        ]
                    }
                }
            ]
        }
    }
}
--Boundary_1_1153447573_1465550731355--
Report parameters in the JSON script
These are the parameters that are passed to the report, and have been defined in the report as described in the Analytics Publisher configuration section above.
p_nls_langis a string containing the NLS language information in<language>.<territory>format, if required.p_app_aliasis the alias name of your application.p_session_idis the current APEX session ID.
Additional report parameters
p_page_idis an APEX parameter that is not included here but may be required for your application.p_parent_region_idandp_version_idare both custom parameters for the report.
Multipart and Boundary
The multipart/form-data attribute of the request header, which forms part of the call to the REST service, is used here to ensure large files are split by the POST request when sending by HTML form. In our case, the output is split into two parts. The first of these is the JSON response and the second is the report output.
The boundary attribute is specified for the multipart form and is used by HTML to define the boundary between the individual parts of the segmented file. It can be any ASCII text up to 70 characters but must be the same in every instance of the POST request.
APEX Integration
Here we will create an Application Process that will call the Web Service function. This will receive and download the BLOB containing the report output. We will create a button in the APEX application to call the Application Process.
Procedure to Run the Report
On completion of the REST call the response will return the output from the Analytics Publisher report in the format defined by the reportContentType element of the JSON payload. This is returned into the l_blob BLOB variable and is downloaded with the following PL/SQL. Note that we define the report output type again in the mime header:
PROCEDURE run_report ( lp_url          IN VARCHAR2,
                       lp_JSON_payload IN CLOB ) IS
  l_blob BLOB;
BEGIN

  l_blob := execute_rest_request( lp_url, lp_JSON_payload );

  sys.htp.init;

  sys.owa_util.mime_header('application/pdf', false);
  sys.htp.p('Content-Length: ' || dbms_lob.getlength(l_blob));
  sys.htp.p('Content-Disposition: filename="' || p_filename || '"');
  sys.owa_util.http_header_close;

  sys.wpg_docload.download_file(l_blob);

  apex_application.stop_apex_engine;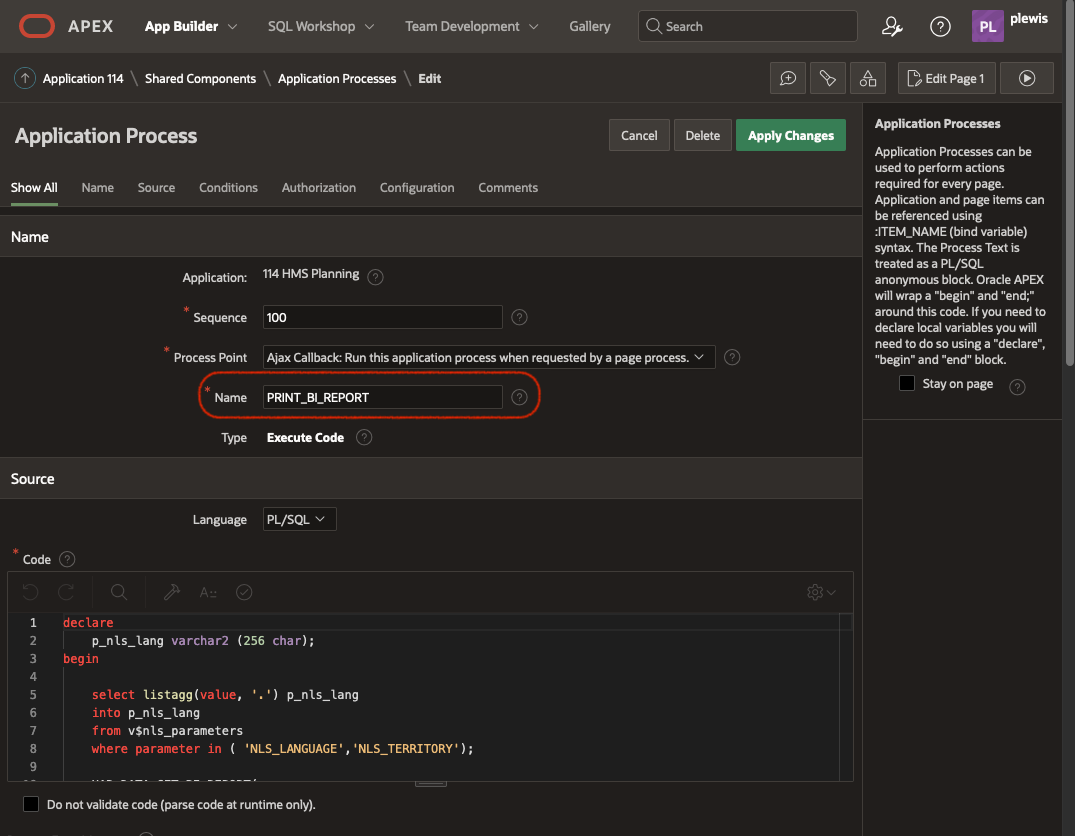
END;The Application Process
Now we can create the Application Process in APEX, in this case called PRINT_BI_REPORT. The process point of this is Ajax Callback, which ensures the process executes by the submit page action of the button (fig 11).
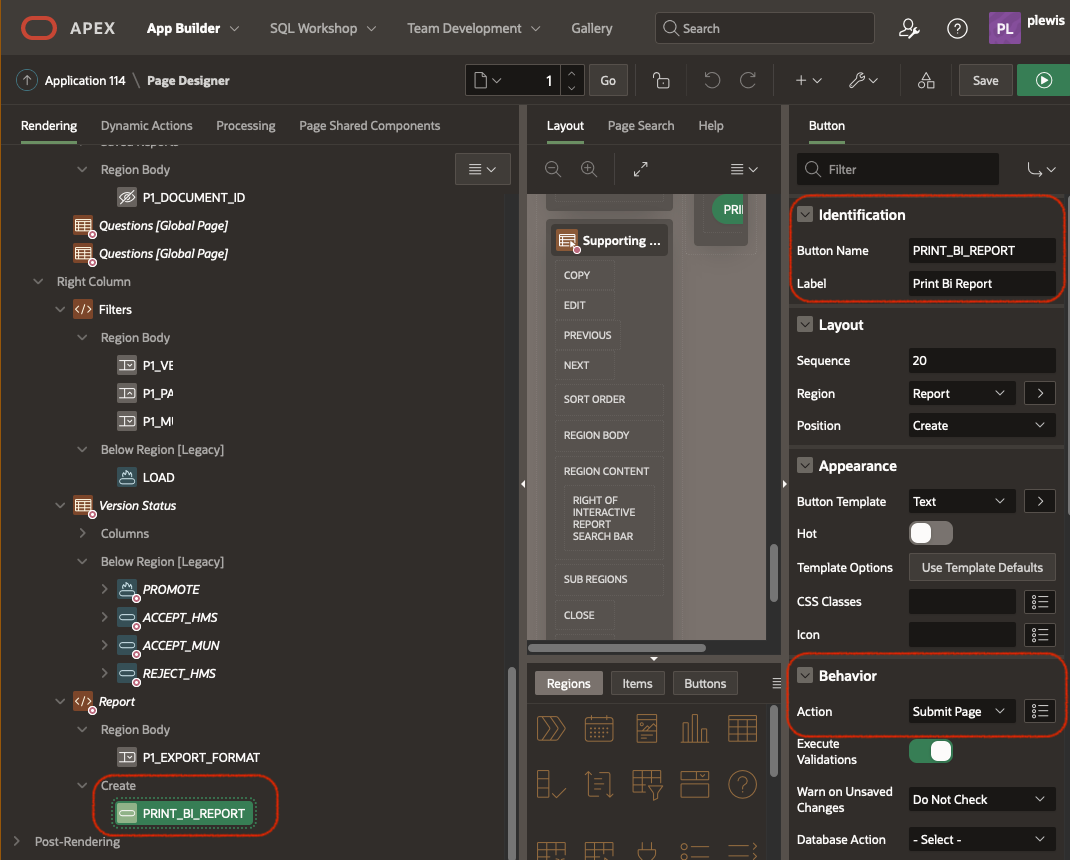
Create a button to call the process
The final stage of this procedure is to create a button that will call the PRINT_BI_REPORT Application Process. For this case, we need a simple button that submit the page:
Then a branch to the same page, with the special request to call the Application Process:
That branch will trigger When Button Pressed - PRINT_BI_REPORT:
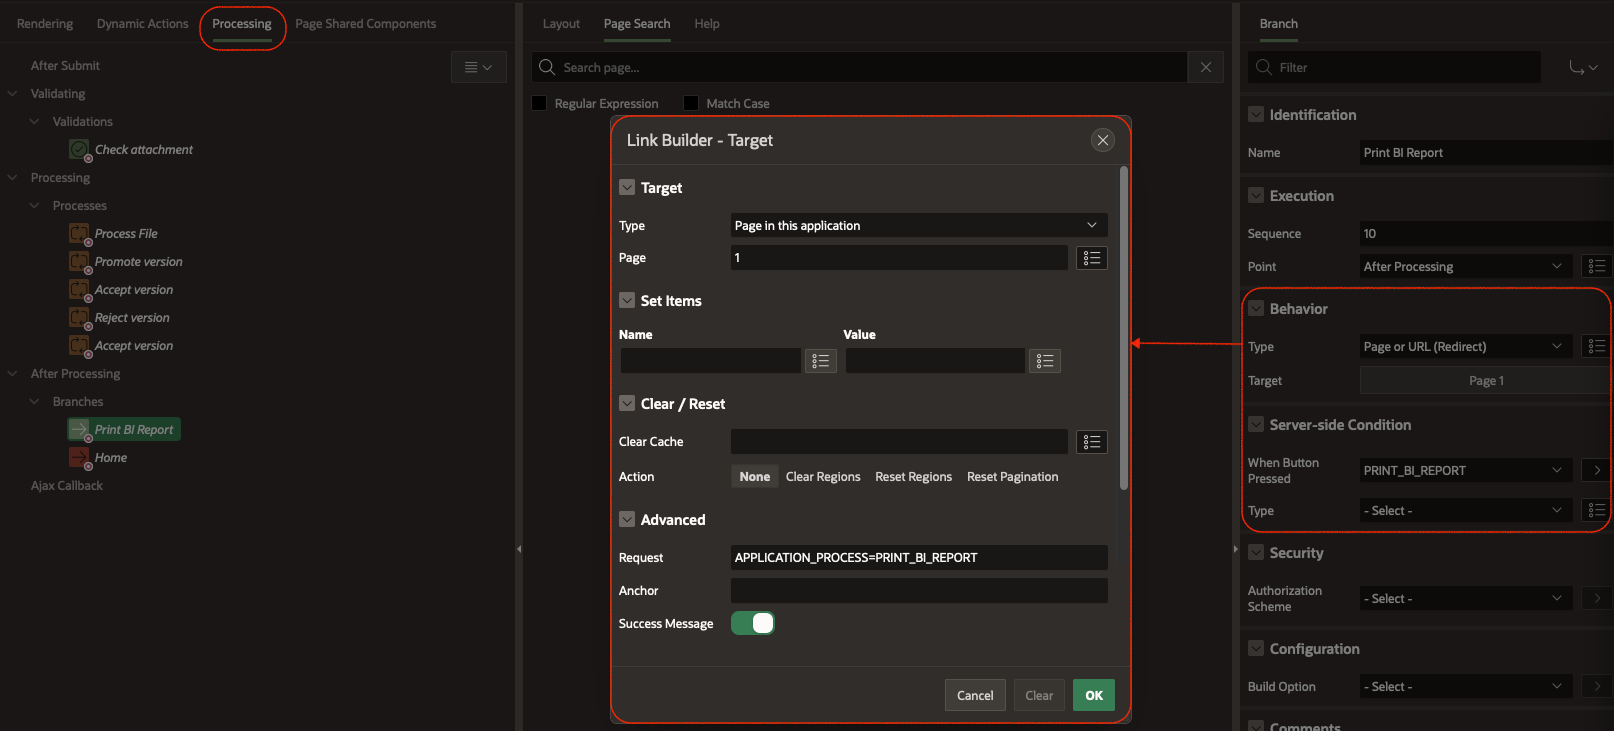
The branch execution point depends on the logic of your page. If you need to save data on submit that will be used in the report, then you can trigger the branch after processing.
Find out more about our APEX services