Oracle APEX - Creating a Dynamic Action Plug-in


When creating an APEX application you do so by placing and configuring in-built components onto a page through the builder. There are many types of components in APEX (such as regions, page items, dynamic actions, buttons and processes) which are combined together to create an application. For each type of component APEX provides an array of pre-built options for you to utilise. Whilst there is a large library to choose from, there are times where the functionality you wish to deploy is not available as standard. In these cases you could simply customise your APEX page by deploying the necessary code into the page (be it HTML, CSS or JavaScript). Before you do this though, perhaps stop and consider when you could be packaging your custom code into an APEX plug-in. This will instantly make it reusable across pages, applications and even the community.
A plug-in, when installed, renders itself into the APEX builder as if it was a native component itself allowing you to use the component on the page as if it was part of standard APEX making it a very appealing choice.

Oracle APEX - Plug-ins Explained
We have found, however, that the documentation available detailing how to create plug-ins is not terribly in-depth or well explained, and getting yourself started can seem a little daunting.
In this new blog post, we will show you how to create a simple dynamic action plug-in from scratch, explaining each step of the process and, hopefully, this will inspire you to start creating your own!
Dynamic Actions
As there are many differing types of components within APEX, it is of no surprise that there are different plug-in types that you can create. The concept remains the same across each of these, but the configuration can be slightly different. In this Blog, we are going to focus on creating a simple dynamic action plug-in and as such it is probably worthwhile to begin with an explanation of what these types of components are and why they are useful in APEX.
Dynamic actions are essentially APEX's way of allowing a user to create rich client-side behaviour declaratively without writing any JavaScript code. Specifically, they enable you to define actions that occur in response to framework events triggered by users or other components on the page. For example, they will allow you to refresh a specific page region after a page item is modified, or hide / show a modal when a button is clicked. When configuring these, APEX writes the JavaScript for you and places it on the page when it is rendered.
Whilst APEX provides the developer with probably 95% of client side functionality they will need when writing applications, it is not possible to include every single event that you may need declaratively, especially if you would like to include functionality related to custom JavaScript libraries that you may want to include in your application.
Example Requirement
In a recent project, a customer wanted to be able to automatically allow the user to capture specific parts of the page as images. This was related to regions of graphs and maps where they wanted to record what those reports were reflecting at a specific point in time also to save that image data for use in BI reports. These images were to either be downloaded or saved to a specific area of the database.
The first task was to try and find a readily available JavaScript library that we could use to achieve the results required (there is no point in trying to reinvent wheels when clever coders have done the work for you!). We settled on https://html2canvas.hertzen.com/ which is a well known library available free under the permissive MIT license. The details of the library are not important here, just that it can be used to capture all or part of the DOM easily.
Building the DA plug-in
In developing the plug-in we therefore started off with the following simple requirements. The new dynamic action should allow the user to download a section of the page (a div id defined in a page item or defined in the action) based on a framework event (eg button click) or, off a similar event, allow the user to save the captured screenshot to a specified APEX collection where it can be readily accessed and then saved via the developers' choice of PL/SQL.
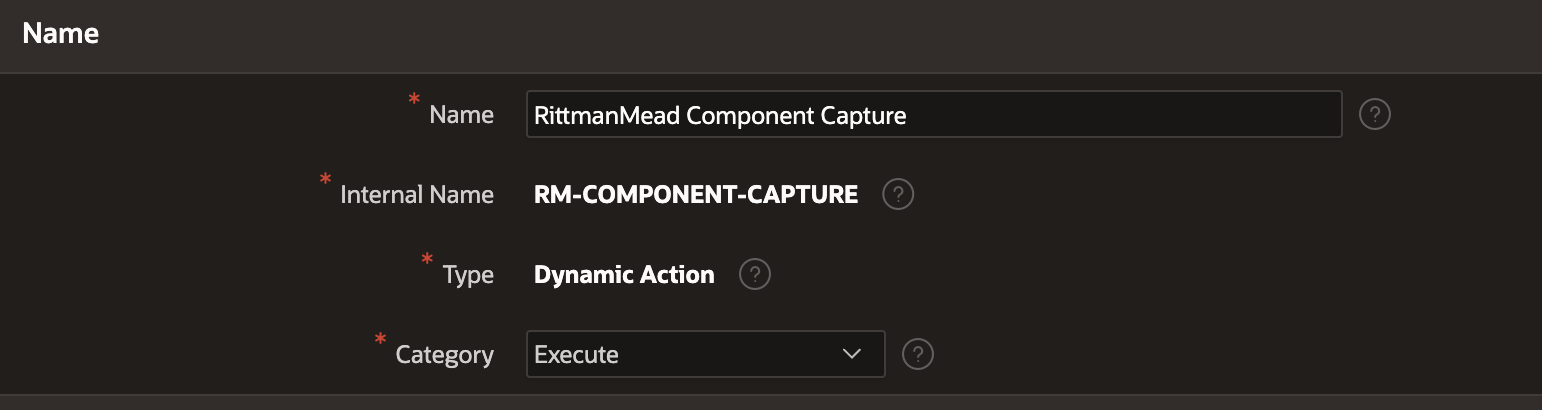
On creating a DA plug-in in the APEX builder, you need to define a name, internal name, type and category. A simple enough start!
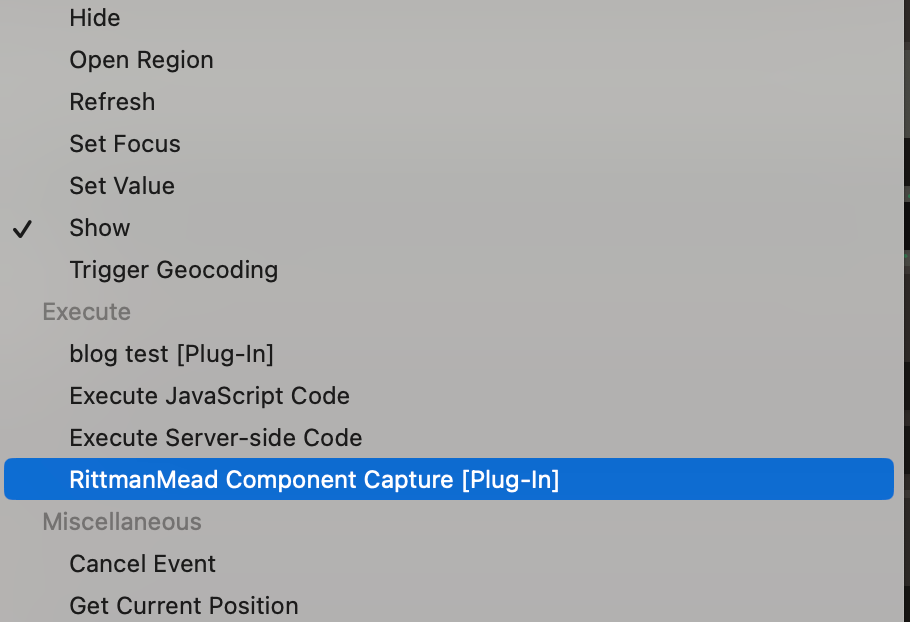
The "Category" you choose just defines where your plug-in will appear in the list when a developer is choosing the dynamic action (see screenshot below for clarity)
The plug-in then asks you to define various other attributes and code that it needs to render the options for the developer in the APEX builder and execute in order for the DA to work. I'll go through these briefly below and then we'll look at them in more details afterwards.
Source This is the a PL/SQL code block (or reference to a package) that contains the procedure / function names for the callback items below.
Callbacks These two items reference the name of the below functions
1) Render Procedure/Function Name
The function referenced in the source that is used to tell APEX how to render (execute) the plug-in, it contains references to any custom attributes defined in the plug-in and the main JavaScript function that should be triggered by the action
2) AJAX Procedure/Function Name
The function referenced in the source that acts as a callback from the executed JavaScript to enact any server side code that is necessary as part of the plug-in's actions.
Standard Attributes Which of the standard APEX dynamic attributes to make available to the APEX developer when configuring the plug-in
Custom Attributes A list of custom defined attributes that can be configured by the APEX developer and are accessed by the PL/SQL and JavaScript code referenced in the plug-in
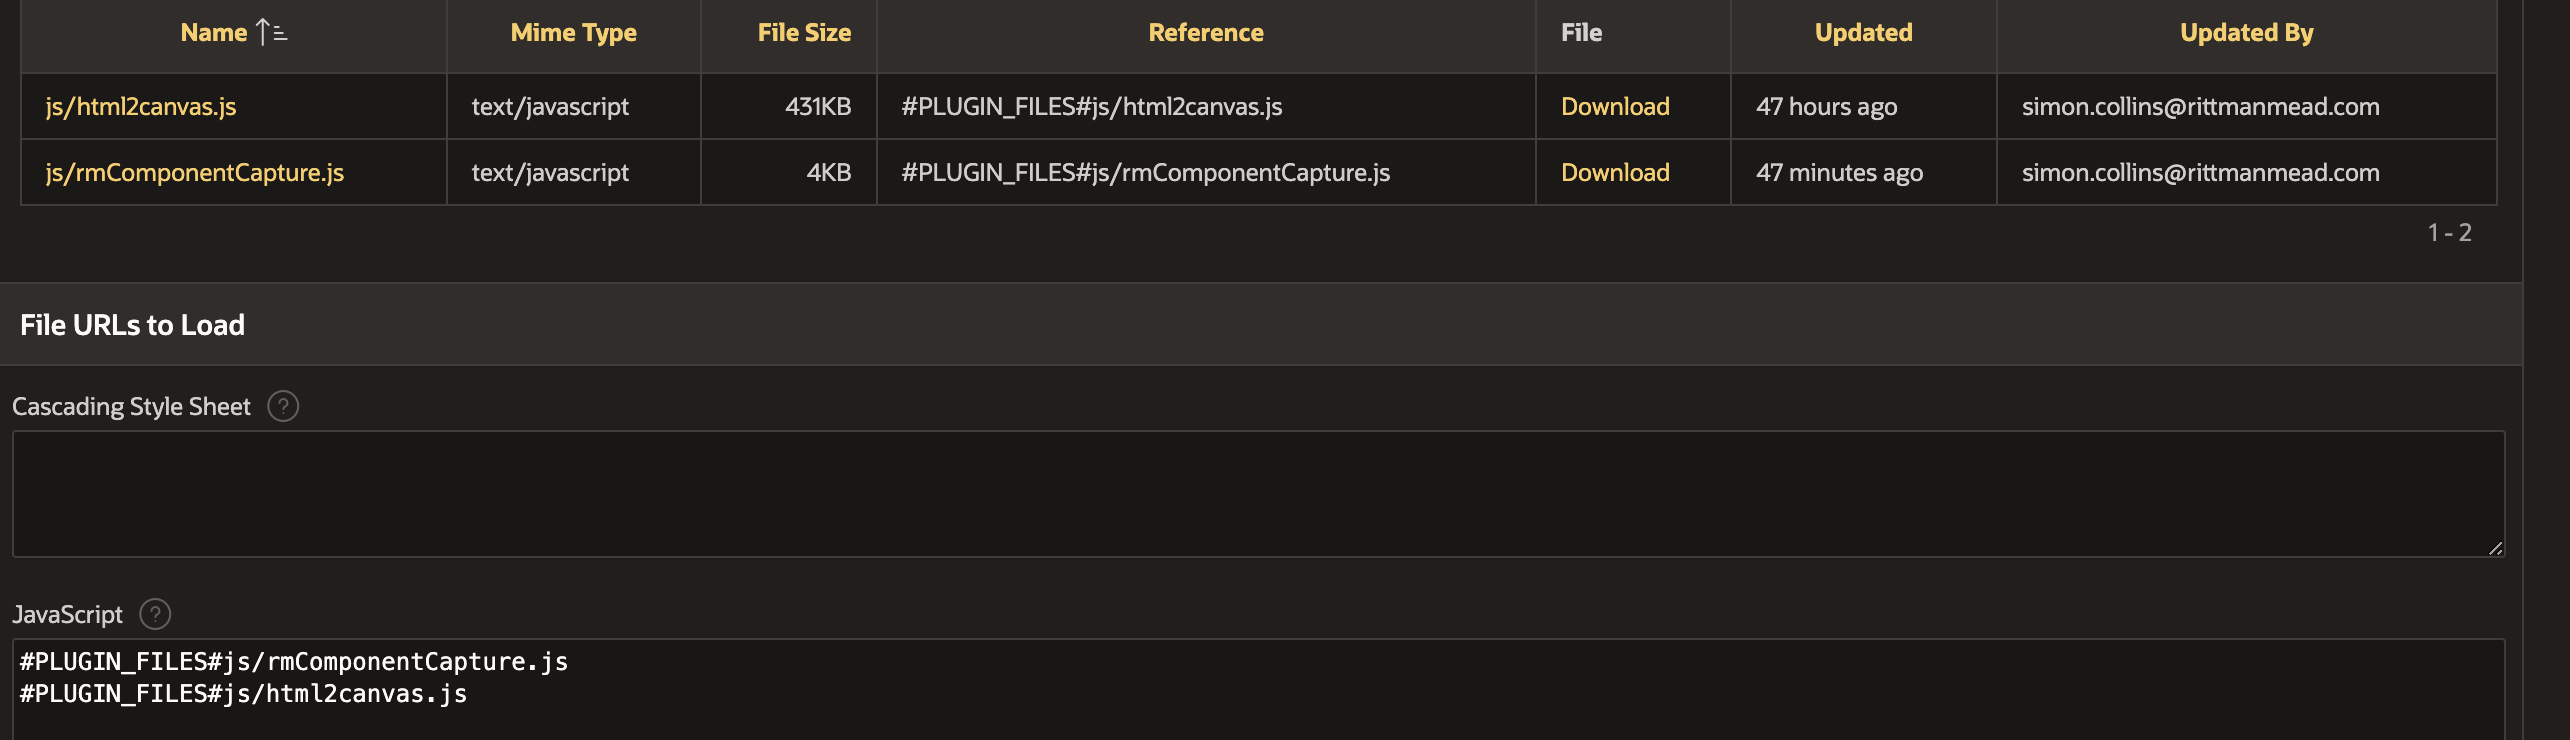
Files A list of files (usually JavaScript and CSS) needed to make the plug-in work
All the above seems a bit abstract and complicated. How do you define these various functions and files and link them together passing in declared attributes and get them to execute the desired effect through APEX configuration? Below we'll take this step by step for our simple example.
Setting up the Attributes
Firstly, we'll start by defining the attributes in the plug-in that we would like to expose to the developer when configuring the dynamic action. We have 5 of these which you can see below (which essentially control 2 parts of the functionality we need - the way of getting the div id of the section to snapshot and what to do with this snapshot once we acquire it)
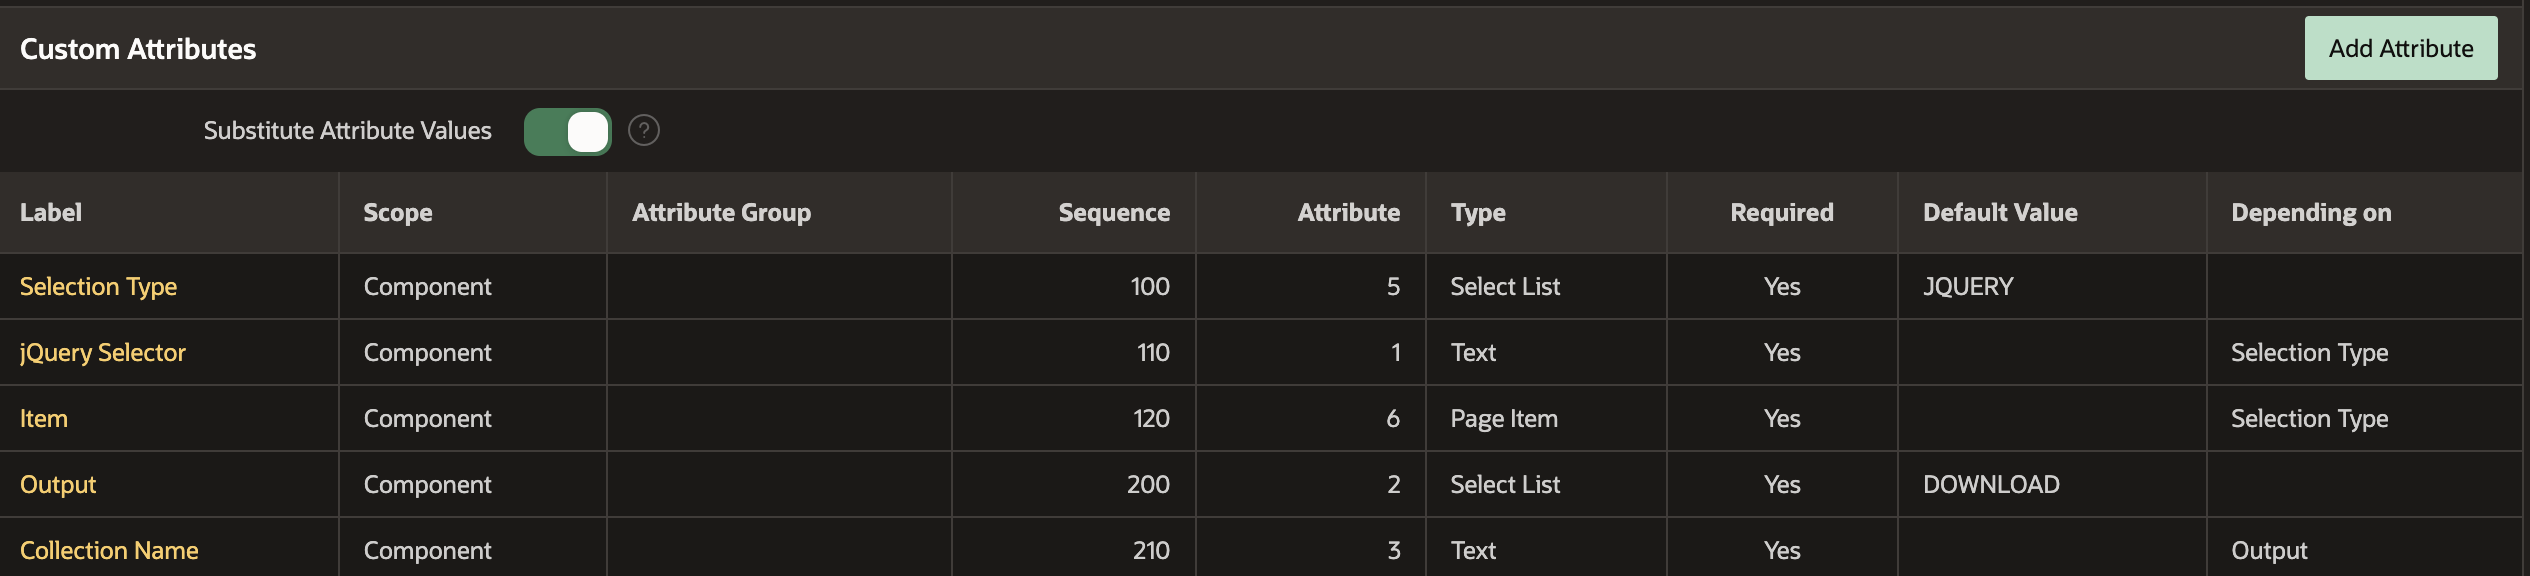
a) Selection Type - This is defined as a Select List and will ask the developer whether they want to input the jQuery Selector div id for the area to be captured directly from a text input or from a page item that will hold that id. The second two attributes are dependent on this "Selection Type". They tell APEX to either render a text box allowing the developer to enter the jQuery id directly or ask them to select a page item where the jQuery id will be stored
b) Output - This is a Select List that will be shown to the developer asking whether the generated screenshot will be downloaded from the browser or saved into a collection. The Collection Name Text box attribute will be shown to the developer if the Output is set to SAVE (one of the choices from the "Output" attribute)
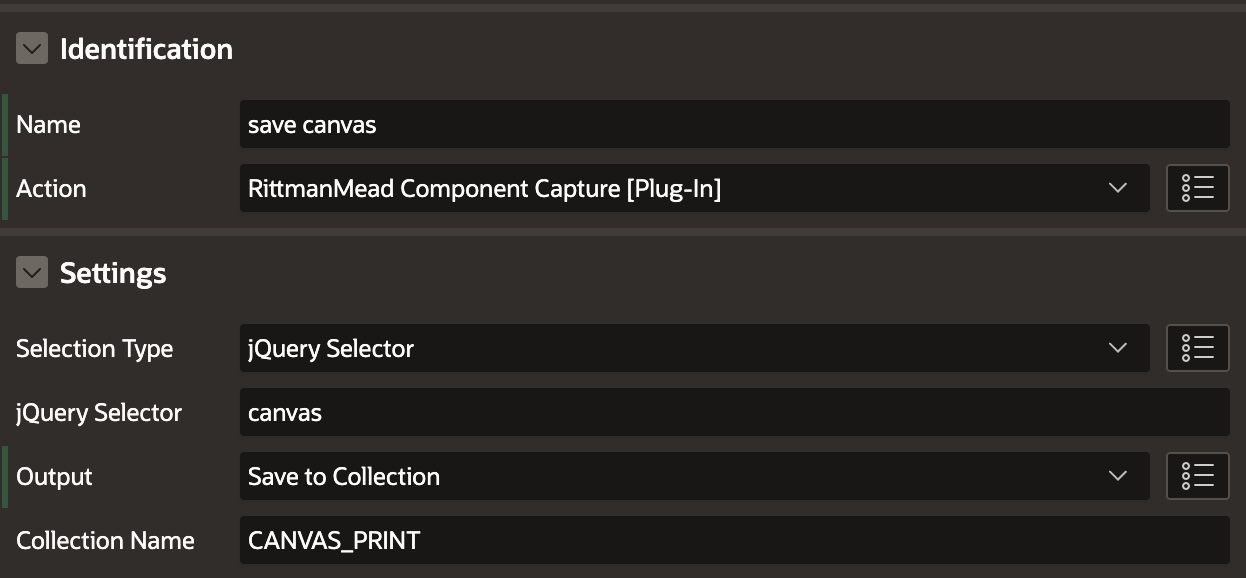
Once we have these set then we have the basis of the Dynamic Action. We can actually go into the APEX builder now and set up the DA, and have access to the attributes that we have defined (below I'm saying I'd like to get the data from a jQuery selector called canvas and then save it to a collection name called CANVAS_PRINT). Of course this dynamic action won't do anything at the moment but you can see it starting to take shape!
Adding the Render function
We're now going to add the code below in the PL/SQL block of the Plug-in. Dynamic action plug-ins have to return apex_plugin.t_dynamic_action_render_result. It looks complicated but really it's only doing two things:
1) Adding the attributes that we've defined to global variables so that the main JavaScript function we will define later can access them
2) Registering the JavaScript function to execute when the dynamic action is fired (we will explain where RM.componentCapture is defined later)
function render
  ( p_dynamic_action in apex_plugin.t_dynamic_action
  , p_plugin         in apex_plugin.t_plugin )
return apex_plugin.t_dynamic_action_render_result
as

l_result     apex_plugin.t_dynamic_action_render_result;


l_jquery_selector p_dynamic_action.attribute_01%type := p_dynamic_action.attribute_01;

l_type p_dynamic_action.attribute_02%type := p_dynamic_action.attribute_02;

l_collection_name p_dynamic_action.attribute_03%type := p_dynamic_action.attribute_03;

l_selector_type p_dynamic_action.attribute_05%type := p_dynamic_action.attribute_05;

l_item_selector p_dynamic_action.attribute_06%type := p_dynamic_action.attribute_06;

begin

    l_result.javascript_function := 'RM.componentCapture';
    l_result.ajax_identifier     := apex_plugin.get_ajax_identifier;
    l_result.attribute_01        := l_jquery_selector;
    l_result.attribute_02        := l_type;
    l_result.attribute_03        := l_collection_name;
    l_result.attribute_05        := l_selector_type;
    l_result.attribute_06        := l_item_selector;

    return l_result;

end render;
When this is done we place "render" in the Render Procedure/Function Name input of the callback section below the PL/SQL
Adding the AJAX
This is the main callback routine of the plug-in. In our case its job is to receive back a CLOB from the browser and place it in a collection (if that is how the DA is configured). How it gets the CLOB data is shown later in the JavaScript section below.
function ajax
  ( p_dynamic_action in apex_plugin.t_dynamic_action
  , p_plugin         in apex_plugin.t_plugin
  )
return apex_plugin.t_dynamic_action_ajax_result
as
    l_result apex_plugin.t_dynamic_action_ajax_result;
    l_collection_name  p_dynamic_action.attribute_03%type := p_dynamic_action.attribute_03;


    l_blob            blob;
    l_filename        varchar2(100);
    l_mime_type       varchar2(100);
    l_token           varchar2(32000);

begin
  -- set the mime type
  l_mime_type := ('image/png');
  -- set the filename
  l_filename  := 'capture_' || to_char(sysdate, 'YYYYMMDDHH24MISS');

  -- build clob from f01 30k array
  dbms_lob.createtemporary(l_blob,
                           false,
                           dbms_lob.session);

  for i in 1 .. apex_application.g_f01.count loop
    l_token := wwv_flow.g_f01(i);
    if length(l_token) > 0 then
      dbms_lob.append(l_blob,             to_blob(utl_encode.base64_decode(utl_raw.cast_to_raw(l_token))));
    end if;
  end loop;

  -- create collection with collection name that user provides

  if not apex_collection.collection_exists(p_collection_name => l_collection_name) then

    apex_collection.create_collection(l_collection_name);

  end if;

  -- add collection member (only if blob not null)

  if dbms_lob.getlength(lob_loc => l_blob) is not null then
    apex_collection.add_member(p_collection_name => l_collection_name,
                  p_c001     => l_filename, -- filename
                  p_c002     => l_mime_type, -- mime_type
                  p_d001     => sysdate, -- date created
                  p_blob001  => l_blob); -- blob img content
  end if;
  --

    return l_result;

end ajax;
When this is done we simply enter "ajax" in the AJAX Procedure/Function Name input of the callback section below the PL/SQL
Adding Callback events
These events can be used to trigger specific actions when an event occurs and will be made available to the APEX developer. They are defined in the Javascript later. In our case we will define a trigger that will allow the captured HTML to be saved in the database only when the capture of the data into an APEX collection has been successful.

Entering the JavaScript
We're now at the heart of the plug-in, which is to set up the JavaScript code that do the screen grabbing. We're definitely going to need the html2canvas library as part of this, so the first thing we'll do is upload that into the Plug-in files part (screenshot later).
This library is going to do most of the work for us. However, we are going to have to write our own little Javascript wrapper first. This small section of code will grab the variables that we have declared in the render function above and decide how to call html2canvas depending on how these have been configured.
The whole of our JavaScript is below.
var RM = {

    // create a js array from clob
    clob2Array: function (clob, size, array) {
        loopCount = Math.floor(clob.length / size) + 1;
        for (var i = 0; i < loopCount; i++) {
            array.push(clob.slice(size * i, size * (i + 1)));
        }
        return array;
    },

    // converts DataURI to base64 string
    dataURI2base64: function(dataURI) {
        var base64 = dataURI.substr(dataURI.indexOf(',') + 1);
        return base64;
    },

    componentCapture: function () {
        // plugin attributes
        var daThis = this;


        var html2canvasConfiguration = {
            allowTaint: false,
            useCORS: true,
            backgroundColor: null,
            logging: true,
            imageTimeout: 0
        };

        var vSelectorType = daThis.action.attribute05;

        // check the selector type
        if (vSelectorType == 'JQUERY') {
            var vRegionSelector = daThis.action.attribute01;
        } else if (vSelectorType == 'ITEM') {
            var vRegionSelector = apex.item(daThis.action.attribute06).getValue();
        }

        var vAjaxIdentifier = daThis.action.ajaxIdentifier;
        // get the type of the plugin: SAVE, DOWNLOAD
        var vPluginType = daThis.action.attribute02;
        // get the element to capture
        var elementToCapture = $(vRegionSelector)[0];

        // if the plugin type is "DOWNLOAD" then save the file locally.
        if (vPluginType == 'DOWNLOAD') {
            html2canvas(elementToCapture, html2canvasConfiguration).then(function (canvas) {


                // get the date and time to generate the filename
                const today = new Date();
                const yyyy = today.getFullYear();
                let mm = today.getMonth() + 1; // Months start at 0!
                let dd = today.getDate();
                let hh = today.getHours();
                let mi = today.getMinutes();
                let ss = today.getSeconds();

                if (dd < 10) dd = '0' + dd;
                if (mm < 10) mm = '0' + mm;
                if (hh < 10) hh = '0' + hh;
                if (mi < 10) mi = '0' + mi;
                if (ss < 10) ss = '0' + ss;

                const formattedToday = yyyy + mm + dd + hh + mi + ss;

                var link = document.createElement('a');
                link.download = 'capture_' + formattedToday + '.png';
                link.href = canvas.toDataURL();
                link.click();
                link.remove();
            });
          // if the plugin type is "SAVE" then save to collection
        } else if (vPluginType == 'SAVE') {
            html2canvas(elementToCapture, html2canvasConfiguration).then(function (canvas) {

                var img = canvas.toDataURL();

                var base64 = RM.dataURI2base64(img);

                var f01Array = [];
                var mimeType = 'image/png';
                f01Array = RM.clob2Array(base64, 30000, f01Array);

                // AJAX call
                apex.server.plugin(vAjaxIdentifier, {
                    f01: f01Array,
                    x01: mimeType
                }, {
                    dataType: 'html',
                    // SUCESS function
                    success: function () {
                        // add apex event
                        apex.event.trigger(elementToCapture, 'screencapture-saved-db');
                    },
                    // ERROR function
                    error: function (pMessage) {
                        // add apex event
                        apex.event.trigger(elementToCapture, 'screencapture-error-db');
                        // logging
                        console.error();
                    }
                });
            });
        } else {

            // TO FIX

            console.log('Conditions not matched.');
            console.log('Parameter value', vPluginType);
        }
    },
}
At the top are a couple of helper functions that are needed when saving the screenshot and passing it back to the APEX collection but the main function that we call is componentCapture (which is why we labelled RM.componentCapture as the JavaScript function in the render function above). Some important features of this code are noted below:
1) Attributes that are defined as custom attributes and returned by render function, can be used in JavaScript code. For instance:
var daThis = this;
var vPluginAtt01 = daThis.action.attribute01;
2) The main Ajax callback is defined in the code below. This is used later on in the code in the apex.server.plugin function to send back the captured CLOB from the browser to the backend so that it can stored in an APEX collection
var vAjaxIdentifier = daThis.action.ajaxIdentifier;3) The Ajax triggers that we defined in the plug-in are referenced in the code like below (in this case when the main Ajax callback that saves the data to a collection is successful).
apex.event.trigger(elementToCapture, 'screencapture-saved-db');We can use this trigger when configuring dynamic actions to trigger any standard DA event (in this case we will use PL/SQL to save the collection to the database).
We then simply upload out two javascript files into the plug-in so it has access to them.
And that is it! The plug-in is ready to use
Configuring a Dynamic Action from the Plug-in
In this last section we can see how the plug-in can be configured by the developer to both download a file and to save the file to the database via the APEX collection.
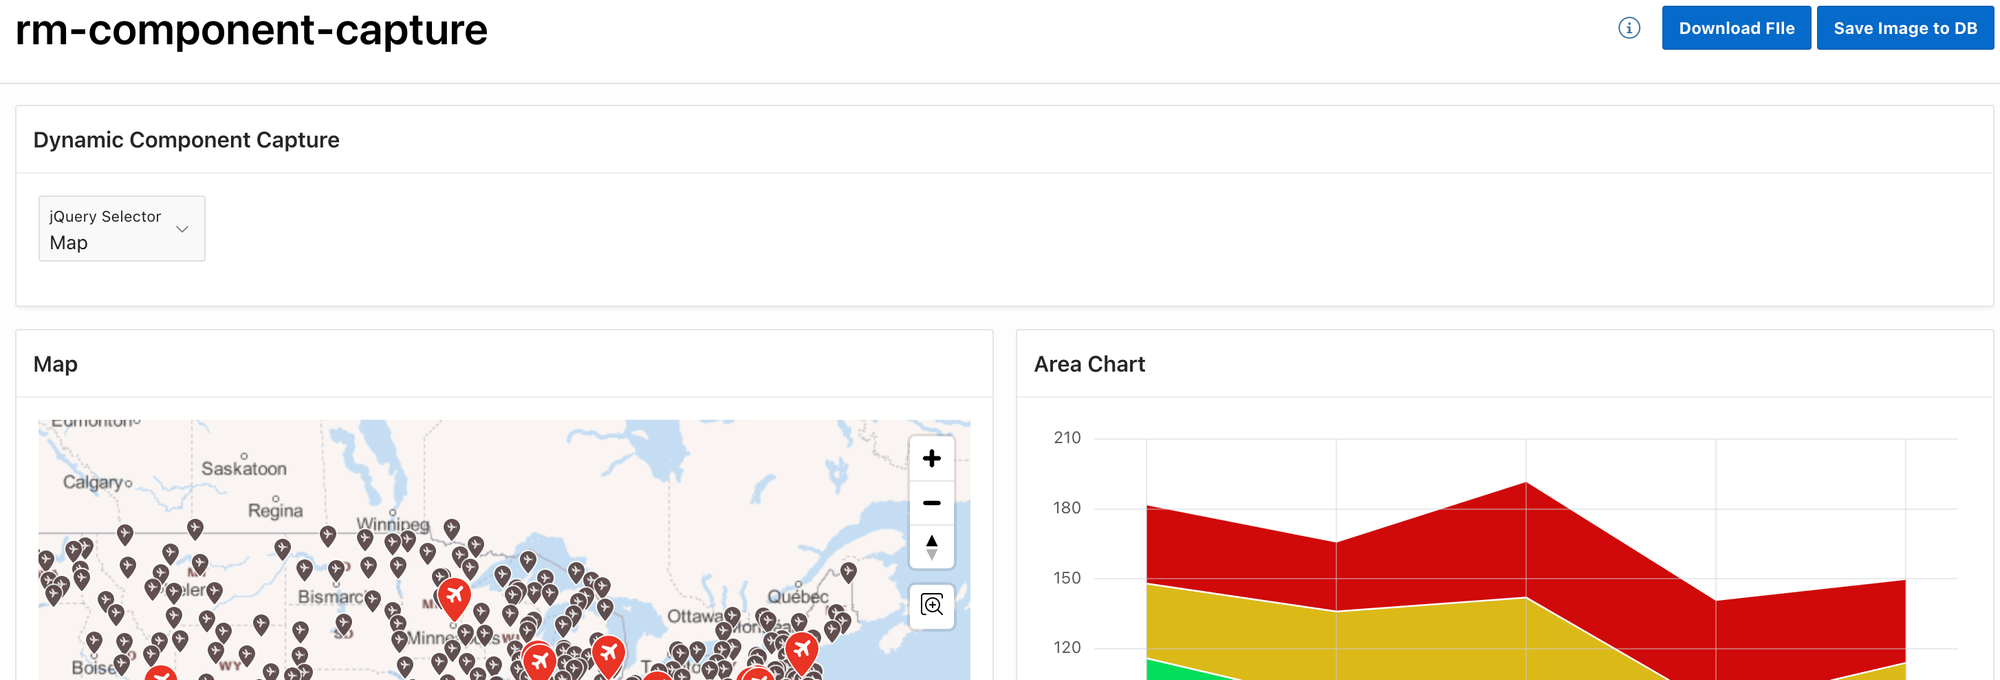
First we create a simple page. The page contains two regions (a map and a chart). The page regions have static ids assigned of custom-map-region and area-chart respectively. We then create a simple select list item that has static return values of #custom-map-region and #area-chart (and friendly display names for the users of course).
Finally in the page layout we place two buttons called "Download" and "Save image to DB". We will configure these to trigger the DA plug-in we have just written.
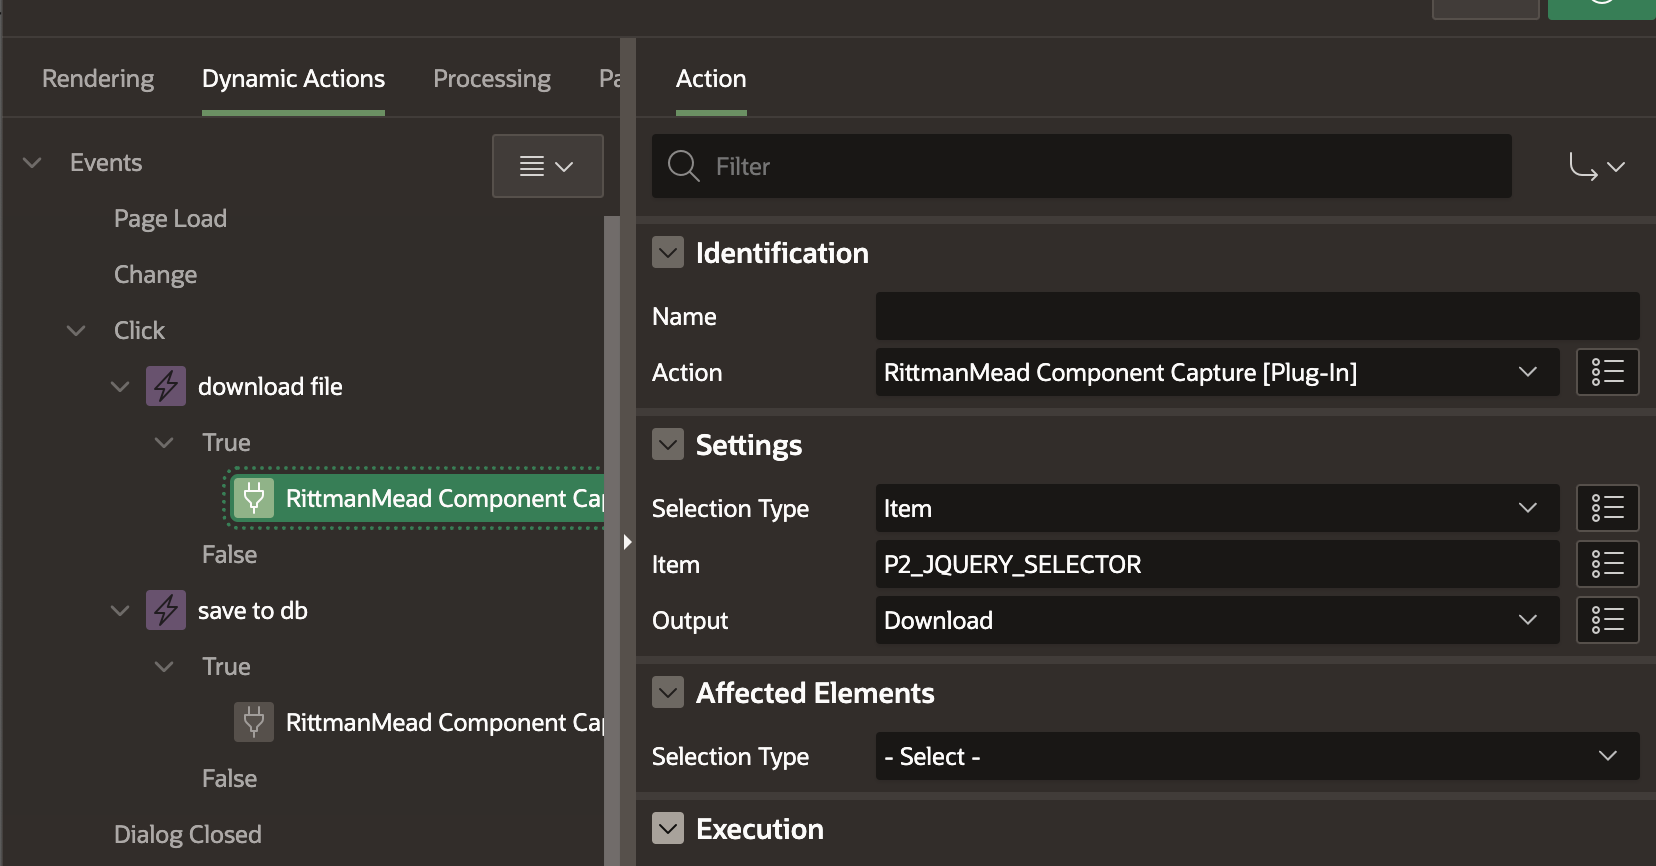
For the download button we configure an on-click event for that button and choose our plug-in from the Action Menu. In the Selection Type we choose item and then pick the select list item we have just created. For the output type we select "Download":
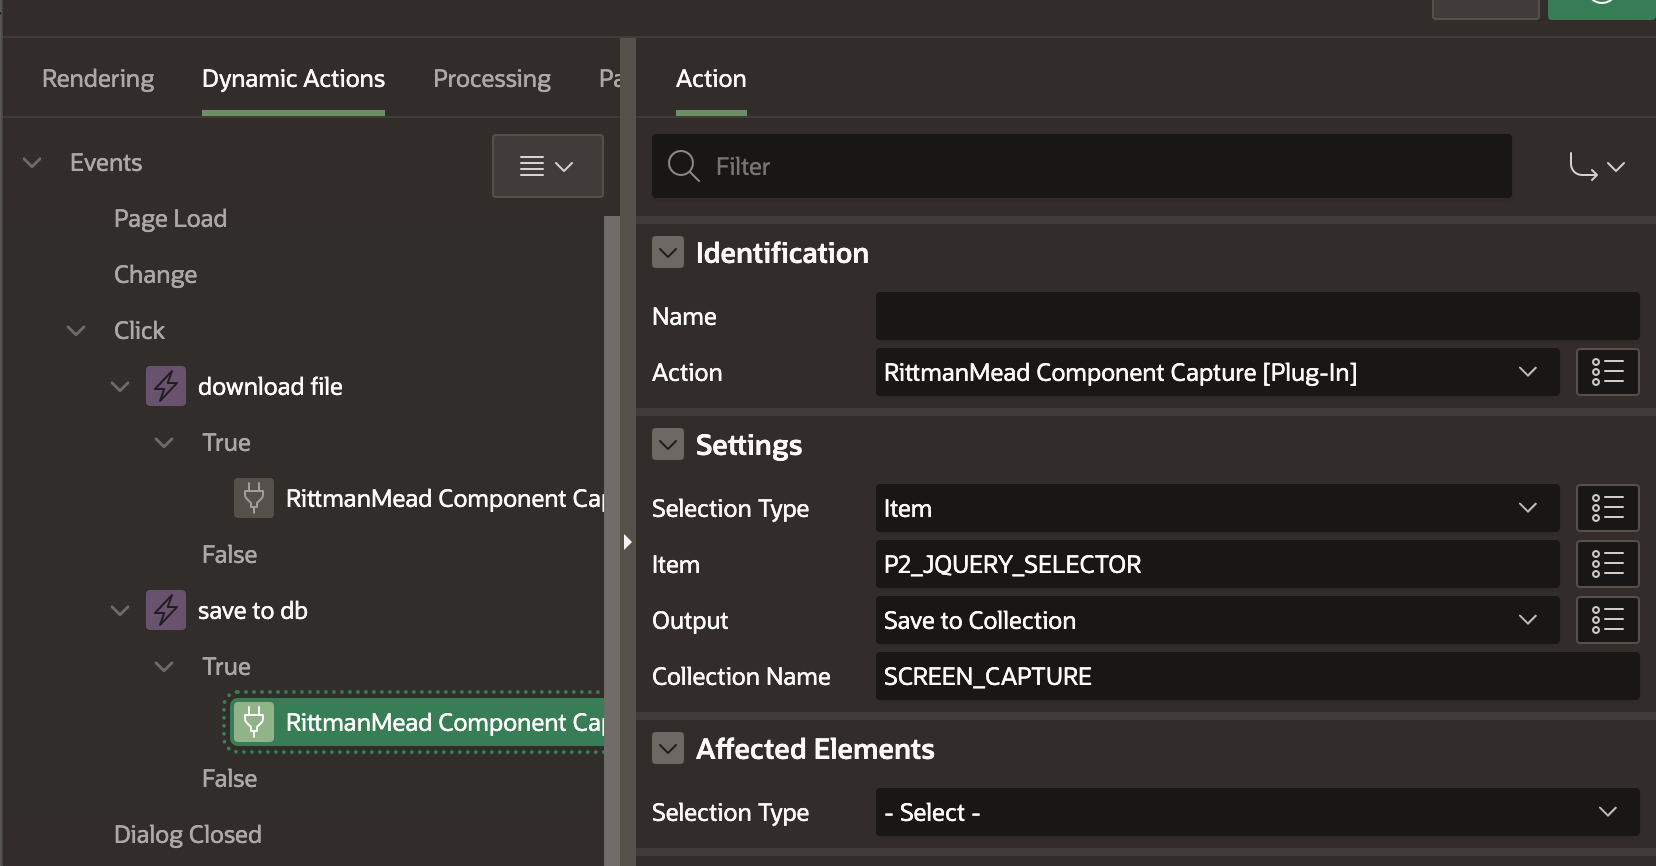
For the "Save to database" button we configure another on click DA and configure it in the same way except that instead of download we choose "Save to Collection" and then give our collection the name SCREEN_CAPTURE:
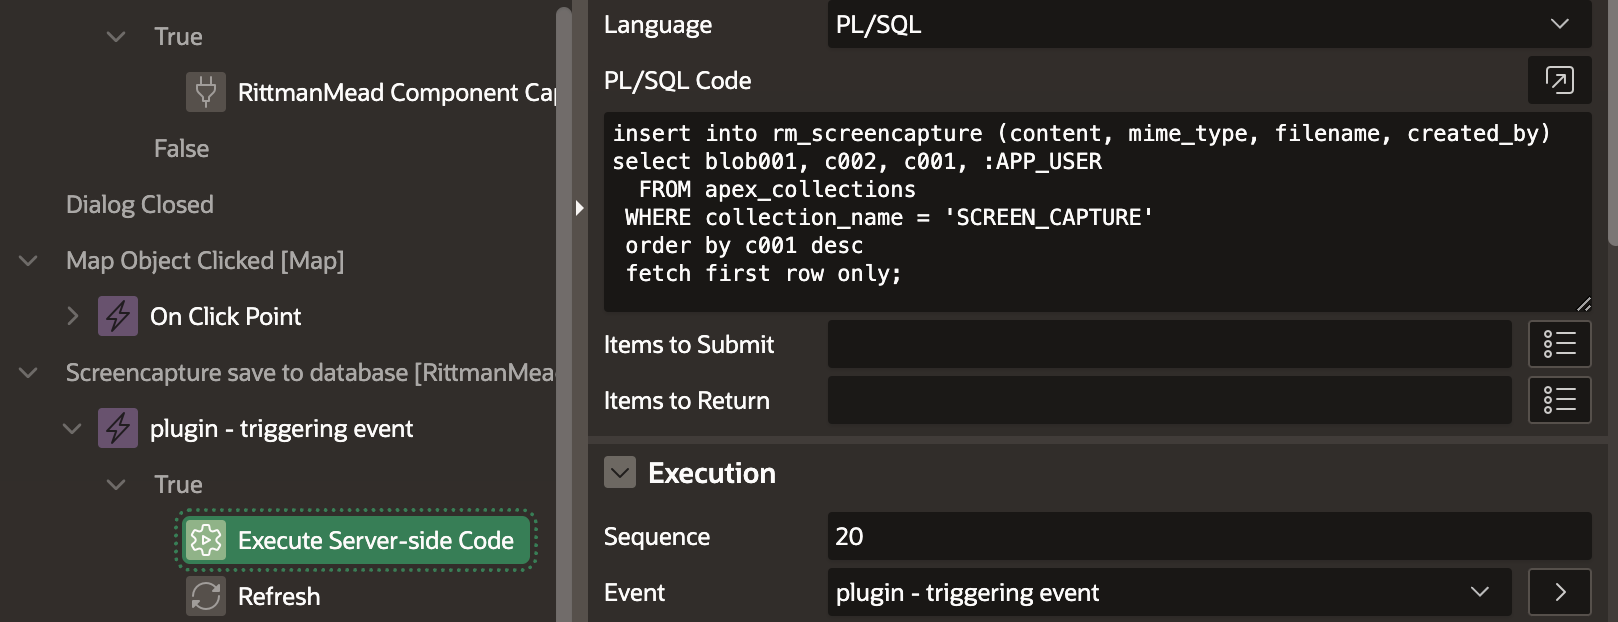
Lastly we configure a DA on the custom event that we set up in our plug-in (to be triggered when the collection is successfully filled).
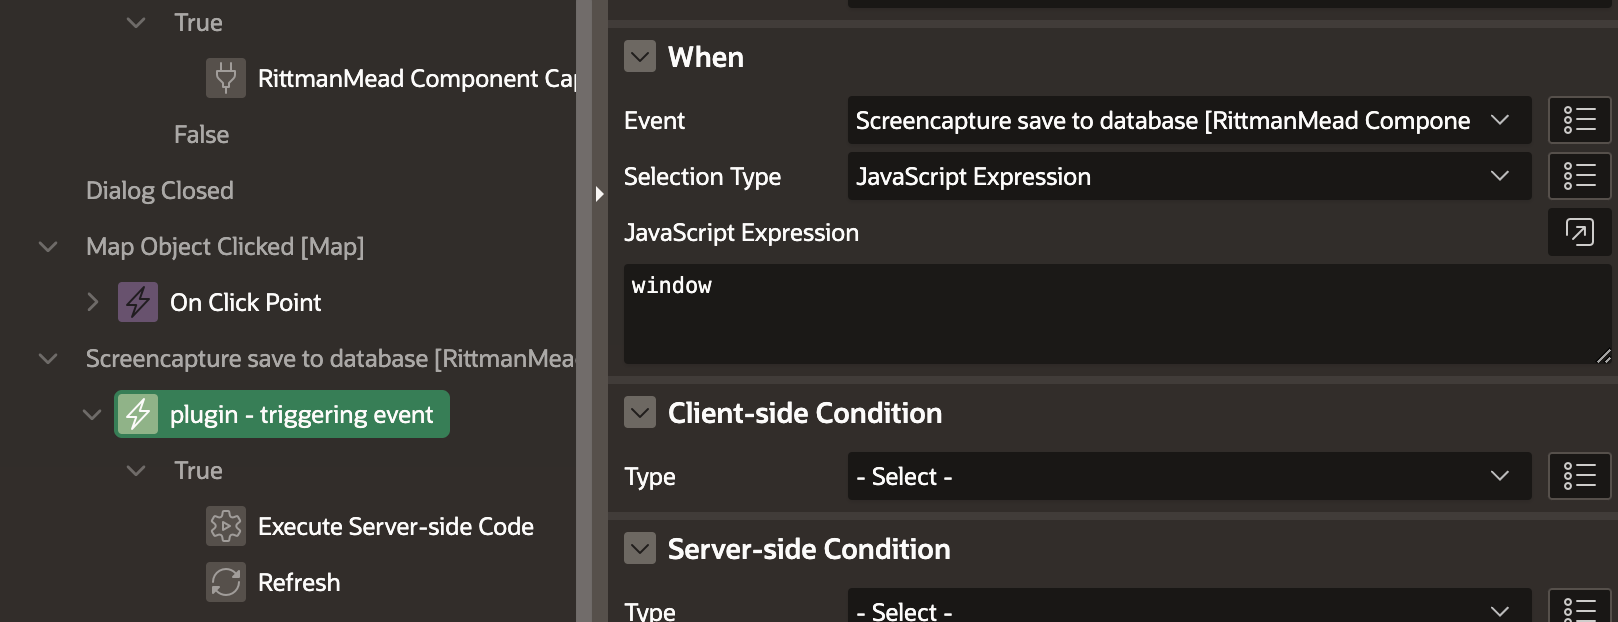
On this event being triggered we simple execute some PL/SQL code that loads the captured image into the database.
In conclusion
Plug-ins are a great way of packaging bespoke features and functionality that may not be natively available to APEX in a way that they can be easily installed and also shared with the community.
Whilst there is a lot of information in this Blog to absorb we hope that it goes someway to explaining the key parts of plug-in creation and shows their development is easier and more accessible than you may have imagined. We hope that this Blog is a first of several on APEX Plug-ins so stay tuned for more information!
Find out more about our APEX Consultancy Services.