Creating an Oracle Endeca Information Discovery 2.3 Application Part 2 : Preparing and Loading Data
Yesterday I started a week of looking at the Oracle Endeca Information Discovery development process, by thinking about just what exactly an Endeca Information Discovery application was, and the types of business questions they are designed to answer. We talked about how Endeca was particularly suited to "data discovery" applications, where sets of loosely-coupled data sources are quickly loaded into something called the Endeca Server, and then explored using a search-type interface that allows filtering and navigating across large sets of dimension attributes. As a way of illustrating the development process, we're going to use the Quickstart demo application that comes with Oracle Endeca Information Discovery 2.3 together with the set of Getting Started with Oracle Endeca Information Discovery recently posted by the Endeca Information Discovery product management team, and break the week into three postings, including this one (links will be added in as the week progresses) :
- Creating an Oracle Endeca Information Discovery 2.3 Application Part 1 : Scoping and Design
- Creating an Oracle Endeca Information Discovery 2.3 Application Part 2 : Preparing and Loading Data
- Creating an Oracle Endeca Information Discovery 2.3 Application Part 3 : Creating the User Interface
We'll start the development process then by looking at the process of sourcing data, processing it and loading it into the data engine that powers Endeca Information Discovery, a product called the Endeca Server. Previously known as the MDEX engine and described in this previous posting of mine, the Endeca Server is a hybrid search/analytic database engine that performs BI-type operations like calculations and aggregations, but filters and transforms data as if it were a search engine. Endeca applications use search as their primary means of data navigation, and store data as key-value pairs for maximum schema flexibility. Let's take a moment to look again at the Endeca Server and the datastores that are its databases, before getting on to the ETL process that's used to load data into it.
Endeca Server data stores are made up of records, with each record containing one or more attributes stored as key-value pairs. Each record is considered "self-describing", with no overarching schema and attributes able to contain single values, multiple values or unstructured (free-form text) values. There are no tables or keys to define, with the schema design instead "emerging" over time as you load data into the datastore. Typically, a datastore used for a search/analytic application will have a number of distinct data sources loaded into it, with some attributes common to all data sources (a customer ID, transaction ID or some other common key, plus some commonly-used attributes) with others unique to each data set or even to particular records. What this gives you is what Endeca refer to as a "jagged" data set, with minimal need for up-front data modelling and an aim of "leaving no data behind", as shown in the diagram below:
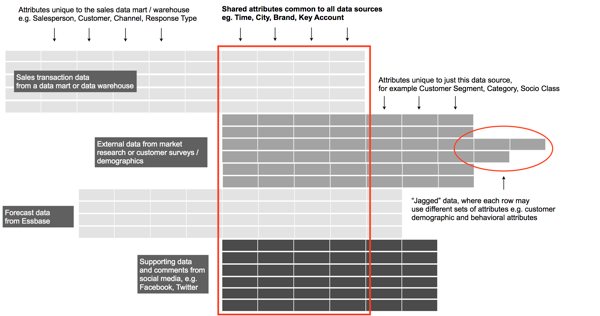
Each record is itself a key-value pair, and taking this approach removes the need to design a formal, dimensional data model, and to maintain and extend it as new data comes in. Unstructured data, as long as it shares a key value with at least some of the other data, is loaded in "as is" and can for example be parsed, enriched and analysed for sentiment by tools within the Endeca Information Discovery suite. This type of database approach isn't appropriate for all BI scenarios of course - if you want to analyse, count and otherwise drill-into a structured set of sales data organised by formal dimensions, hierarchies and aggregation rules, you're better off with a tool like Essbase or the BI Server's semantic model, but if your aim is to bring together all relevant data for a problem space, spend as little time as possible on the data modelling stage and instead just load data in and start searching it, that's what the Endeca Server was designed for.
Under the covers, Endeca Server datastore data is stored on disk, in a column-based compressed database with records in the "working data set" held in-memory. The aim when designing a Endeca Server datastore is to have all of your data held in-memory, so that users running searches across their data have instantaneous responses, and in the background storage columns in the disk-based store are mapped into virtual memory, and fetched into RAM when referenced. Datastores have embedded index trees to locate required records fast, and this hybrid in-memory/disk-based system is designed to provide the benefits of in-memory storage without being bound by the RAM available on the server (although, as said before, the aim is to get all working records into memory if possible).
As well as supporting calculations and aggregations though, the Endeca Server engine also has a number of search-type capabilities designed to filter and select from structured data sources, and parse and lexically analyse unstructured sources such as web feeds, customer comments, supporting documents and other textual sources. Some of these search capabilities include:
- Keyword search, boolean search, parametric search, wildcard search, dimension search and dimension filters
- Dimension precedence rules
- Numeric range, geospatial, date/time and security filters
- Spell correction/suggestion, and "do you mean"-type alternative presentation
- Find similar, and 1 and 2-way synonyms
- Stemming and lemmatisation
- Keyword-in-context snippeting
- Results clustering, relevance ranking, sorting and paging
- Multi-language support
The Endeca Server itself runs as an OS-level application on either a 64-bit Windows 2008 server, or a 64-bit Linux (Oracle Linux 5, or RHEL 5), with a web service interface, a Java command-line interface, and a bulk-load interface that bypasses the regular "data ingest" web service for large data loads. Taken together with Oracle Endeca Information Discovery Integrator, the ETL tool for loading the Endeca Server that I'll get onto in a moment, and Oracle Endeca Information Discovery Studio, the presentation layer server that renders the user interface for Information Discovery applications, the overall product architect looks like this:
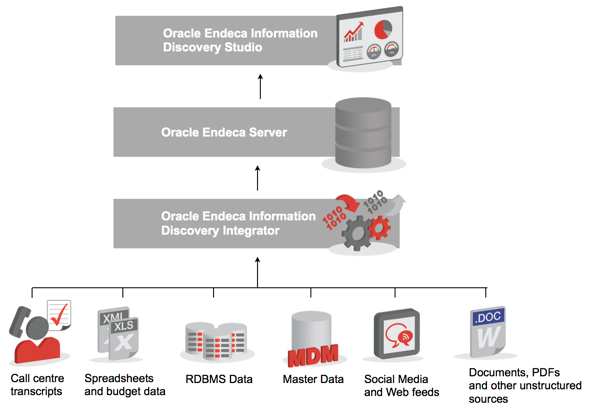
So how do you go about getting data into the Endeca Server? At the most basic level, it's generally through web service calls or through a bulk-load interface, but the tool that's usually used to load Endeca Server data stores is Oracle Endeca Information Discovery Integrator, an ETL tool built off-of the open-source CloverETL product, which comes with a set of generic data loading components and a set of Information Discovery ones that use the Endeca Server's APIs. Endeca Information Discovery's approach to data loading and integration will be familiar to anyone who's used tools such as Oracle Warehouse Builder, Oracle Data Integrator or Informatica PowerCenter, and uses one or more "graphs" (the equivalent to OWB's mappings, or ODI's interfaces) to bring together reader components, writer components, transformer and joiner components to create data flows that eventually load data into an Endeca Server datastore.
I mentioned earlier on that I'll be using the Quickstart demo application that comes with Oracle Endeca Information Discovery 2.3 to illustrate the development process, along with the set of Getting Started with Endeca Information Discovery screencasts that just became available on YouTube and OTN. If you've not taken a look at these screencasts already, take a look through these two before going any further, as they introduce you to the OEID platform and the Quickstart demo itself:
- 1.1 - Quick Start Studio Overview : Get an overview of the Quick Start Studio application, as well as learn some key concepts within Studio.
- 1.2 - Quick Start Integrator Overview : Get an overview of the Quick Start Integrator project, as well as learn some key concepts within Integrator
So the process we'd need to go through to load data into the Endeca Server goes something like this:
- Using an Integrator graph, create a new Endeca Server datastore which in the case of the screencast tutorial steps, we'll call BikeStore (the Quickstart demo dataset is based off of Microsoft's AdventureWorks sample data)
- Create another graph that we'll use to load records into the Endeca Server datastore, initially from a set of fact table sales records containing measures, dimension keys and a few dimension attributes
- Quickly create a simple Endeca Information Discovery Studio application for viewing the initial records in the Endeca Server datastore, to see how the initial load went
- In the case of the tutorial steps, then add a new data source to the graph, this time containing unstructured (survey data) records, connected to the initial record set by a common sales order number
- Then add other data sources to the Integrator graph, to provide additional attributes to enhance the initial set of records, adding customer attributes, product attributes and so on, using tools such as whitelist taggers and transformers to manipulate the incoming data
Now I'm not going to go into the same level of detail as is in the screencasts, as that would take too long a blog post and you're better off watching the videos and following along with your own demo system. But let's look for a moment at the process of creating an Endeca Data Store, which you can do either using a command-line tool, or through a web service SOAP interface which is the primary way that the Endeca Server is administered.
The process to create an Endeca Server datastore is described in this screencast:
As mentioned a moment ago, you can either create a new Endeca Server datastore from the command-line, using a script called endeca-cmd that can be found in the [Endeca_Home]\Server\2.3.0\endeca-cmd directory, like this (based on a Windows server installation):
cd c:\Oracle\Endeca\Server\2.3.0\endeca-cmd
endeca-cmd create-ds bikestore
After making sure the Endeca Server is running, executing the "create-ds" command creates, and then mounts and starts, a new datastore with the given name, and there's other commands such as:
- "attach-ds", for attaching and starting an existing datastore, and "detach-ds" for stopping and detaching one
- "start-ds" and "stop-ds" for stopping and starting an attached datastore
- "status-ds" for showing the status of a datastore, "version" for displaying the Endeca Server version, along with "list-ds" and "list-jobs" which list the data stores attached to a given Endeca Server, and any running jobs
The more common way of creating a new datastore is to use the Oracle Endeca Information Discovery Integrator tool (I'll just shorten it to "Integrator" now), which has components to create a new datastore and clear down existing ones via the Endeca Server's web service API. As this is the first time we've looked at Integrator properly, let's open up the Quickstart Integrator project that comes with the Quickstart demo, and as the "2.1 - Create an Endeca Server Data Store" screencast described, create a new project called "BikeStore" into which we'll copy the parameter file from the Quickstart demo, change it to reference the new datastore ("bikestore") that we're going to create, and create a new graph called "InitDataStore" that implements this web service call, copied from a more complete graph of the same name in the QuickStart Integrator project. What we have then is this:
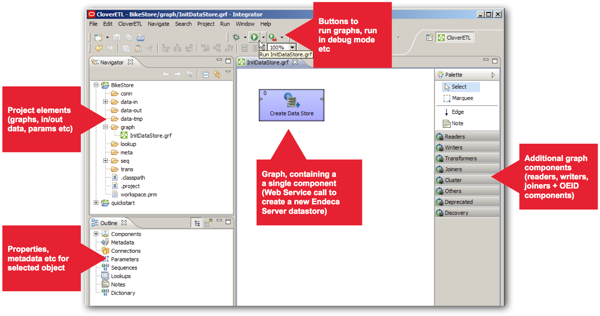
Integrator is built on top of an open-source ETL tool called CloverETL, which itself it built on an IDE framework called Eclipse, so if you've used any Eclipse-based tools in the past (such as Oracle's own Essbase Studio, or RTD Studio) you'll be familiar with the layout and how it operates. As a quick run-through of what's on the screen, you've got:
- A panel on the top left-hand side that lists out all of the project elements; graphs (mappings), folders for input and output data files, folders for database connections and so forth. In this folder there's also a parameter file called "workspace.prm" that we'll get onto in a moment
- Underneath this panel is another one whose content changes depending on what object is in focus in the middle panel. Normally it displays the properties and settings for a graph, but it can also show these for an individual component or other project element
- In the middle is the graph canvas, into which you place components from the palette on the right such as readers, writers, joiners, transformers and so on
- And on the right-hand side is the component palette, which along with standard CloverETL components also contains a set of OEID-specific components as shown below
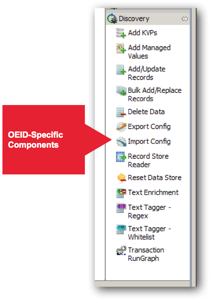
These components are used for tasks such as:
- Adding individual key/value pairs to a record, as opposed to loading whole records + their attributes in one go (Add KVPs)
- Incrementally loading records into a datastore, updating values in old ones (Add/Update Records)
- Bulk-loading via a bulk-load interface records into a datastore, faster than the web service API but completely overwriting attribute values in existing records (Bulk Add/Replace Records)
- Text Tagging incoming unstructured dat (Text Tagger - Whitelist)
and so on. If you then double-click on the Create Data Store component in the graph, you'll see that it's actually a web service call, calling the Endeca Server API to create a web service using the datastore name entered into the workspace.prm parameter file, which also contains settings for the port the the Endeca Server is running on, and other Endeca-specific settings.
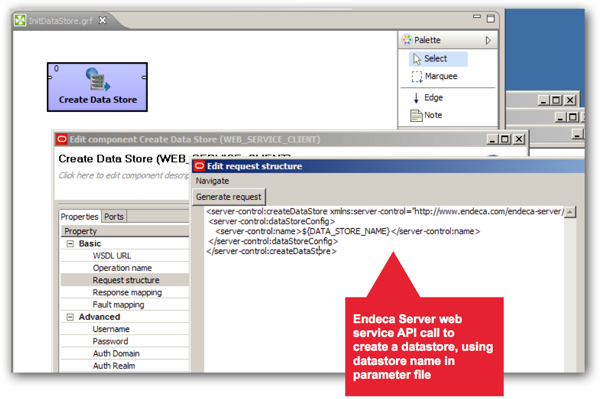
Running this graph creates a new datastore in the same way as the command-line interface, and in-fact under the covers, the command-line interface is calling the same Endeca Server APIs, via a Java JAR file.
If you then following along with the screencasts, you then get to the next step in the development process, which takes you through the initial data load into the Endeca Server datastore:
Following the set of instructions in the video, you end up with a new graph called "LoadData" that will become, over time, the main mapping to load data into the datastore. In its initial version, it takes an initial feed from a fact table export and uses it to create the initial record structure in the BikeStore Endeca Server datastore. Let's take a look at what this graph contains:
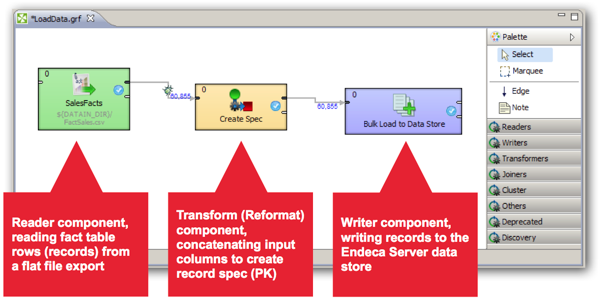
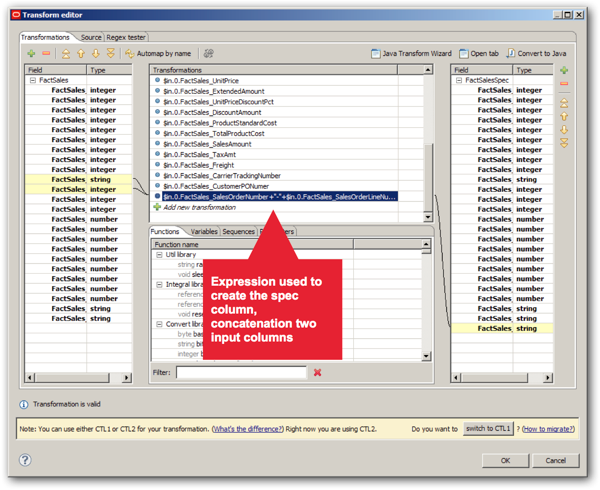
At the start of the ETL process, we have a reader component that reads data in from a flat file export of a relational fact table. This file contains a set of measures, along with dimension key values, and the reader component then passes the rows through a transformation component, which takes the sales order number and order line number values from two input columns, and concatenates them to create a primary key for the datastore records, which in OEID terminology is called a "spec". The screenshot below is from the transformation operator, and you can see the mapping between columns and the additional expression used to create the spec.
Once you've run the graph, and you use Studio to create a quick test application (we'll get onto Studio in more detail tomorrow), you can view the records you've loaded. In the screenshot below, you can see the initial set of attributes created as part of this initial data load, which are a combination of measure values and keys to values in some associated dimensions (which haven't yet been loaded, of course). On the right you can see an example of a record, again showing the attributes that have been created along with this record's set of values.
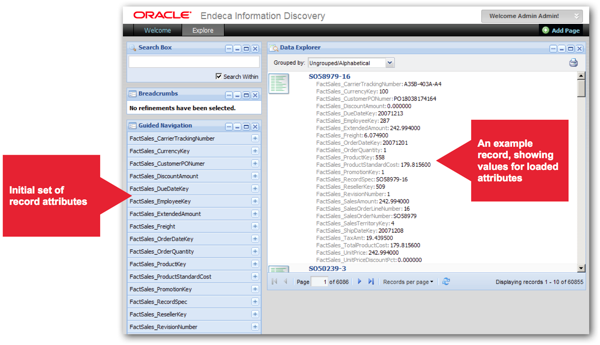
As you load more data into the Endeca Server datastore, you might end-up re-using these previously-created attributes, or you may create other ones, which is where the "jagged" data model idea comes from. As long as whatever source you bring in has values that link into the spec attribute that you defined earlier, it will all fit together and users can start browsing and exploring the dataset.
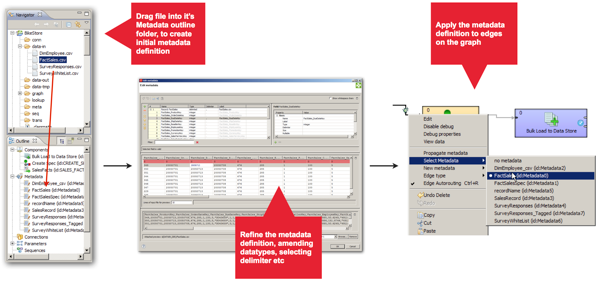
One other thing that you need to bear in mind when creating Integrator graphs is how it handles metadata. When you drop a reader component onto the graph, for example the FactSales.csv file used to load our initial set of records and attributes, the next step that you perform is to create an accompanying metadata definition, which in the examples is done by dragging the file down to the Metadata section for this file in the Outline panel, then using the Metadata definition dialog to update datatypes, select delimiter columns and so on. Once you're done, you then right-click on the edge (connector) between the file and the next component, and apply this metadata definition to the edge, giving it it's data format. Later on in the process you duplicate and further amend these metadata definitions to take account of derived columns, for example when we add the spec column using the transformation component giving us an extra column (attribute) in the data flow.
Of course dimension key values on their own aren't much use, so the next two screencasts in the series take you through loading a file containing employee dimension data, and another one containing survey responses.
- 2.4 - Join in a Second Data Source: Learn how to configure a join in Integrator.
- 2.5 - Configure a Whitelist Text Tagger: Learn how to configure a whitelist text tagger to enrich unstructured data.
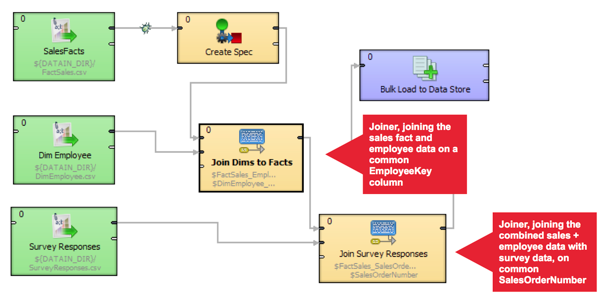
When the graph in the project is updated to include the two new files, you can now see how joins are performed across two or more sources. In the example below, the two sources are joined in separate steps, but you can actually configure joins to use multiple input source (called "ports" in Integrator terminology) and multiple joins, which can either be an inner join, left-outer join or full-outer join. Joins can also be used to transform data using expressions, and there's actually a range of join types to cover situations where you have matching key values, key values that don't exactly match but match within ranges, joins across sorted and unsorted data sources and so on. The screenshot below shows the graph with the two additional data sources brought in, and the joiner components highlighted.
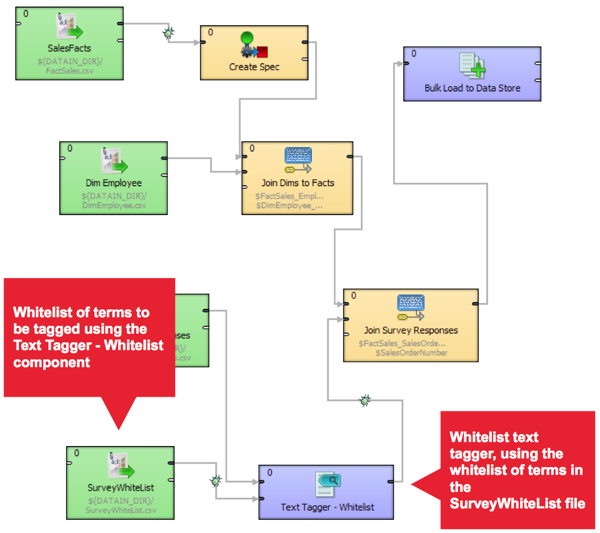
So far this is very similar to any other ETL development environment. Where it gets a bit more interesting is in the next screencast in the series, where we start to use some of the text parsing and enrichment components that are found in the Discovery part of the component palette. In this instance, the graph is updated again to add a whitelist text tagger, which in this instance tags records that mention a particular member of staff, creating the tag as an additional attribute that we can then filter against.
Finally, at the end of this phase, there's a screencast that takes you through creating the remainder of the file inputs, bringing in data on time periods, products, resellers, sales territories and so on, so that you end up with the data loading graph that's actually used in the full Quickstart demo.
with the final LoadData graph looking like this:
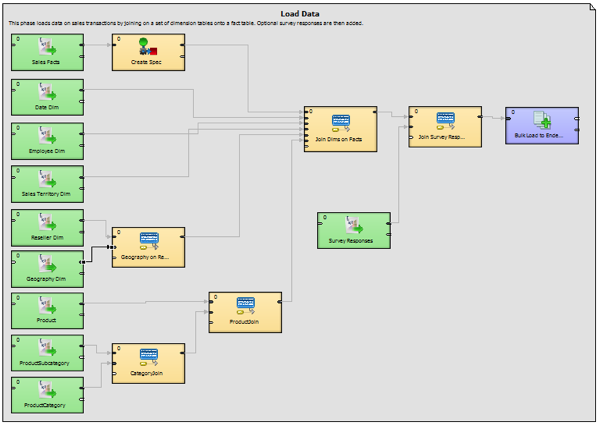
So once you run this final ETL graph, records in the Endeca Server datastore are updated with the full set of dimension attributes, and when you view the records in a simple Studio page, you can see how each record now consists of attributes sourced from each of the files, the set of which can vary record-by-record depending on what data is loaded in and from where.
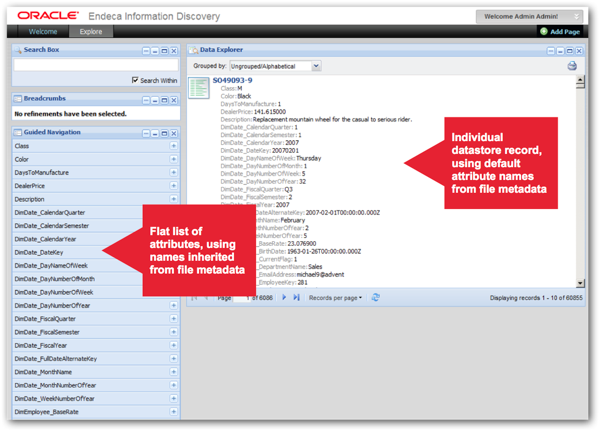
Notice though how each of the attributes has the original, default name inherited from the file metadata created earlier on? Also, you'll see that all of the attributes are grouped together into a single group, whereas it would be nice if they were grouped into dimensions, or functional areas. To put these settings in place, you have to load configuration data into the datastore that provides names for the attributes and groups them into attribute groups, and you follow a similar set of steps to set up indexing, searching and so on for these attributes. One way of loading this configuration data is to use another graph, which reads each configuration setting from a file and then loads them into the datastore using another Endeca Server web service API, with an example of this included in the QuickStart Integrator project.
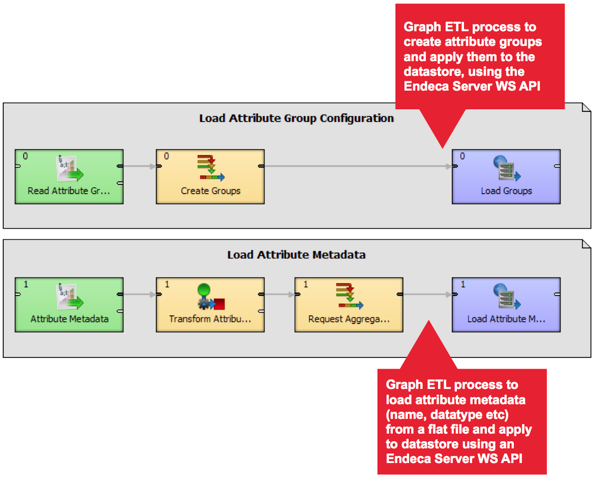
Another way of achieving the same goal though is to use the Studio application to define and apply attribute, search and other datastore settings, and we'll look at this tomorrow, when we conclude this short series with a look at creating the Oracle Endeca Information Discovery user interface.