GoldenGate and Oracle Data Integrator - A Perfect Match in 12c... Part 4: Start Journalizing!

In this post, the finale of the four-part series "GoldenGate and Oracle Data Integrator - A Perfect Match in 12c", I'll walk through the setup of the ODI Models and start journalizing in "online" mode. This will utilize our customized JKM to build the GoldenGate parameter files based on the ODI Metadata and deploy them to both the source and target GoldenGate installation locations. Before I get into all of the details, let's recap the first 3 posts and see how we arrived at this point.
Part one of the series, Getting Started, led us through a quick review of the Oracle Reference Architecture for Information Management and the tasks we're trying to accomplish; loading both the Raw Data Reservoir (RDR) and Foundation schemas simultaneously, using Oracle GoldenGate 12c replication, and set it all up via Oracle Data Integrator 12c. We also reviewed the setup of the GoldenGate JAgent process, necessary for communication between ODI and GoldenGate when using the "online" version of the Journalizing Knowledge Module.
In part two, we reviewed the Journalizing Knowledge Module, "JKM Oracle to Oracle Consistent (OGG Online)", its new features, and how much it has been improved in ODI 12c. Full integration with Oracle GoldenGate, through the use of the new ODI Tool "OdiOggCommand", allows for the setup and configuration of GoldenGate process groups, trail file directories, and table-level supplemental logging, all from the ODI JKM.
Most recently, part 3, titled Setup Journalizing, walked us through the customizations of the "JKM Oracle to Oracle Consistent (OGG Online)" that will allow us to create the source-to-foundation replication alongside the standard source-to-RDR setup. We added a set of options, the first to control whether or not we replicat to foundation and the second to capture the ODI Logical Schema corresponding to the foundation schema. Then we added the task that will create the source-to-foundation table mapping inside the GoldenGate replicat parameter file and set the options appropriately. I've been using the ODI 12c Getting Started VM, with the 12.1.2 version of ODI, for my demo setup. If you haven't done so already, you can download the latest version of the VM, with ODI 12.1.3, from the Oracle Technical Network. I'd say that's enough recap, now on to the final steps for GoldenGate and ODI 12c integration and let's start journalizing!
Setup ODI Models
Create Models
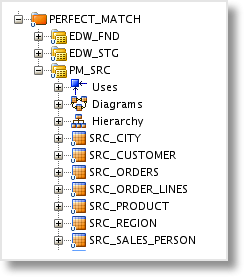
We first need to create the ODI Models and Datastores for the Source, Staging (Raw Data Reservoir) and Foundation tables. I will typically reverse engineer the source tables into a Model first, then copy them to the Staging and Foundation Models. This approach will ensure the column names and data types remain consistent with the source. I then execute a Groovy script to create the additional data warehouse audit columns in each of the Foundation Datastores.
Configure JKM
Unlike the 11g version of ODI, in 12c the "JKM Oracle to Oracle Consistent (OGG Online)" Knowledge Module will be set on the source Model. Open up the Model, in this example, PM_SRC, and switch to the Journalizing tab.
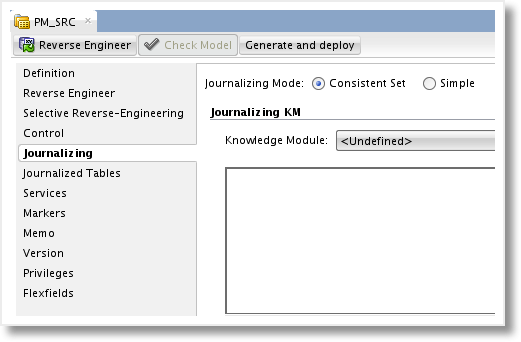
We'll set the Journalizing Mode to "Consistent Set" and then choose the customized JKM that we have been working with in this example, "JKM Oracle to Oracle Consistent (OGG Online) RM", from the dropdown list. Now we are presented with the GoldenGate Process Selection parameters and a list of KM Options to configure.
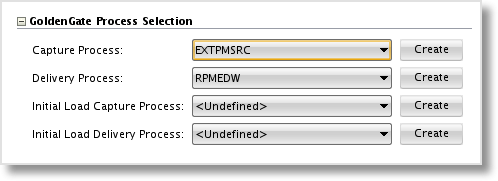
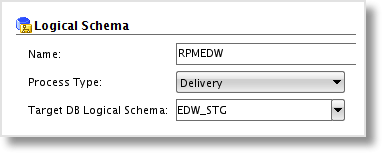
Set the Process Selection parameters for the Capture Process and Delivery Process by selecting the Logical Schemas created in Part 3 - Setup GoldenGate Topology - Schemas. This setting drives the naming of the Extract, Pump, and Replicat parameter files and process groups in GoldenGate. If you plan to use GoldenGate for the initial load, select the processes here as well. I'm not setting mine, as I typically use a batch load tool, such as Oracle Datapump or insert across DBLink to perform the initial load of the target. As you can see in the image below, you can also create the Oracle GoldenGate Logical Schemas from the Model.
Next are the set of Options, including the 2 new Options added in the previous post. We can leave several of the values as the default, as they are specific to particular character sets or implementation on a multi-node Oracle RAC setup.
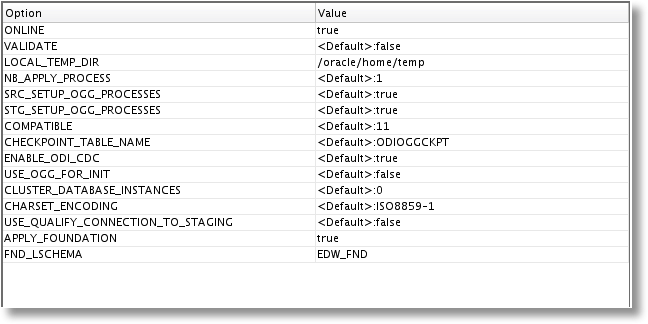
The Options we do want to set:
ONLINE - Set to "true" to enable the automatic GoldenGate configuration when Start Journal is run.
LOCAL_TEMP_DIR - Enter a directory local to the machine on which the Start Journal process will be executed. Be sure the user executing the Start Journal process has privileges to create/modify/remove directories and files.
APPLY_FOUNDATION - Custom Option, set to "true" to enable the addition of the source-to-foundation mapping to the GoldenGate Replicat parameter file.
FND_LSCHEMA - The Logical Schema for the Foundation layer, necessary when APPLY_FOUNDATION is true.
After the Options are set, the Model can be saved and closed. Back in the Designer Navigator, add the Datastores to CDC by either selecting each individual Datastore and adding it or by right-clicking the Model and choosing to add the entire set all at once.
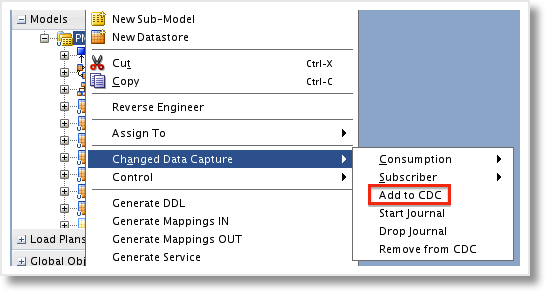
Before we get on with using the JKM, there is one thing I forgot to mention in the previous post. When setting up the Logical Schema for the GoldenGate "Delivery" process, you must also set the target Logical Schema. If you fail to do so, you'll get an error stating "SnpLSchema does not exist" when attempting any Change Data Capture commands on the source Model.
With the JKM set and the tables added to Change Data Capture, we can now add a Subscriber. Subscribers allow multiple mappings to consume the change data from the J$ tables at different intervals. For example, a table may be consumed by one mapping every hour, and then by an additional mapping each night. Two different Subscribers would be used in this case. In our example, I'll create a single Subscriber named "PERFECT_MATCH". Make sure the process runs successfully, then it's time to start Journalizing.
Start Capturing Changes
With the setup and configuration out of the way, the rest is up to the JKM. We're now able to right-click the source Model and select Change Data Capture-->Start Journal. This executes all of the Start Journal related steps in the JKM, which will create the CDC Framework (J$ tables, JV$ views, etc.), generate and deploy the GoldenGate parameter files (Extract, Pump, and Replicat), and configure and start the GoldenGate process groups. Be sure that the source and target GoldenGate Manager and JAgent processes are running prior to executing the Start Journal process. Also, make sure that the database is in ArchiveLog mode and ready for GoldenGate to capture transactions.
After the Start Journal process is successfully completed, you can browse to the source GoldenGate home directory, run GGSCI, and view the status of the OGG process groups.
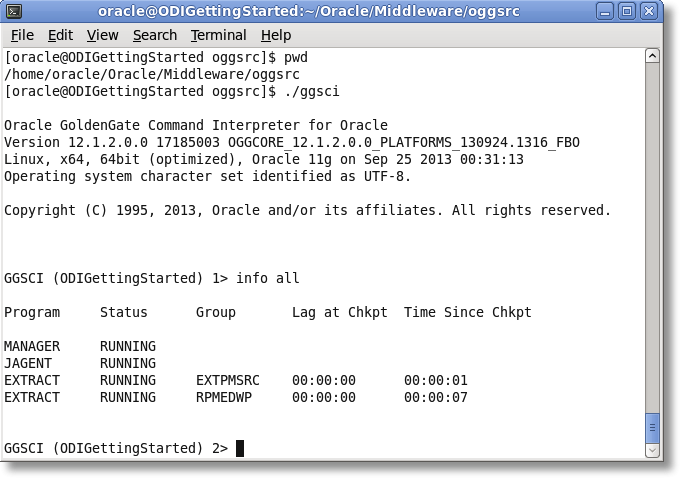
It looks like the Extract and Pump are in place and running. Now let's check out the Replicat on the target GoldenGate installation.
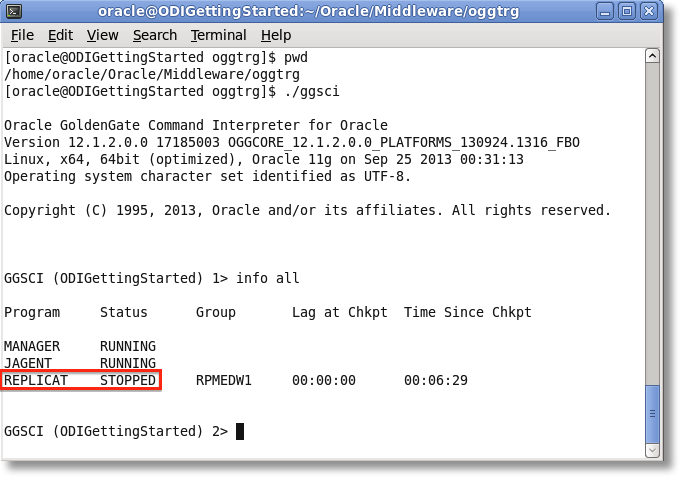
Here we see that the Replicat process is in place, but not actually running. Remember from our JKM editing that we commented out the step that will start the Replicat process. This is to ensure we perform an initial load prior to applying any captured change data to the target.
The last bit of work that must be completed is the initial load. I won't go into details here, but the way I like to do it is to load the source to the target data based on a captured SCN using Oracle Datapump or DBLink rather than using GoldenGate process groups to perform the load. Note: The ODI 12c Getting Started Guide doesn't even use the OGG initial load! Then, we can start the replicat in GoldenGate after the captured SCN using the same approach I wrote about in a previous blog on ODI and GoldenGate 11g.
JKM "Online" Mode
Beyond adding the parameter files and process groups, what exactly did the "online" version of the JKM do for us? If you browse to the directory that we set in the JKM Options under LOCAL_TEMP_DIR, you'll find all of the GoldenGate files generated by the JKM. These files were generated locally, then uploaded to their proper GoldenGate home directory. Without "online" mode, they would had to have been manually copied to GoldenGate.
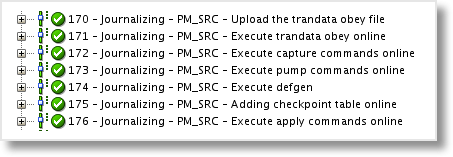
Once uploaded, the obey files (batch files for GoldenGate commands) were executed.
OdiOggCommand "-LSCHEMA=EXTPMSRC" "-OPERATION=EXECUTEOBEY" "-OBEY_FILE=/home/oracle/Oracle/Middleware/oggsrc/EXTPMSRC.oby"
And finally, JKM steps were generated to perform the creation of the process groups in GoldenGate.
OdiOggCommand "-LSCHEMA=EXTPMSRC" "-OPERATION=EXECUTECMD"
add extract EXTPMSRC, tranlog, begin now
add exttrail /home/oracle/Oracle/Middleware/oggsrc/dirdat/oc, extract EXTPMSRC, megabytes 100
stop extract EXTPMSRC
start extract
If you ever need to stop the change data capture process, either to add additional tables or make modifications to the metadata, you can run the Drop Journal process. Not only will the CDC Framework of tables and views be removed, but the "online" mode also reaches into GoldenGate and drops the process groups that were generated by the JKM.
OdiOggCommand "-LSCHEMA=EXTPMSRC" "-OPERATION=EXECUTECMD"
stop extract RPMEDWP
delete extract RPMEDWP
In conclusion, the integration between GoldenGate and Oracle Data Integrator in 12c has been vastly improved over the 11g version. The ability to manage the entire setup process from within ODI is a big step forward, and I can only see these two products being further integrated in future releases. If you have any questions or comments about ODI or GoldenGate, or would like some help with your own implementation, feel free to add a comment below or reach out to me at michael.rainey@rittmanmead.com.