Oracle APEX - Microsoft Azure Entra ID Integration

In past posts we have discussed the advantages of using identity management providers (IdPs) to manage the authentication and authorisation of users that are accessing a specific APEX application.
Initially, we showed how to set up single sign-on with Google.

Oracle APEX - Social Login
Subsequently, we also showed (using Oracle IDCS) how we can extend the responsibility of the IdP to supply user specific role information that can then be used, via APEX authorization schemes, to control the level of access they have within the application.

Oracle APEX - Role-Based Access with Social Login
In theory, integrations of this kind with different IdPs should (using OpenID standards) be identical, and the information in the above posts be enough to consume, understand and then apply when looking at connecting an APEX application to your chosen provider.
However, in practice, different suppliers have slightly differing implementations. We recently came upon an example of this when trying to implement authentication and active directory role based security using Azure Entra ID, and found that, whilst the authentication set up was fairly straightforward, we could not get the user's roles in the same way that we described in the above post (i.e. by using the group scope in the OpenID call).
In this post, we'll talk about the differences in getting this to work and, for completeness, show the configuration on the Azure and APEX side to get Authentication and active directory (AD) group information integration set up in your application.
Entra ID Configuration
This section contains configuration needed on the Azure platform to register an application and configure some simple AD groups. We did this on the Azure free tier but in practice all this will hopefully be set up by the Microsoft experts in your organisation 😇.
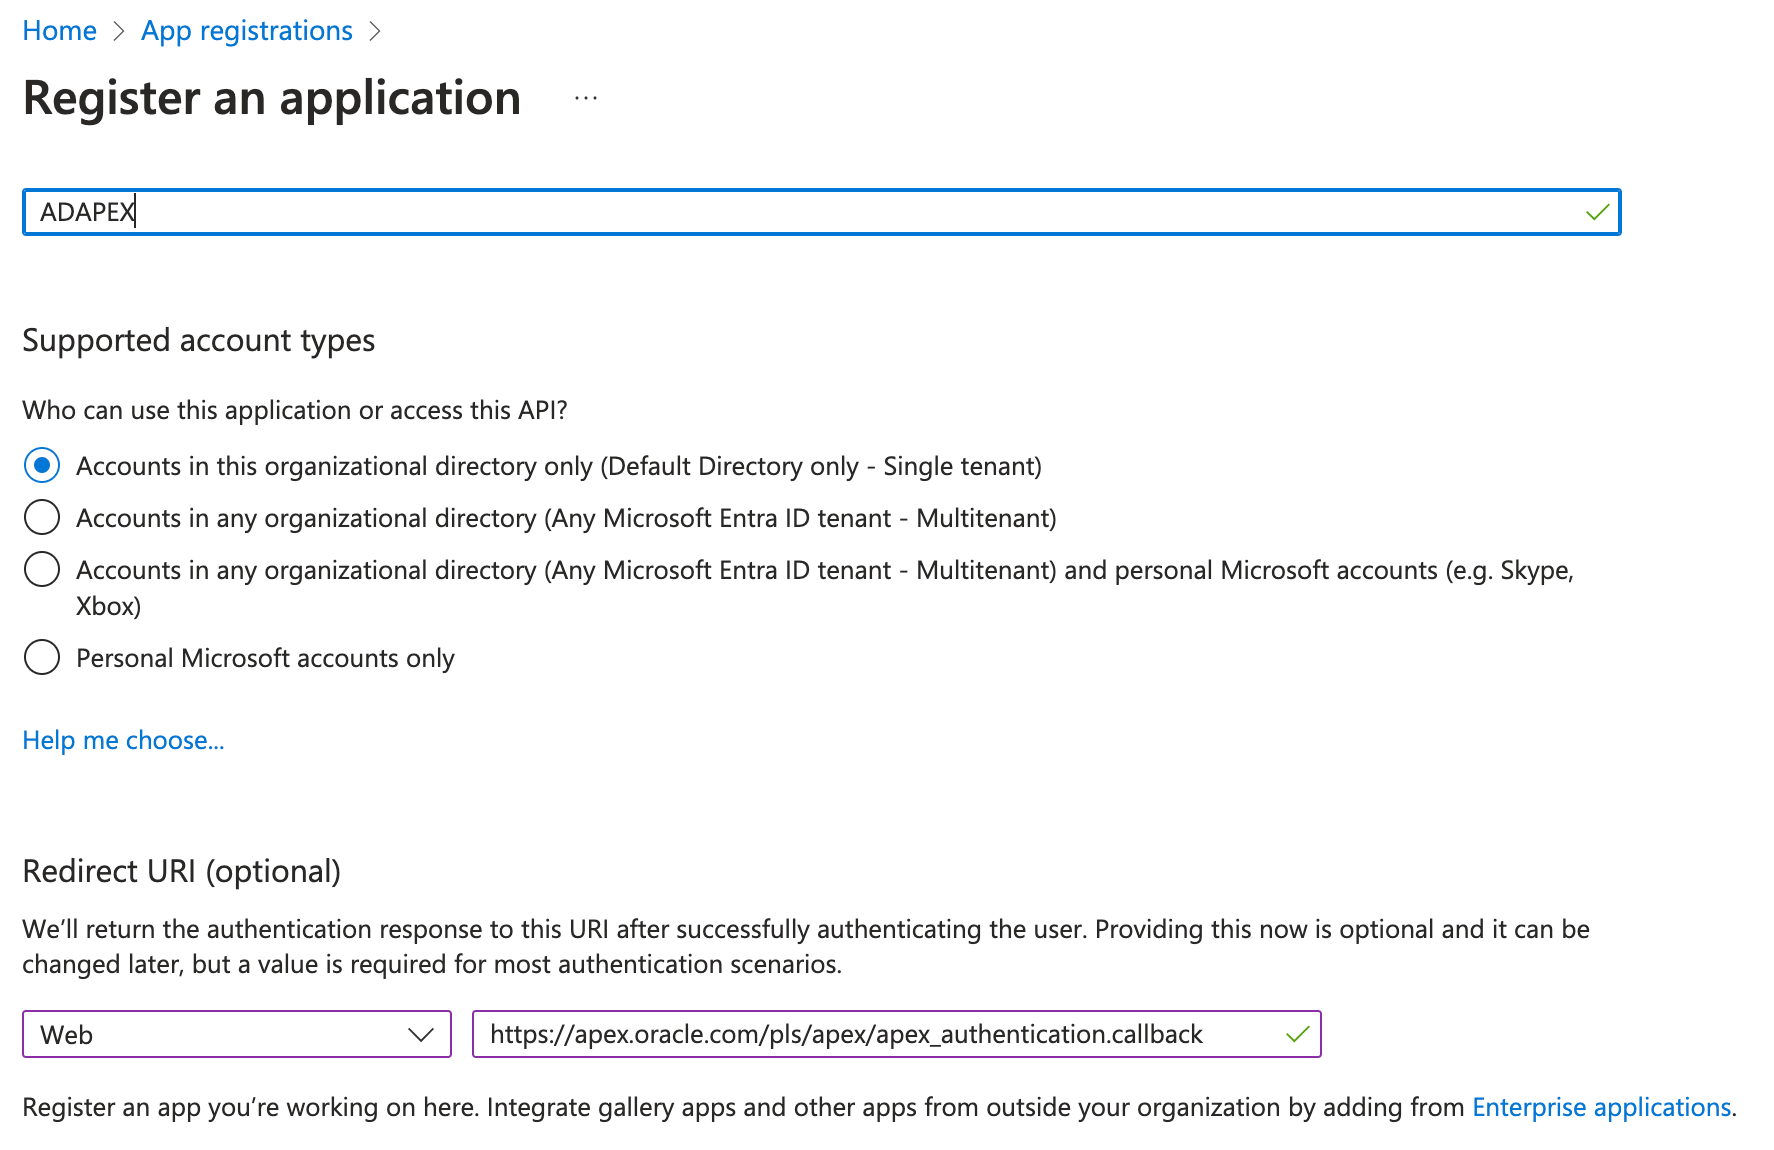
Registering and configuring an Application
First you'll need to register the application in Azure (through the application registrations page). Just give it a name and make sure you put the correct redirect URI in (in our case it's linking back to apex.oracle.com domain where our sample APEX application sits)
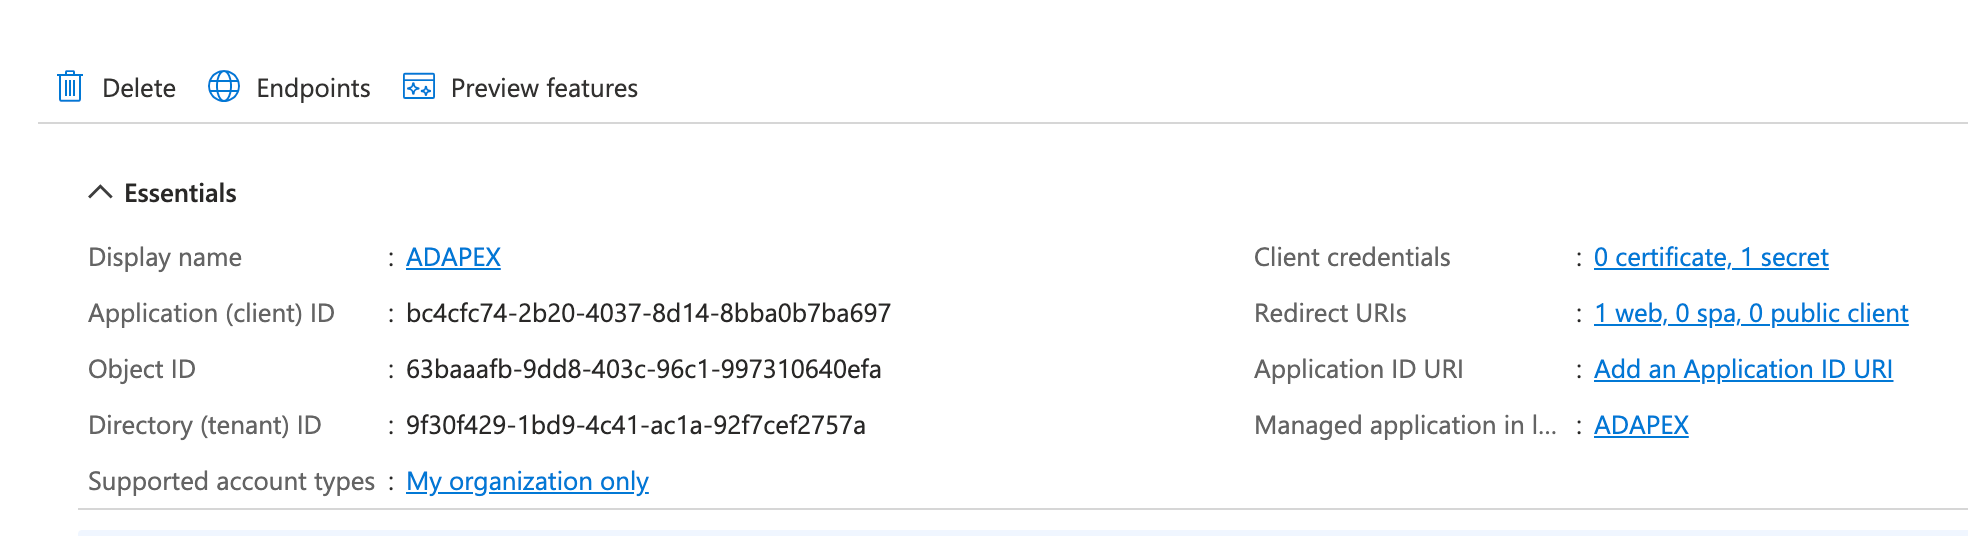
Once created, Azure will assign it a client ID. Keep note of this as you'll need to enter this as part of the Workspace credentials in APEX later
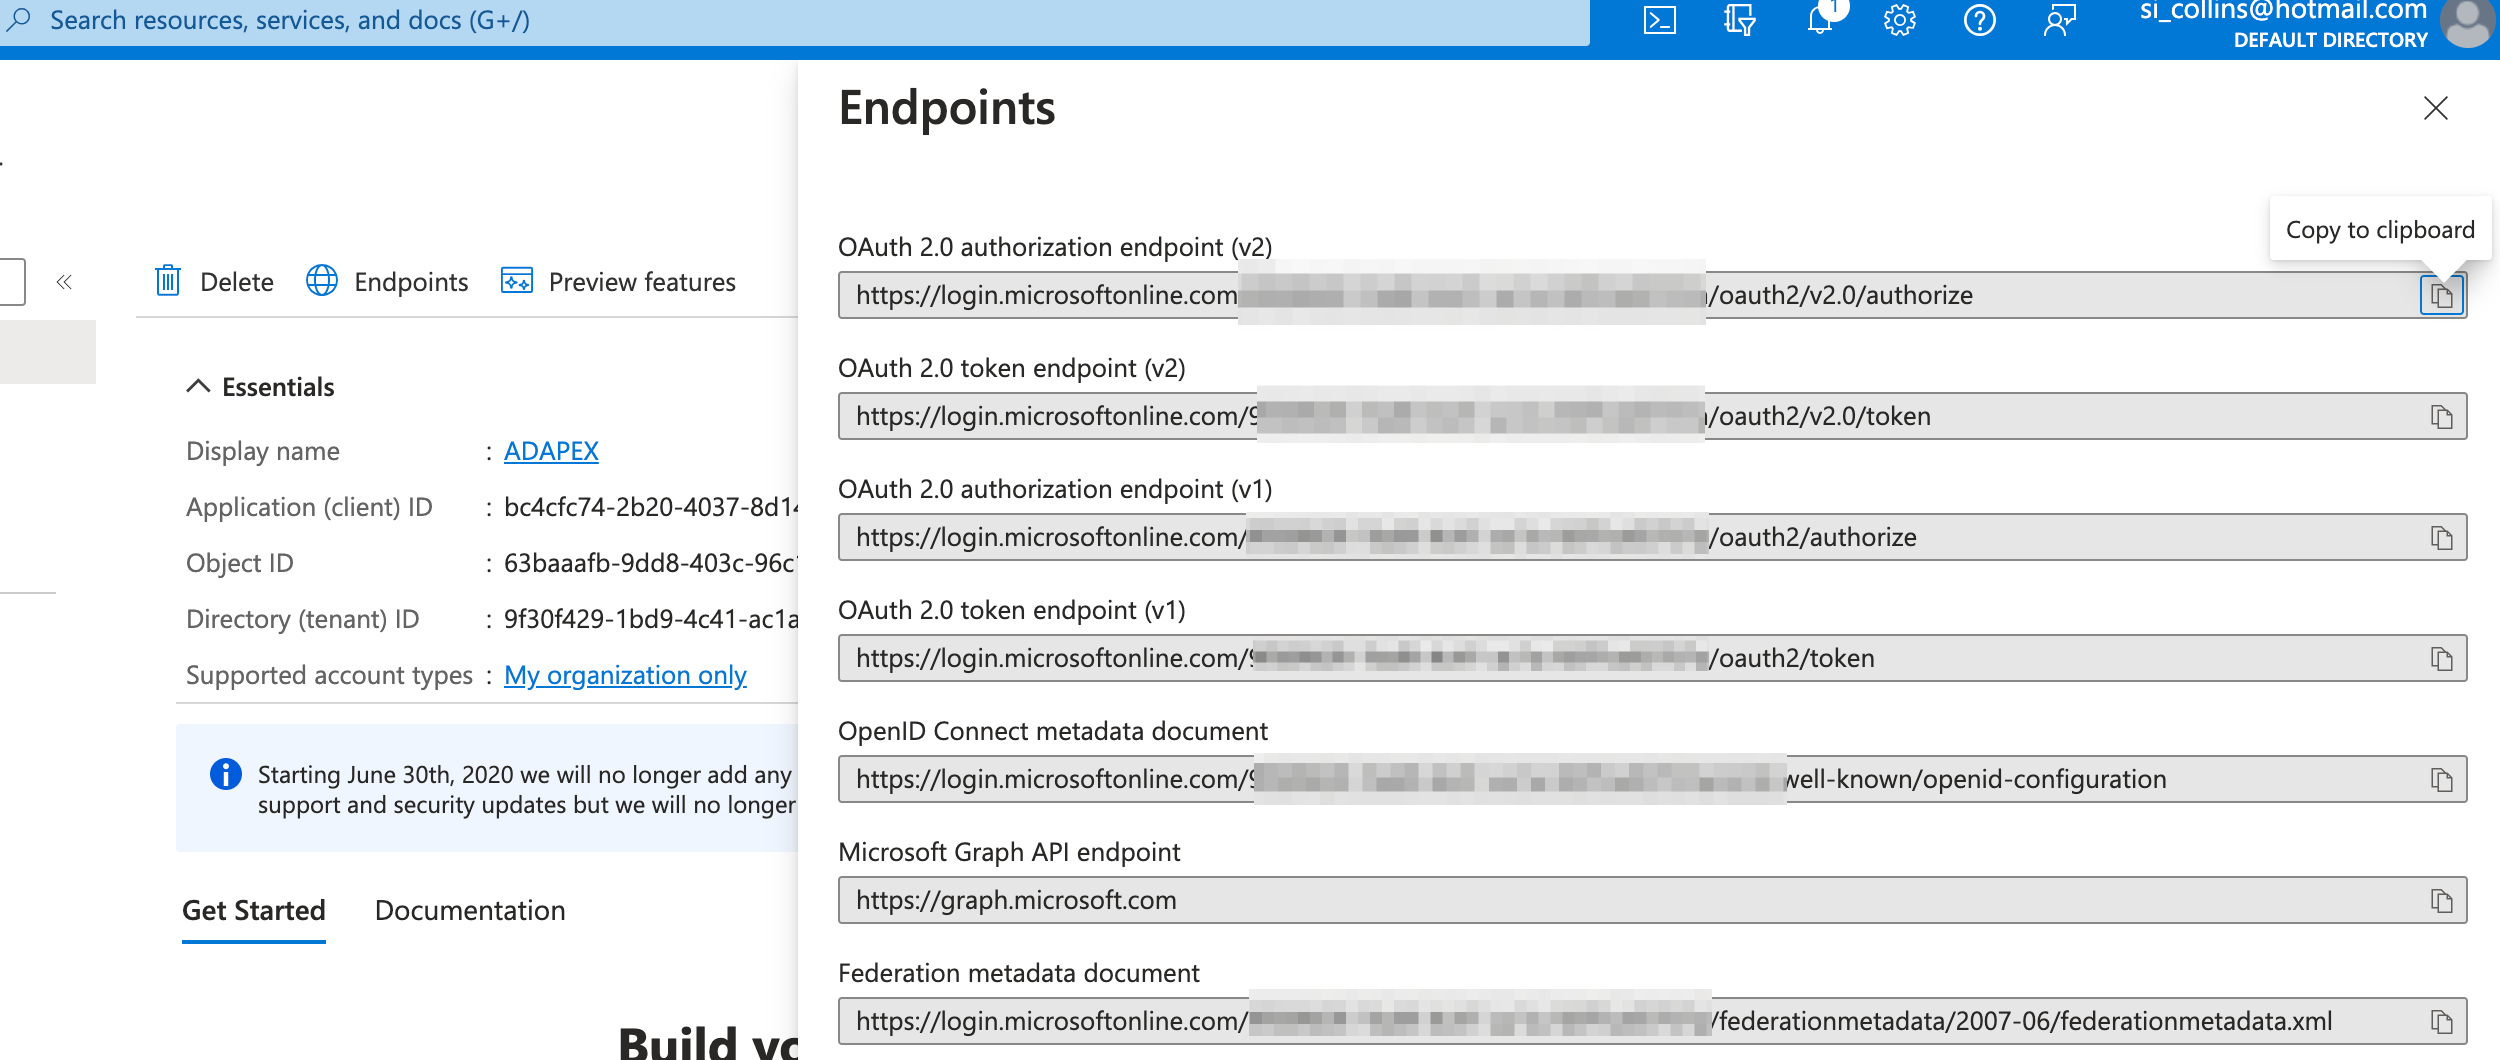
Hitting the Endpoints button will display all the authentication endpoints that are available for that application. You'll need some of these later as well when creating the authentication scheme in APEX
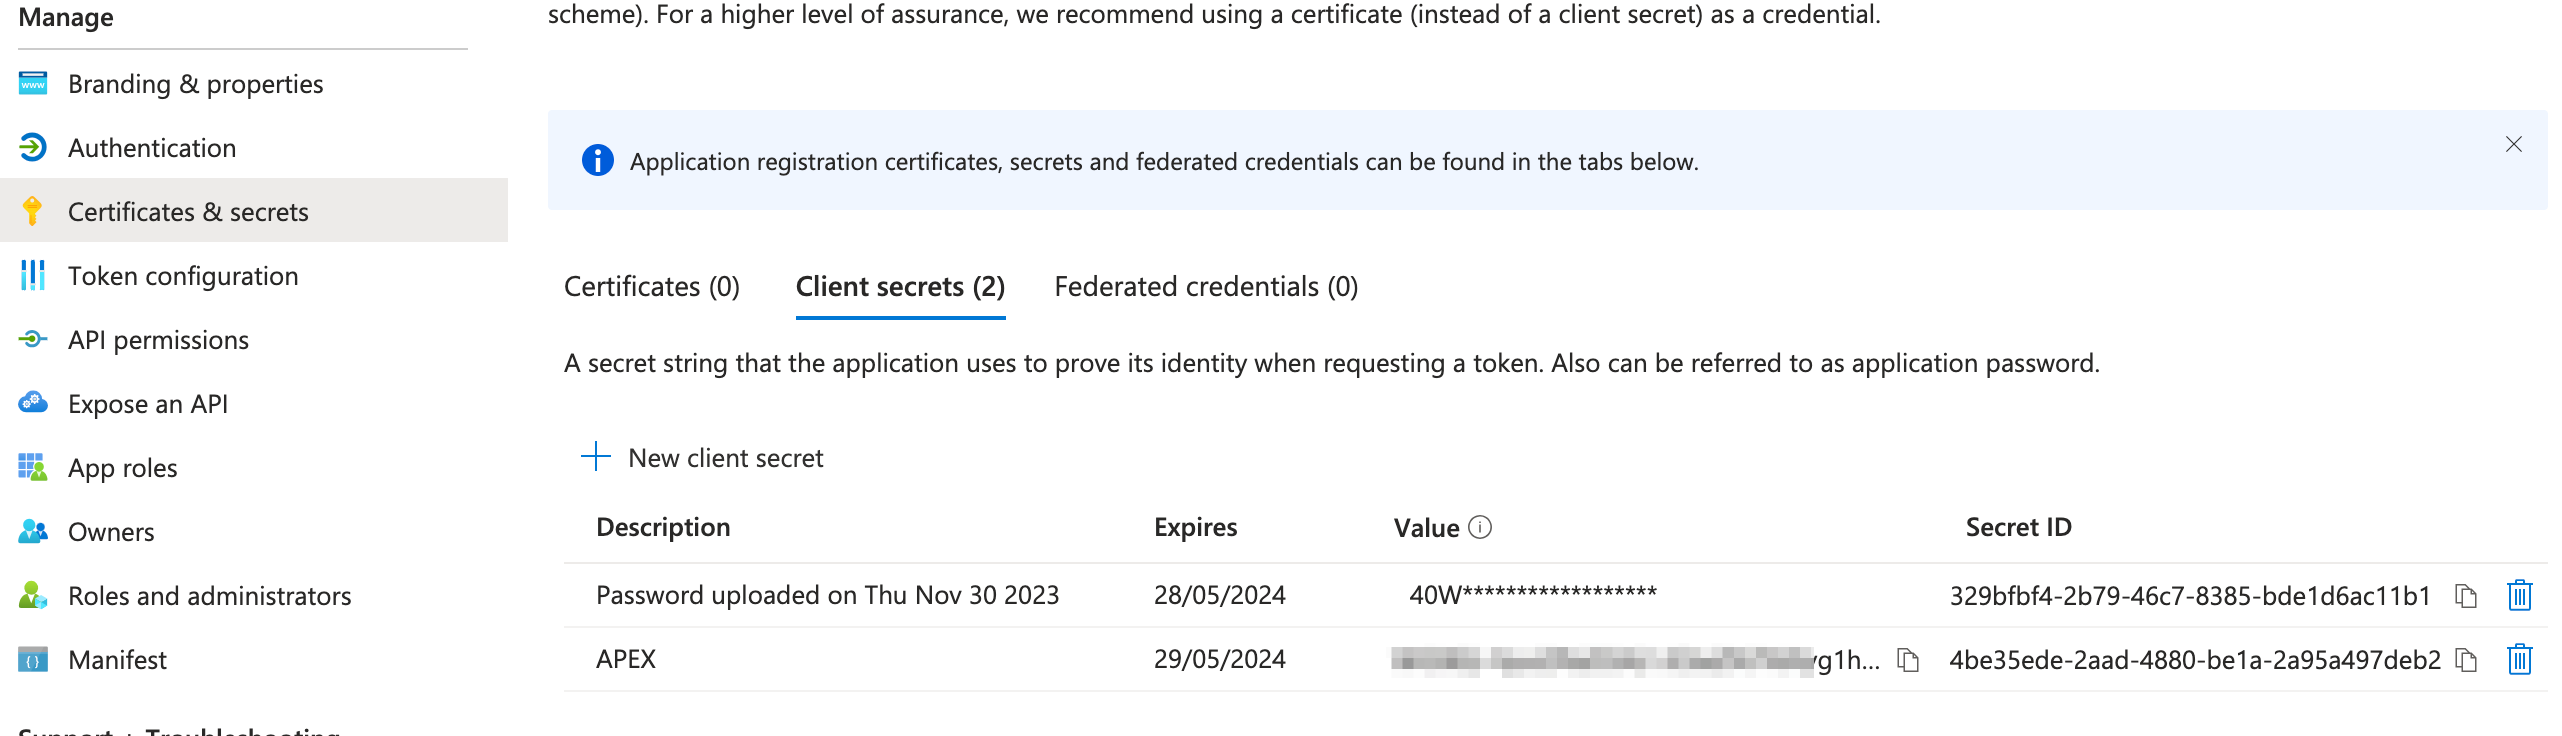
You'll then need to create a client secret for the registered application (this will be used in conjunction with the client id to create the workspace credentials in APEX). This can be done from the Certificates and secrets submenu of the registered application. It's best to save the value of the secret somewhere safe temporarily as Azure only shows the secret for a limited time.
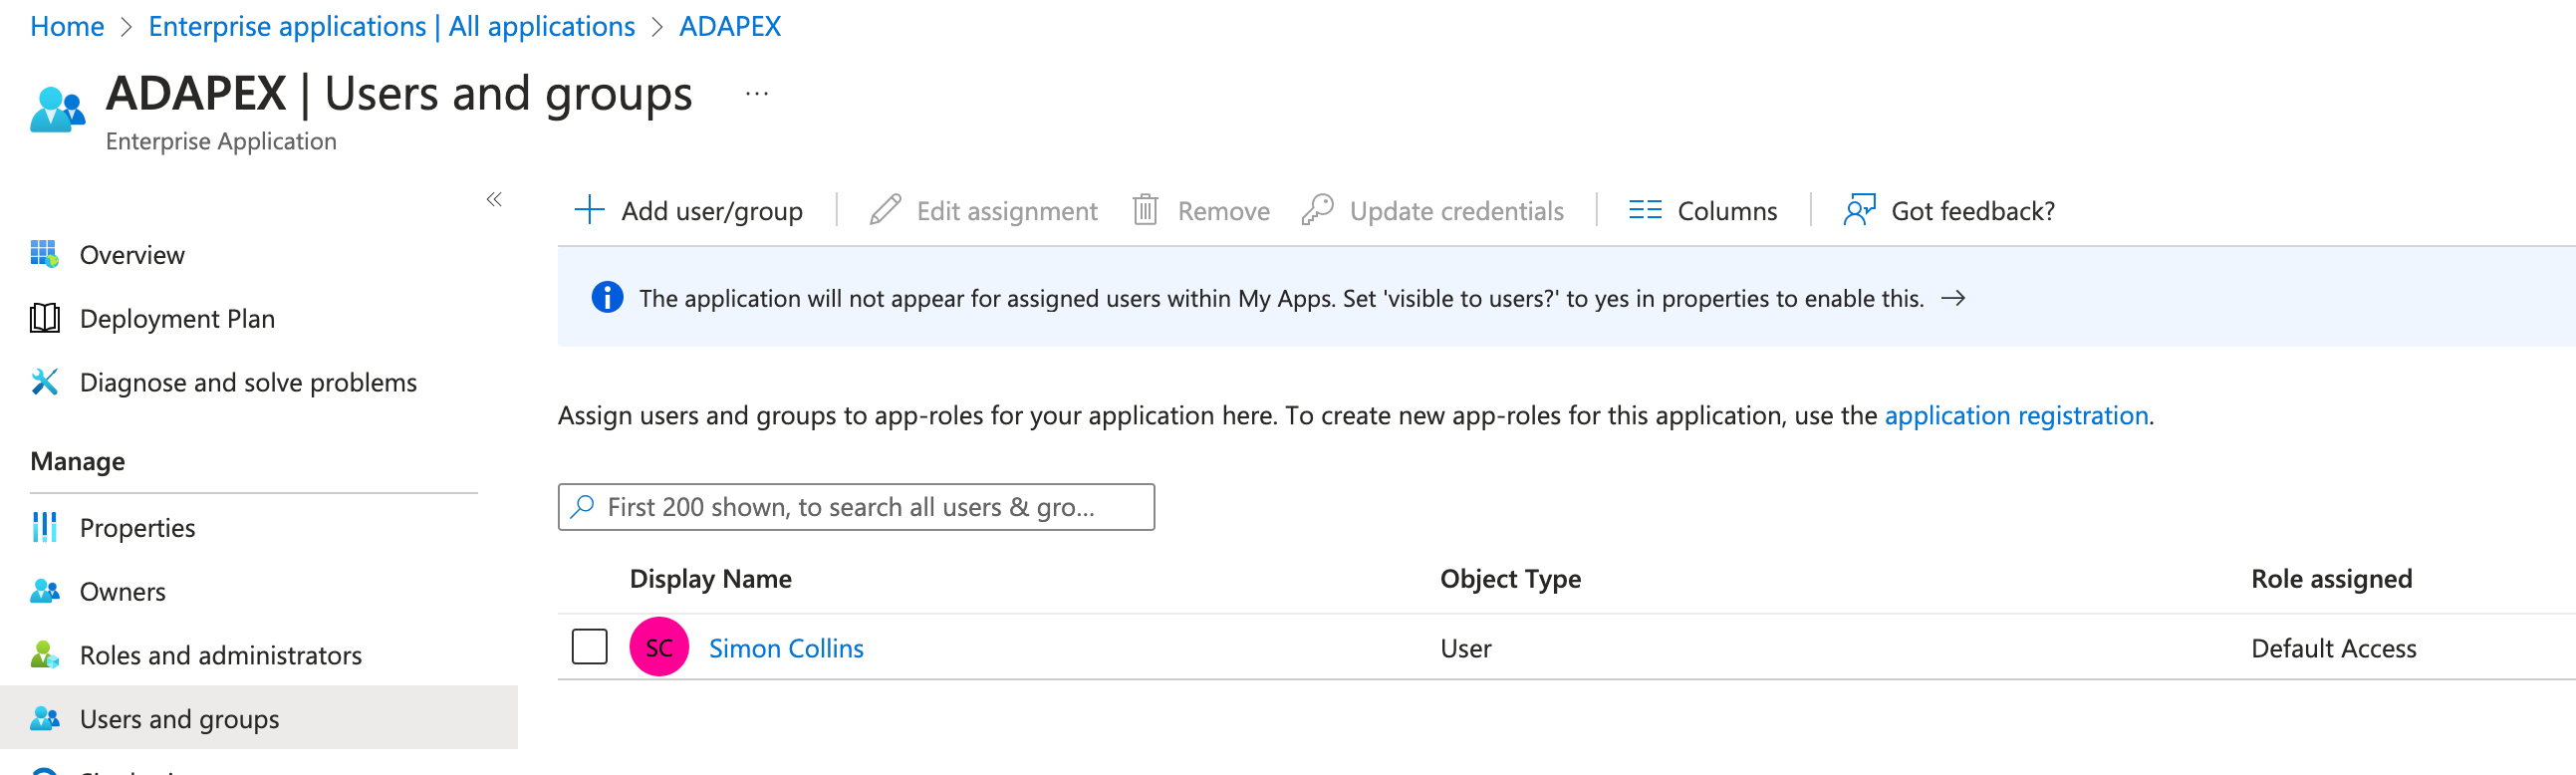
The last step (for the authentication part of the set up) is to ensure that the appropriate users or groups have access to the registered application. To do this navigate to the Enterprise applications area on Azure and click on the application that you have just created in the list. This section will allow you to assign users and / or groups to the application. In our application, we're just going to assign a single user.
Configuring the AD groups in Azure
If we just wanted to use Azure for managing the authentication then we'd have already finished the configuration, but we want to also demonstrate how we can extract Active Directory information for users into APEX so that data may be used to control the user's authorisation level(s) in the application. For this we need to configure a couple more things.
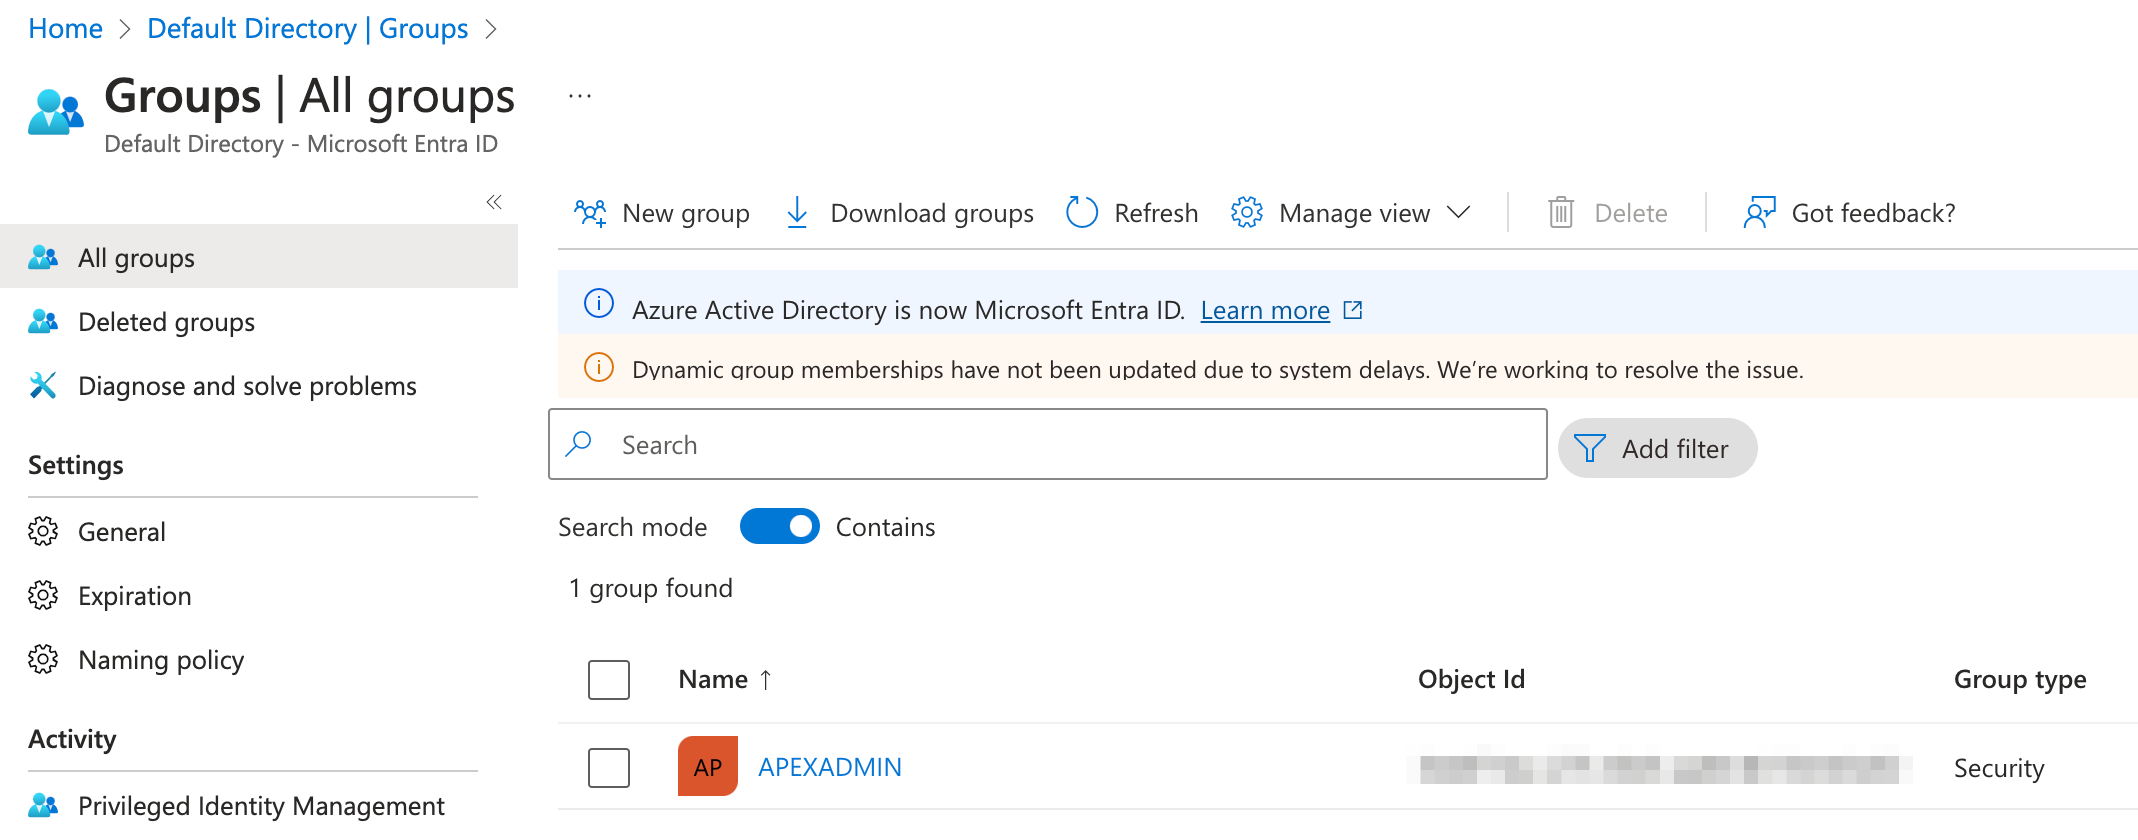
Firstly, we should set up an AD group itself. To do this, navigate to the rather strangely named "Microsoft Entra Id" from the main menu and subsequently to the Groups submenu. Here you can add a group. You may want to set up several like APEXREAD, APEXWRITE, APEXADMIN for example, the number will depend on the requirements of your APEX application.
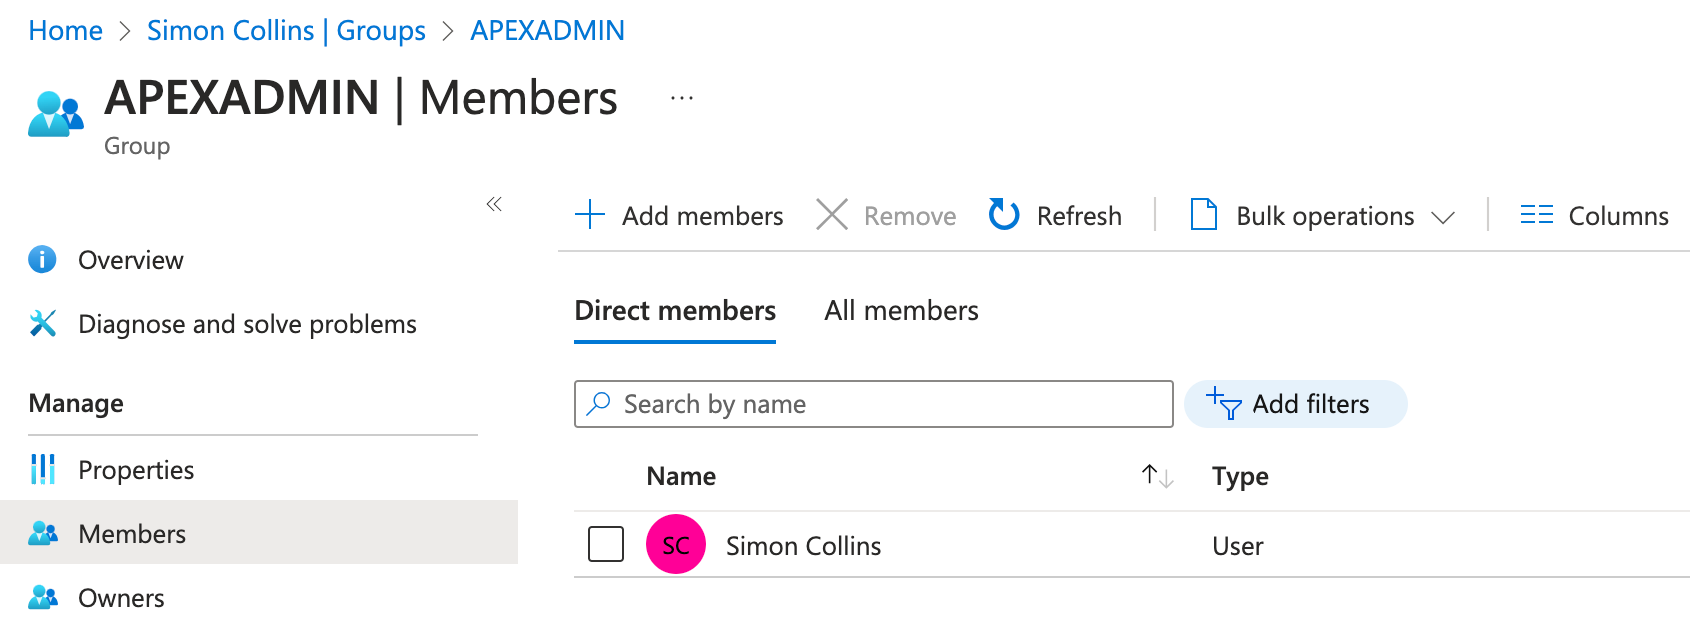
Once this is done, navigate to the Members section in the Group submenu and add the users that you wish to be part of this group
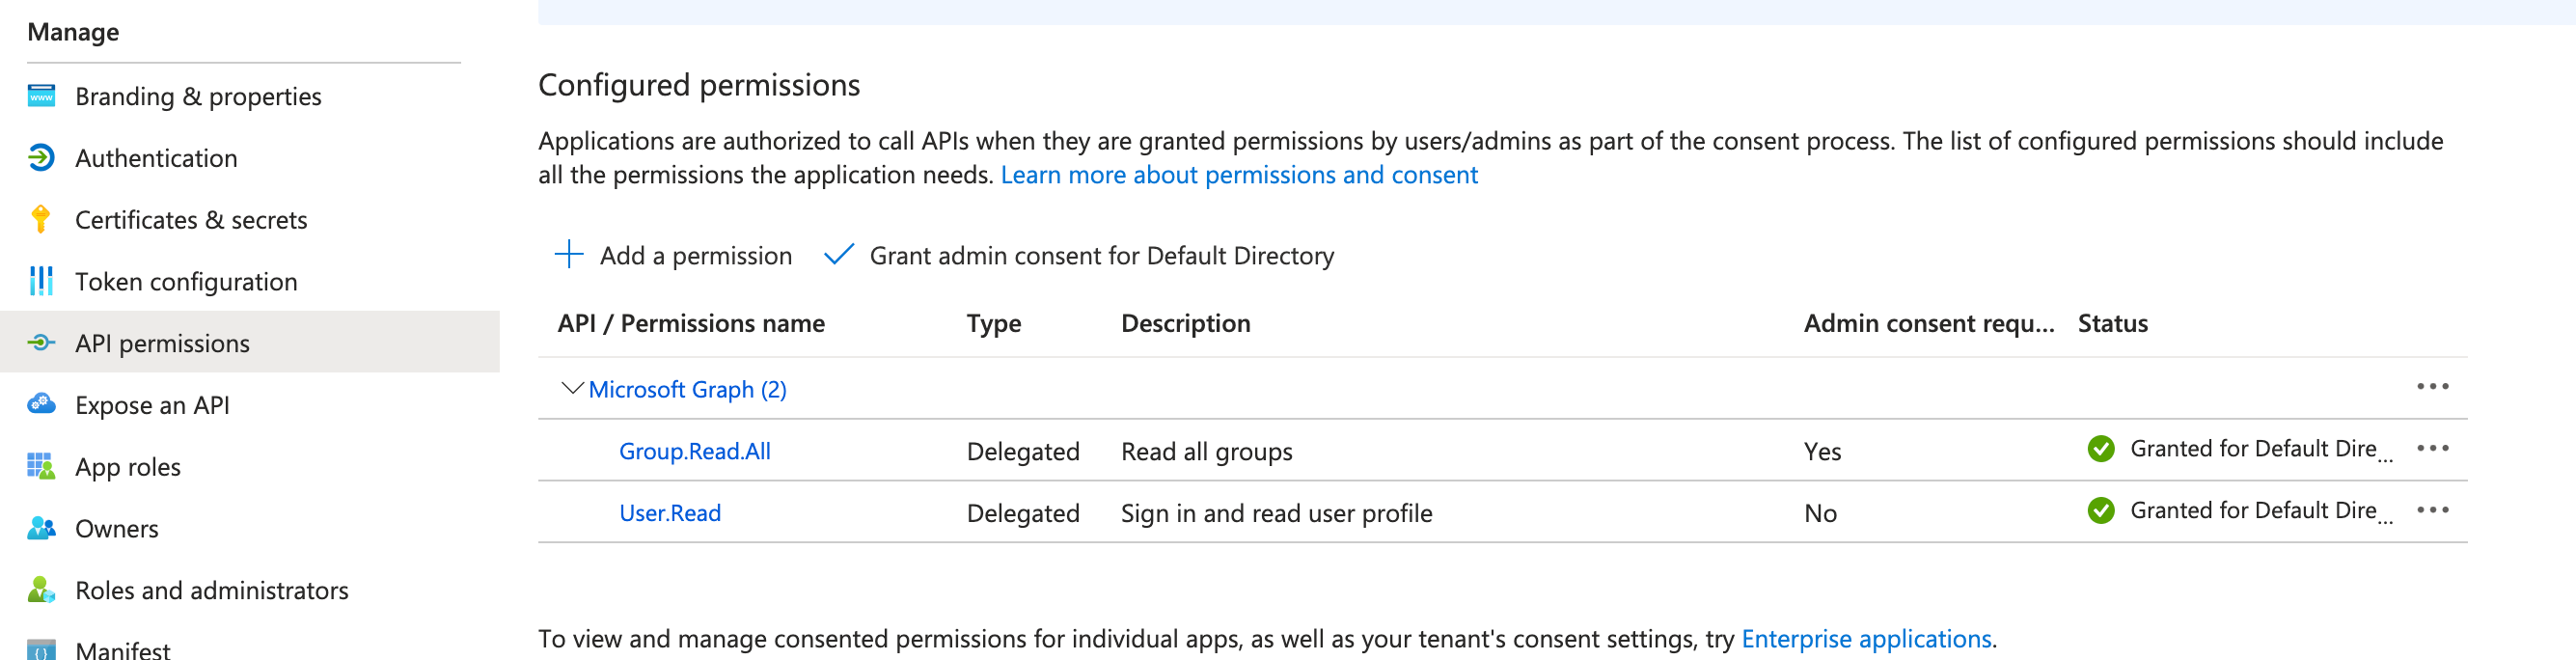
Nearly there! For the final piece of configuration, we want to make sure our application has access to read all group properties. When APEX asks for the AD group information for a user we would like to read the "friendly" group name from Azure and not just receive the internal Azure id. To achieve this we need to hop back to the application registrations page and click into our application. From here navigate to the API Permissions section and make sure that the Group.Read.All permission is set up against Microsoft Graph. Check that the status on the right is "Granted", you may need administrator rights to confirm this
APEX Configuration
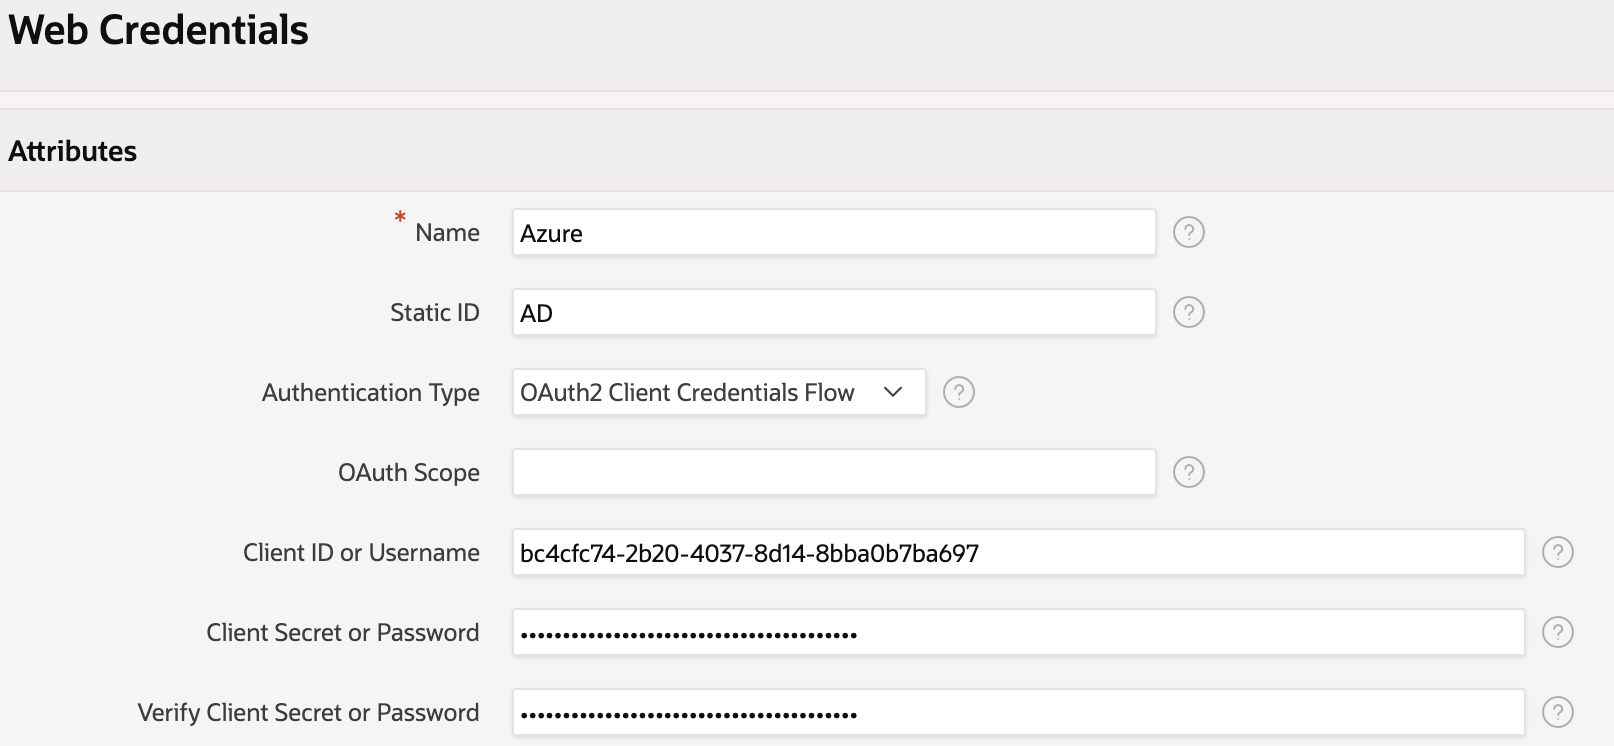
Now we have Azure configured, we can go back to safer ground (assuming you are an APEX developer) and configure our application. Firstly, we need to create some web credentials so let's create one and enter the client id and secret that we received when setting up the Azure application registration in the previous steps
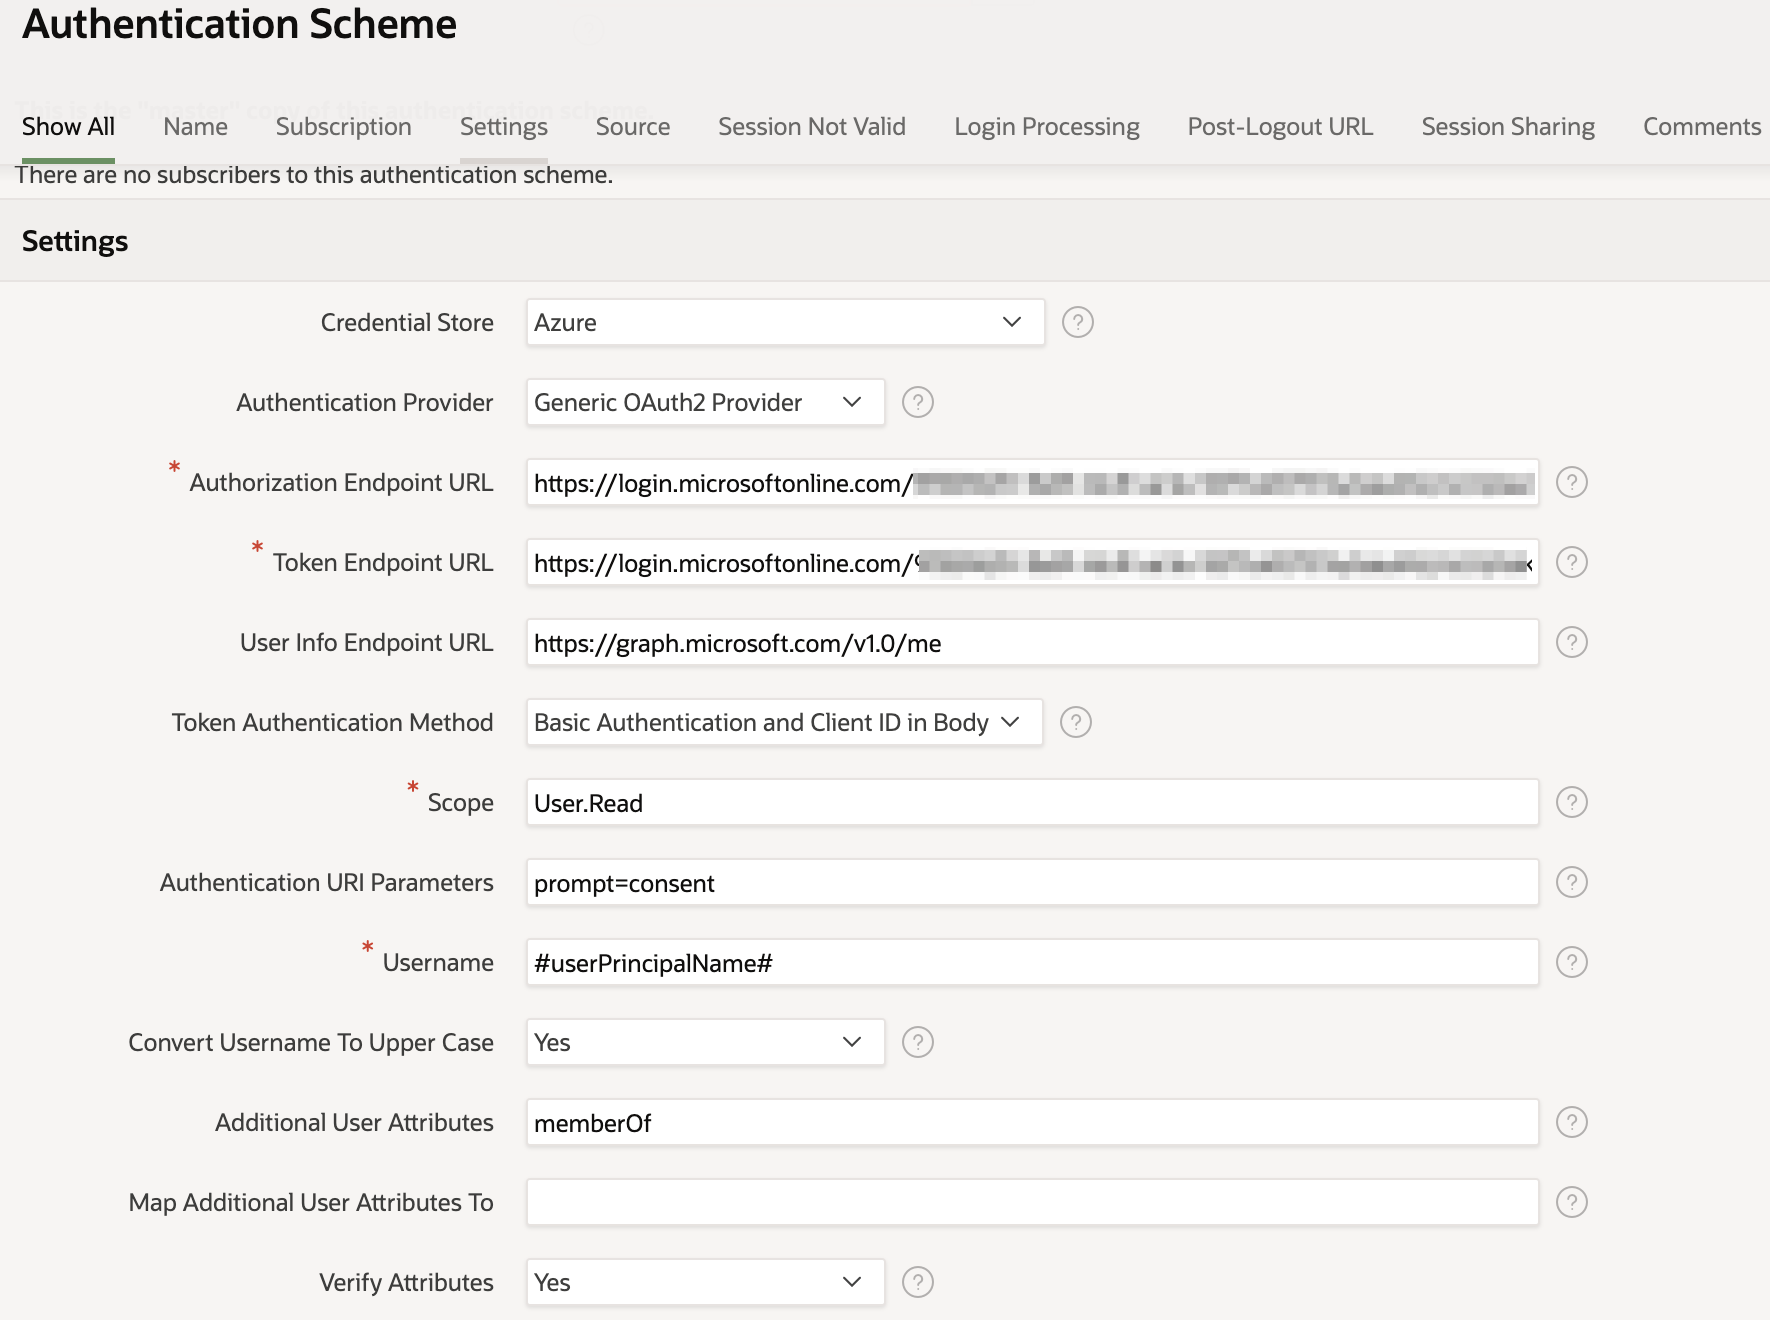
Next, we add our authentication scheme. This is of type Social Sign and, in this case, along with choosing the credential store configured above, we have chosen the Generic OAuth2 Provider and plugged in the relevant endpoints that we found configured in Azure before. You could use the OpenId connect provider if you prefer, which is a simpler set up as it only requires one endpoint to be configured - in our tests this route worked as well. For the scope we have used User.Read which provides full access to the user's profile information. The prompt=consent in the additional attributes forces the user to give their consent every time they login. Perhaps not needed but really helps when you, as a developer, want to debug the login process.
The last bit of the puzzle is to get the Azure AD group information for the user. We do this in the post authentication procedure which makes an extra call to the Azure graph endpoint and retrieves user information which we place in the APEX custom workspace groups. Please note that to get this to work, you must activate the custom groups, which you can do by visiting the security menu and changing "Source for Role or Group Schemes" to "Custom Code"
The below snippet shows the post authentication procedure we used. Note, if you look at the screenshot above, you see that in the additional user attributes we have placed "memberOf". We have found this helpful in ensuring the authentication of the web request in the next call is successful.
PROCEDURE post_authentication AS
    l_response clob;
    l_group_names apex_t_varchar2;
    l_values apex_json.t_values;

    l_name VARCHAR2 (100);
BEGIN

    -- Call memberOf API
    l_response := apex_web_service.make_rest_request(
                    p_url => 'https://graph.microsoft.com/v1.0/me/memberOf',
                    p_http_method => 'GET'
                    );

    -- Parse JSON response
    APEX_JSON.PARSE (
        p_values => l_values,
        p_source  => l_response
    );

    IF apex_json.get_count( p_values => l_values,  p_path=>'value' ) > 0 THEN
    -- Loop the groups in Values

        FOR i IN 1..apex_json.get_count( p_values => l_values, p_path=>'value' ) LOOP

            l_name := apex_json.get_varchar2(
                        p_values => l_values,
                        p_path => 'value[%d].displayName',
                        p0 => i);

            If l_name is not null then

            -- Create the group array
                apex_string.push(p_table => l_group_names, p_value => l_name
                );

            END IF;

        END LOOP;

        -- save group names in session
        apex_authorization.enable_dynamic_groups(p_group_names => l_group_names);

    END IF;

END post_authentication;
If you would like to see the detail of the JSON that Azure is providing for the AD group info you can do so by debugging the login session.
{
  "@odata.context": "https://graph.microsoft.com/v1.0/$metadata#directoryObjects",
  "value": [
    {
      "@odata.type": "#microsoft.graph.group",
      "id": "36d8716a-xxxx-xxxx-xxxx-86159cfd5d02",
      "deletedDateTime": null,
      "classification": null,
      "createdDateTime": "2023-12-01T09:00:49Z",
      "creationOptions": [],
      "description": "ADMINADMIN",
      "displayName": "APEXADMIN",
      "expirationDateTime": null,
      "groupTypes": [],
      "isAssignableToRole": null,
      "mail": null,
      "mailEnabled": false,
      "mailNickname": "3c54c849-9",
      "membershipRule": null,
      "membershipRuleProcessingState": null,
      "onPremisesDomainName": null,
      "onPremisesLastSyncDateTime": null,
      "onPremisesNetBiosName": null,
      "onPremisesSamAccountName": null,
      "onPremisesSecurityIdentifier": null,
      "onPremisesSyncEnabled": null,
      "preferredDataLocation": null,
      "preferredLanguage": null,
      "proxyAddresses": [],
      "renewedDateTime": "2023-12-01T09:00:49Z",
      "resourceBehaviorOptions": [],
      "resourceProvisioningOptions": [],
      "securityEnabled": true,
      "securityIdentifier": "S-1-12-1-920154474-xxxxxxxx-xxxxxxxx-39714204",
      "theme": null,
      "visibility": null,
      "onPremisesProvisioningErrors": [],
      "serviceProvisioningErrors": []
    }
  ]
}
The below article may help you if you are having any difficulties with this.

Oracle APEX - Debugging a Social Login
Authorisation
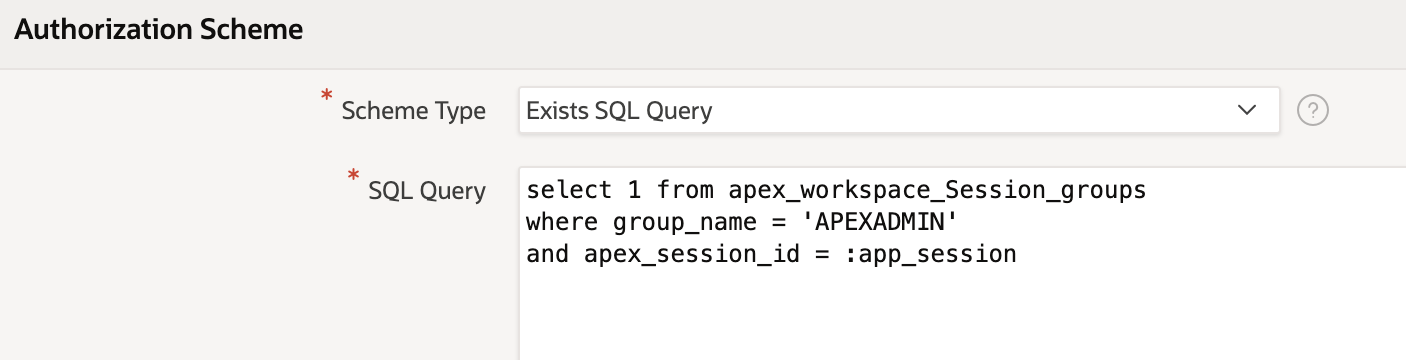
Now you have your group information you can create APEX authorization schemes based on these. For example the following scheme, when applied to an APEX component, will only allow users with the Active Directory group "APEXADMIN" access to it
Conclusion
If your organisation utilises Azure and Oracle APEX it is a sensible option to delegate the latter's authentication and authorisation to Azure. APEX makes the integration process simple and seamless.
Find out more about our APEX Consultancy Services.