Accelerating Your ODI Implementation, Rittman Mead Style

Introduction
Over the years, at Rittman Mead, we've built up quite a collection of tooling for ODI. We have accelerators, scripts, reports, templates and even entire frameworks at our disposal for when the right use case arises. Many of these tools exploit the power of the excellent ODI SDK to automate tasks that would otherwise be a chore to perform manually. Tasks like, topology creation, model automation, code migration and variable creation.
In this blog post, I'm going to give you a demo of our latest addition, a tool that allows you to programmatically create ODI mappings. ( and a few other tricks )
So you may be thinking isn't that already possible using the ODI SDK ? and you'd be right, it most definitely is. There are many examples out there that show you how it's done, but they all have one thing in common, they create a fairly simple mapping, with, relatively speaking, quite a lot of code and are only useful for creating the said mapping.
And herein lies the obvious question, Why would you create a mapping using the ODI SDK, when it's quicker to use ODI Studio ?
And the obvious answer is...you wouldn't, unless, you were trying to automate the creation of multiple mappings using metadata.
This is a reasonable approach using the raw ODI SDK, the typical use case being the automation of your source to stage mappings. These mappings tend to be simple 1 to 1 mappings, the low hanging fruit of automation if you like. The problem arises though, when you want to automate the creation of a variety of more complex mappings, you run the risk of spending more time writing the automation code, than you would actually save due to the automation itself. The point of diminishing return can creep up pretty quickly.
The principle, however, is sound. Automate as much as possible by leveraging metadata and free up your ODI Developers to tackle the more complex stuff.
All Aboard the Rittman Mead Metadata Train !
What would be really nice is something more succinct, more elegant, something that allows us to create any mapping, with minimal code and fuss.
Something that will allow us to further accelerate...
- Migrating to ODI from other ETL products
- Greenfield ODI Projects
- Day to Day ODI Development work
..all powered by juicy metadata.
These were the design goals for our latest tool. To meet these goals, we created a mini-mapping-language on top of the ODI SDK. This mini-mapping-language abstracts away the SDK's complexities, while, at the same time, retaining its inherent power. We call this mini mapping language OdiDsl ( Oracle Data Integrator Domain Specific Language ) catchy heh?!
OdiDsl
OdiDsl is written in Groovy and looks something like this...
/*
 * OdiDsl to create a SCD2 dimension load mapping.
 */

mapping.drop('MY_PROJECT', 'DEMO_FOLDER', 'EMPLOYEE_DIM_LOAD')

mapping.create('MY_PROJECT', 'DEMO_FOLDER', 'EMPLOYEE_DIM_LOAD')
        .datastores([
                [name: "HR.EMPLOYEES"],
                [name: "HR.DEPARTMENTS"],
                [name: "HR.JOBS"],
                [name: "PERF.D_EMPLOYEE", integration_type: "SCD"],
        ])
        .select("EMPLOYEES")
            .filter('NAME_FILTER', [filter_condition: "EMPLOYEES.FIRST_NAME LIKE 'D%'" ])
            .join('EMP_DEPT', ['DEPARTMENTS'], [join_condition: "EMPLOYEES.DEPARTMENT_ID = DEPARTMENTS.DEPARTMENT_ID" ])
            .join('DEPT_JOBS', ['JOBS'], [join_condition: "EMPLOYEES.JOB_ID = JOBS.JOB_ID" ])
            .connect("D_EMPLOYEE", [
                                        [ attr: "employee_id", key_indicator: true ],
                                        [ attr: "eff_from_date", expression: "sysdate", execute_on_hint: "TARGET"],
                                        [ attr: "eff_to_date", expression: "sysdate", execute_on_hint: "TARGET"],
                                        [ attr: "current_flag", expression: 1, execute_on_hint: "TARGET"],
                                        [ attr: "surr_key", expression: ":RM_PROJECT.D_EMPLOYEE_SEQ_NEXTVAL", execute_on_hint: "TARGET"],
                                   ])
        .commit()
        .validate()
The above code will create the following, fully functional, mapping in ODI 12c (sorry 11g).
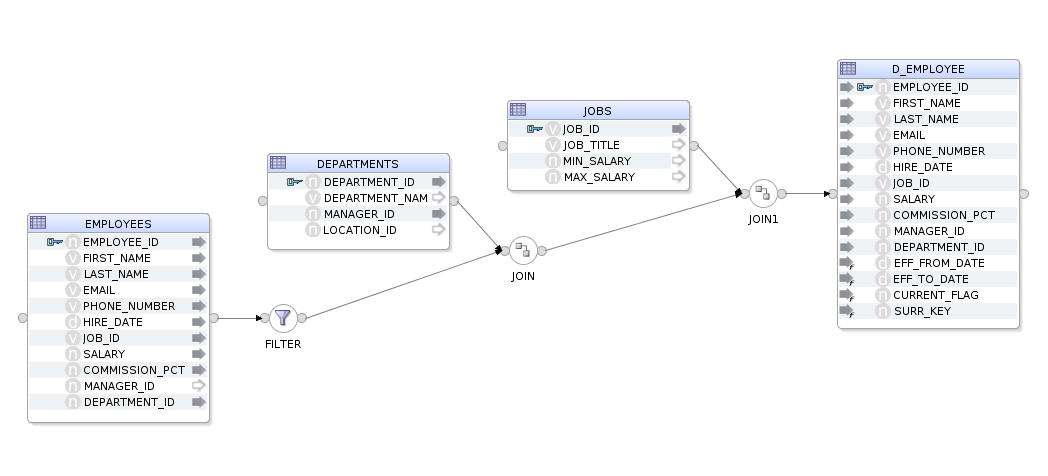
It should be fairly easy to eyeball the code and reconcile it with the above mapping image. We can see that we are specifying our datastores, selecting the EMPLOYEES datastore, adding a filter, a couple of joins and then connecting to our target. OdiDsl has been designed in such a way that it mimics the flow based style of ODI 12c's mappings by chaining components onto one another.
Creating a Mapping Using OdiDsl
Let's walk through the above code, starting with just the datastores, adding the rest as we go along...
Datastores
We start by creating the mapping with mapping.create( <project>, <folder>, <mapping name>). We then chain the .datastores(), .commit() and .validate() methods onto it using the "dot" notation. The .datastores() method is the only method you can chain directly onto mapping.create() as it's a requirement to add some datastores before you start building up the mapping. The .commit() method persists the mapping in the repository and the .validate() method calls ODI's validation routine on the mapping to check if all is ok.
/*
 * OdiDsl to create a mapping with 4 datastores.
 */

mapping.drop('MY_PROJECT', 'DEMO_FOLDER', 'EMPLOYEE_DIM_LOAD')

mapping.create('MY_PROJECT', 'DEMO_FOLDER', 'EMPLOYEE_DIM_LOAD')
        .datastores([
                [name: "HR.EMPLOYEES"],
                [name: "HR.DEPARTMENTS"],
                [name: "HR.JOBS"],
                [name: "PERF.D_EMPLOYEE", integration_type: "SCD"],
        ])
        .commit()
        .validate()
When we execute this code it returns the following to the console. You can see that the mapping has been dropped/created and that ODI has some validation warnings for us.
Connecting to the repository...

mapping EMPLOYEE_DIM_LOAD dropped
mapping EMPLOYEE_DIM_LOAD created

  Validation Results
  ------------------
  WARNING: Mapping component EMPLOYEES has no input or output connections.
  WARNING: Mapping component DEPARTMENTS has no input or output connections.
  WARNING: Mapping component JOBS has no input or output connections.
  WARNING: Mapping component D_EMPLOYEE has no input or output connections.
And here is the mapping in ODI - well, it's a start at least...

Starting the Flow with a Filter
Before we can start building up the rest of the mapping we need to select a starting datastore to chain off, you've got to start somewhere right? For that, we call .select("EMPLOYEES"), which is a bit like clicking and selecting the component in ODI Studio. The .filter() method is then chained onto it, passing in the filter name and some configuration, in this case, the actual filter condition.
/*
 * OdiDsl to create a mapping with 4 datastores and a filter.
 */

mapping.drop('MY_PROJECT', 'DEMO_FOLDER', 'EMPLOYEE_DIM_LOAD')

mapping.create('MY_PROJECT', 'DEMO_FOLDER', 'EMPLOYEE_DIM_LOAD')
        .datastores([
                [name: "HR.EMPLOYEES"],
                [name: "HR.DEPARTMENTS"],
                [name: "HR.JOBS"],
                [name: "PERF.D_EMPLOYEE", integration_type: "SCD"],
        ])
        .select("EMPLOYEES")
            .filter('NAME_FILTER', [filter_condition: "EMPLOYEES.FIRST_NAME LIKE 'D%'" ])
        .commit()
        .validate()
We now have an error in the validation results. This is expected as our filter doesn't connect to anything downstream yet.
Connecting to the repository...

mapping EMPLOYEE_DIM_LOAD dropped
mapping EMPLOYEE_DIM_LOAD created

  Validation Results
  ------------------
  WARNING: Mapping component DEPARTMENTS has no input or output connections.
  WARNING: Mapping component JOBS has no input or output connections.
  WARNING: Mapping component D_EMPLOYEE has no input or output connections.
  ERROR: Mapping component NAME_FILTER must have a connection for output connector point OUTPUT1.
And here's the mapping, as you can see the filter is connected to the EMPLOYEES datastore output connector.

Adding a Join
Next we'll create the join between the filter and the DEPARTMENTS table. To do this we can just chain a .join() onto the .filter() method and pass in some arguments to specify the join name, what it joins to and the join condition itself.
/*
 * OdiDsl to create a mapping with 4 datastores a filter and a join.
 */

mapping.drop('MY_PROJECT', 'DEMO_FOLDER', 'EMPLOYEE_DIM_LOAD')

mapping.create('MY_PROJECT', 'DEMO_FOLDER', 'EMPLOYEE_DIM_LOAD')
        .datastores([
                [name: "HR.EMPLOYEES"],
                [name: "HR.DEPARTMENTS"],
                [name: "HR.JOBS"],
                [name: "PERF.D_EMPLOYEE", integration_type: "SCD"],
        ])
        .select("EMPLOYEES")
            .filter('NAME_FILTER', [filter_condition: "EMPLOYEES.FIRST_NAME LIKE 'D%'" ])
            .join('EMP_DEPT', ['DEPARTMENTS'], [join_condition: "EMPLOYEES.DEPARTMENT_ID = DEPARTMENTS.DEPARTMENT_ID" ])
        .commit()
        .validate()
Only 2 validation warnings and no errors this time...
Connecting to the repository...

mapping EMPLOYEE_DIM_LOAD dropped
mapping EMPLOYEE_DIM_LOAD created

  Validation Results
  ------------------
  WARNING: Mapping component JOBS has no input or output connections.
  WARNING: Mapping component D_EMPLOYEE has no input or output connections.
We now have a join named EMP_DEPT joining DEPARTMENTS and the filter, NAME_FILTER, together.

Adding another Join
We'll now do the same for the final join.
/*
 * OdiDsl to create a mapping with 4 datastores, a filter and 2 joins.
 */

mapping.drop('MY_PROJECT', 'DEMO_FOLDER', 'EMPLOYEE_DIM_LOAD')

mapping.create('MY_PROJECT', 'DEMO_FOLDER', 'EMPLOYEE_DIM_LOAD')
        .datastores([
                [name: "HR.EMPLOYEES"],
                [name: "HR.DEPARTMENTS"],
                [name: "HR.JOBS"],
                [name: "PERF.D_EMPLOYEE", integration_type: "SCD"],
        ])
        .select("EMPLOYEES")
            .filter('NAME_FILTER', [filter_condition: "EMPLOYEES.FIRST_NAME LIKE 'D%'" ])
            .join('EMP_DEPT', ['DEPARTMENTS'], [join_condition: "EMPLOYEES.DEPARTMENT_ID = DEPARTMENTS.DEPARTMENT_ID" ])
            .join('DEPT_JOBS', ['JOBS'], [join_condition: "EMPLOYEES.JOB_ID = JOBS.JOB_ID" ])
        .commit()
        .validate()
looking better all the time...
Connecting to the repository...

mapping EMPLOYEE_DIM_LOAD dropped
mapping EMPLOYEE_DIM_LOAD created

  Validation Results
  ------------------
  WARNING: Mapping component D_EMPLOYEE has no input or output connections.
And we now have a join named DEPT_JOBS joining JOBS and the join, EMP_DEPT, to each other.

Connecting to the target
The final step is to connect the DEPT_JOBS join to our target datastore, D_EMPLOYEE. For this we can use the .connect() method. This method is used to map upstream attributes to a datastore. When you perform this action in ODI Studio, you'll be prompted with the attribute matching dialog, with options to auto-map the attributes.
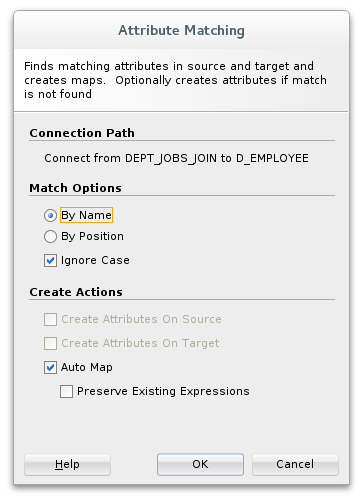
OdiDsl will, by default, auto-map all attributes that are not explicitly mapped in the .connect() method. In our completed code example below we are explicitly mapping several attributes to support SCD2 functionality, auto-map takes care of the rest.
/*
 * OdiDsl to create a SCD2 dimension load mapping
 */

mapping.drop('MY_PROJECT', 'DEMO_FOLDER', 'EMPLOYEE_DIM_LOAD')

mapping.create('MY_PROJECT', 'DEMO_FOLDER', 'EMPLOYEE_DIM_LOAD')
        .datastores([
                [name: "HR.EMPLOYEES"],
                [name: "HR.DEPARTMENTS"],
                [name: "HR.JOBS"],
                [name: "PERF.D_EMPLOYEE", integration_type: "SCD"],
        ])
        .select("EMPLOYEES")
            .filter('NAME_FILTER', [filter_condition: "EMPLOYEES.FIRST_NAME LIKE 'D%'" ])
            .join('EMP_DEPT', ['DEPARTMENTS'], [join_condition: "EMPLOYEES.DEPARTMENT_ID = DEPARTMENTS.DEPARTMENT_ID" ])
            .join('DEPT_JOBS', ['JOBS'], [join_condition: "EMPLOYEES.JOB_ID = JOBS.JOB_ID" ])
            .connect("D_EMPLOYEE", [
                                        [ attr: "employee_id", key_indicator: true ],
                                        [ attr: "eff_from_date", expression: "sysdate", execute_on_hint: "TARGET"],
                                        [ attr: "eff_to_date", expression: "sysdate", execute_on_hint: "TARGET"],
                                        [ attr: "current_flag", expression: 1, execute_on_hint: "TARGET"],
                                        [ attr: "surr_key", expression: ":RM_PROJECT.D_EMPLOYEE_SEQ_NEXTVAL", execute_on_hint: "TARGET"],
                                   ])
        .commit()
        .validate()
Nice, all validated this time.
Connecting to the repository...

mapping EMPLOYEE_DIM_LOAD dropped
mapping EMPLOYEE_DIM_LOAD created
Validation Successful
What about Updates ?
Yes. We can also update an existing mapping using mapping.update(<project>, <folder>, <mapping name>). This is useful when you need to make changes to multiple mappings or when you can't drop and recreate a mapping due to a dependency. The approach is the same, we start by selecting a component with .select() and then chain a method onto it, in this case, .config().
mapping.update('MYPROJECT', 'DEMO', "EMPLOYEE_DIM_LOAD")
        .select('DEPT_JOBS')
            .config([join_type: "LEFT_OUTER"])
##Which Properties Can I Change for each Component ? Probably more than you'll ever need to, **OdiDsl** mirrors the properties that are available in ODI Studio via the SDK.
##Can We Generate OdiDsl Code From an Existing Mapping ?
Yes, we can do that too, with .reverse(). This will allow you to mirror the process.
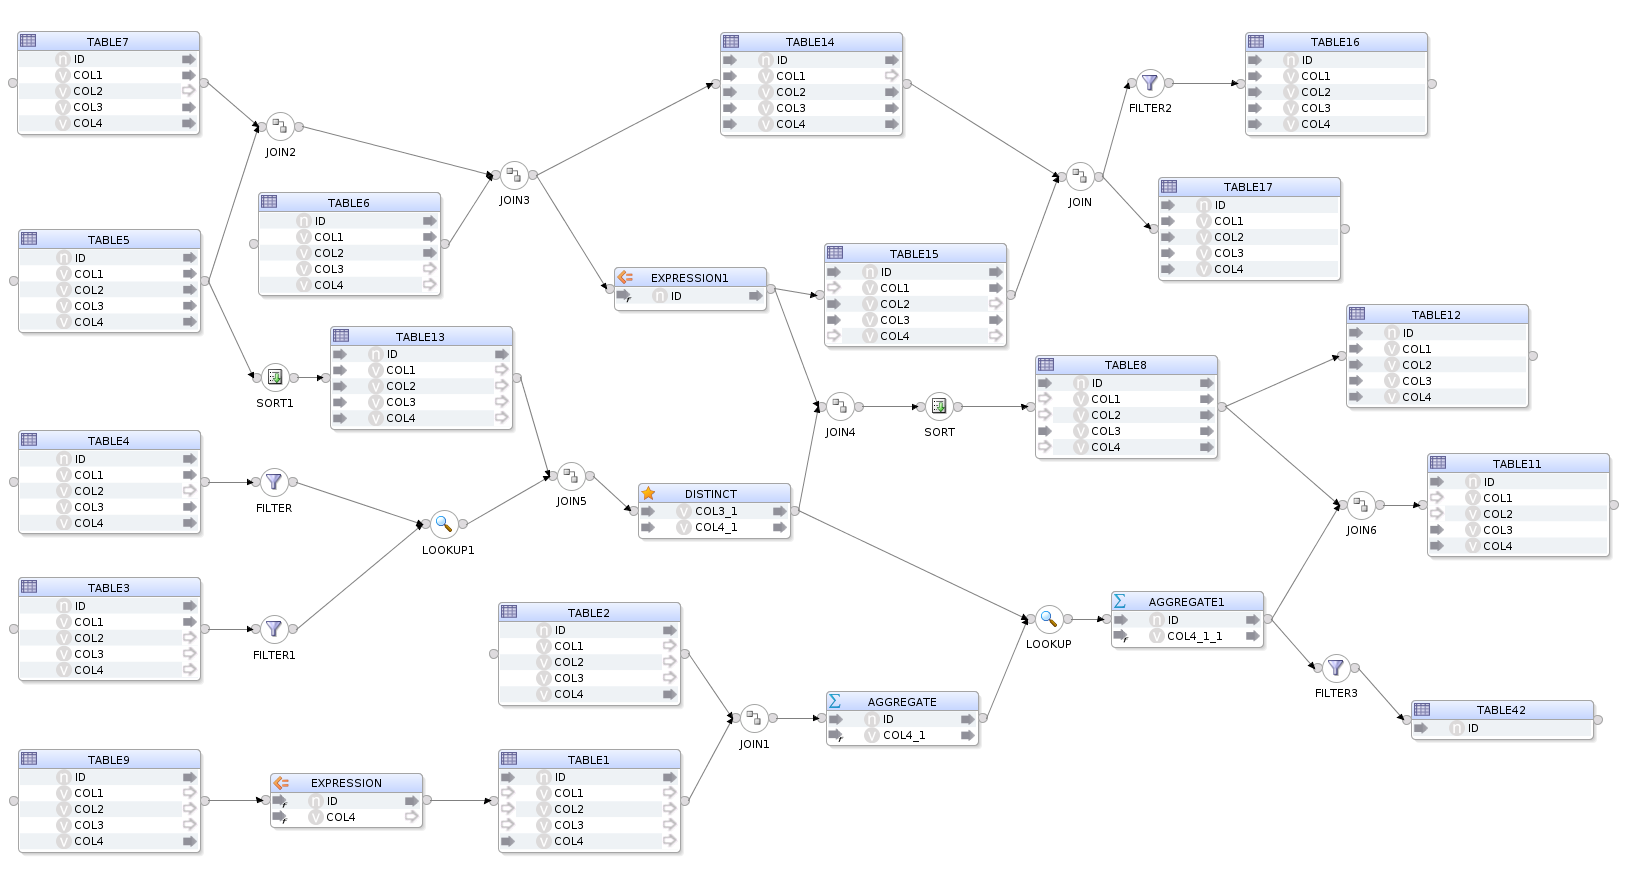
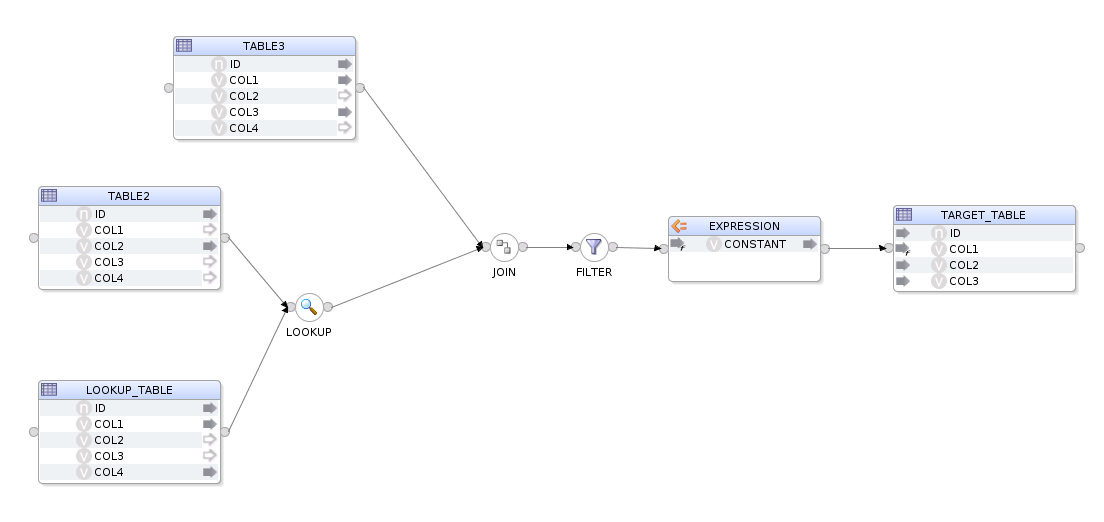
Let's take this, hand built, fictional and completely CRAZY_MAPPING as an example. (fictional and crazy in the sense that it does nothing useful, however, the flow and configuration are completely valid).

If we execute .reverse() on this mapping by calling...
mapping.reverse('MY_PROJECT', 'DEMO_FOLDER', 'CRAZY_MAPPING')
...OdiDsl will return the following output to the console. What you are seeing here is the OdiDsl required to recreate the crazy mapping above.
Connecting to the repository...

mapping.create('MY_PROJECT', 'DEMO_FOLDER', 'CRAZY_MAPPING')
	.datastores([
		 ['name':'STAGING.TABLE1', 'alias':'TABLE1'],
		 ['name':'STAGING.TABLE9', 'alias':'TABLE9'],
		 ['name':'STAGING.TABLE3', 'alias':'TABLE3'],
		 ['name':'STAGING.TABLE4', 'alias':'TABLE4'],
		 ['name':'STAGING.TABLE6', 'alias':'TABLE6'],
		 ['name':'STAGING.TABLE5', 'alias':'TABLE5'],
		 ['name':'STAGING.TABLE7', 'alias':'TABLE7'],
		 ['name':'STAGING.TABLE2', 'alias':'TABLE2'],
		 ['name':'STAGING.TABLE8', 'alias':'TABLE8'],
		 ['name':'STAGING.TABLE11', 'alias':'TABLE11'],
		 ['name':'STAGING.TABLE12', 'alias':'TABLE12'],
		 ['name':'STAGING.TABLE13', 'alias':'TABLE13'],
		 ['name':'STAGING.TABLE15', 'alias':'TABLE15'],
		 ['name':'STAGING.TABLE14', 'alias':'TABLE14'],
		 ['name':'STAGING.TABLE16', 'alias':'TABLE16'],
		 ['name':'STAGING.TABLE17', 'alias':'TABLE17'],
		 ['name':'STAGING.TABLE42', 'alias':'TABLE42'],
	])
	.select('TABLE5')
		.join('JOIN2', ['TABLE7'], [join_condition: "TABLE5.ID = TABLE7.ID" ])
		.join('JOIN3', ['TABLE6'], [join_condition: "TABLE6.ID = TABLE7.ID" ])
		.connect('TABLE14', [
				[ attr: "ID", expression: "TABLE5.ID" ],
				[ attr: "COL1", expression: "TABLE7.COL1" ],
				[ attr: "COL2", expression: "TABLE6.COL2" ],
				[ attr: "COL3", expression: "TABLE7.COL3" ],
				[ attr: "COL4", expression: "TABLE7.COL4" ],
		])
	.select('JOIN3')
		.expr('EXPRESSION1', [attrs: [
				[ attr: "ID", expression: "TABLE6.ID * 42", datatype: "NUMERIC", size: "38", scale: "0"]]])
		.connect('TABLE15', [
				[ attr: "ID", expression: "EXPRESSION1.ID" ],
				[ attr: "COL1", expression: "", active_indicator: false ],
				[ attr: "COL2", expression: "TABLE6.COL2" ],
				[ attr: "COL3", expression: "TABLE7.COL3" ],
				[ attr: "COL4", expression: "", active_indicator: false ],
		])
		.join('JOIN', ['TABLE14'], [join_condition: "TABLE14.ID = TABLE15.ID" ])
		.filter('FILTER2', [filter_condition: "TABLE15.COL3 != 'FOOBAR'" ])
		.connect('TABLE16', [
				[ attr: "ID", expression: "TABLE15.ID" ],
				[ attr: "COL1", expression: "TABLE15.COL1" ],
				[ attr: "COL2", expression: "TABLE14.COL2" ],
				[ attr: "COL3", expression: "TABLE14.COL3" ],
				[ attr: "COL4", expression: "TABLE14.COL4" ],
		])
	.select('JOIN')
		.connect('TABLE17', [
				[ attr: "ID", expression: "TABLE15.ID" ],
				[ attr: "COL1", expression: "TABLE15.COL1" ],
				[ attr: "COL2", expression: "TABLE14.COL2" ],
				[ attr: "COL3", expression: "TABLE14.COL3" ],
				[ attr: "COL4", expression: "TABLE14.COL4" ],
		])
	.select('TABLE5')
		.sort('SORT1', [sorter_condition: "TABLE5.ID, TABLE5.COL2, TABLE5.COL4" ])
		.connect('TABLE13', [
				[ attr: "ID", expression: "TABLE5.ID" ],
				[ attr: "COL1", expression: "TABLE5.COL1" ],
				[ attr: "COL2", expression: "TABLE5.COL2" ],
				[ attr: "COL3", expression: "TABLE5.COL3" ],
				[ attr: "COL4", expression: "TABLE5.COL4" ],
		])
	.select('TABLE3')
		.filter('FILTER1', [filter_condition: "TABLE3.ID != 42" ])
	.select('TABLE4')
		.filter('FILTER', [filter_condition: "TABLE4.COL1 = 42" ])
		.lookup('LOOKUP1', 'FILTER1', [join_condition: "TABLE4.ID = TABLE3.ID AND TABLE3.COL1 = TABLE4.COL1"])
		.join('JOIN5', ['TABLE13'], [join_condition: "TABLE13.ID = TABLE3.ID" ])
		.distinct('DISTINCT_', [attrs: [
				[ attr: "COL3_1", expression: "TABLE4.COL3", datatype: "VARCHAR", size: "30"],
				[ attr: "COL4_1", expression: "TABLE4.COL4", datatype: "VARCHAR", size: "30"]]])
	.select('DISTINCT_')
		.join('JOIN4', ['EXPRESSION1'], [join_condition: "TABLE5.ID = TABLE6.COL1" ])
		.sort('SORT', [sorter_condition: "EXPRESSION1.ID" ])
		.connect('TABLE8', [
				[ attr: "ID", expression: "EXPRESSION1.ID" ],
				[ attr: "COL1", expression: "", active_indicator: false ],
				[ attr: "COL2", expression: "", active_indicator: false ],
				[ attr: "COL3", expression: "TABLE7.COL3" ],
				[ attr: "COL4", expression: "", active_indicator: false ],
		])
		.connect('TABLE12', [
				[ attr: "ID", expression: "TABLE8.ID" ],
				[ attr: "COL1", expression: "TABLE8.COL1" ],
				[ attr: "COL2", expression: "TABLE8.COL2" ],
				[ attr: "COL3", expression: "TABLE8.COL3" ],
				[ attr: "COL4", expression: "TABLE8.COL4" ],
		])
	.select('TABLE9')
		.expr('EXPRESSION', [attrs: [
				[ attr: "ID", expression: "TABLE9.ID *42", datatype: "NUMERIC", size: "38", scale: "0"],
				[ attr: "COL4", expression: "TABLE9.COL4 || 'FOOBAR'", datatype: "VARCHAR", size: "30"]]])
		.connect('TABLE1', [
				[ attr: "ID", expression: "EXPRESSION.ID" ],
				[ attr: "COL1", expression: "", active_indicator: false ],
				[ attr: "COL2", expression: "", active_indicator: false ],
				[ attr: "COL3", expression: "", active_indicator: false ],
				[ attr: "COL4", expression: "TABLE9.COL4" ],
		])
		.join('JOIN1', ['TABLE2'], [join_condition: "TABLE1.ID = TABLE2.ID" ])
		.aggregate('AGGREGATE', [attrs: [
				[ attr: "ID", expression: "TABLE1.ID", datatype: "NUMERIC", size: "38", scale: "0", group_by: "YES"],
				[ attr: "COL4_1", expression: "MAX(TABLE2.COL4)", datatype: "VARCHAR", size: "30", group_by: "AUTO"]]])
		.lookup('LOOKUP', 'DISTINCT_', [join_condition: "AGGREGATE.ID = DISTINCT_.COL3_1"])
		.aggregate('AGGREGATE1', [attrs: [
				[ attr: "ID", expression: "AGGREGATE.ID", datatype: "NUMERIC", size: "38", scale: "0", group_by: "YES"],
				[ attr: "COL4_1_1", expression: "SUM(AGGREGATE.COL4_1)", datatype: "VARCHAR", size: "30", group_by: "AUTO"]]])
		.filter('FILTER3', [filter_condition: "AGGREGATE1.COL4_1_1 > 42" ])
		.connect('TABLE42', [
				[ attr: "ID", expression: "AGGREGATE1.ID" ],
		])
	.select('AGGREGATE1')
		.join('JOIN6', ['TABLE8'], [join_condition: "AGGREGATE1.ID = TABLE8.ID" ])
		.connect('TABLE11', [
				[ attr: "ID", expression: "TABLE8.ID" ],
				[ attr: "COL1", expression: "" ],
				[ attr: "COL2", expression: "" ],
				[ attr: "COL3", expression: "TABLE8.COL3" ],
				[ attr: "COL4", expression: "TABLE8.COL4" ],
		])
	.commit()
	.validate()
When we execute this OdiDsl code we get, you guessed it, exactly the same crazy mapping with the flow and component properties all intact.
Being able to flip between ODI studio and OdiDsl has some really nice benefits for those who like the workflow. You can start prototyping a mapping in ODI Studio, convert it to code, hack around for a bit and then reflect it all back into ODI. It's also very useful for generating a "code template" from an existing mapping. The generated code template can be modified to accept variables instead of hard coded properties, all you need then is some metadata.
Did Somebody Say Metadata ?
Metadata is the key to bulk automation. You can find metadata in all kinds of places. If you are migrating to ODI from another product then there will be a whole mass of metadata living in your current product's repository or via some kind of export routine which typically produces XML files. If you are starting a fresh ODI implementation, then there will be metadata living in your source and target systems, in data dictionaries, in excel sheets, in mapping specifications documents, all over the place really. This is the kind of metadata that can be used to feed OdiDsl.
A Quick Example of One possible Approach to Using OdiDsl With Metadata
First we build a mapping in Odi Studio, this will act as our template mapping.
We then generate the equivalent OdiDsl code using mapping.reverse('MY_PROJECT', 'DEMO_FOLDER', 'FEED_ME_METADATA'). Which gives us this code.
mapping.create('MY_PROJECT', 'DEMO_FOLDER', 'FEED_ME_METADATA')
	.datastores([
		 ['name':'STAGING.TABLE1', 'alias':'LOOKUP_TABLE'],
		 ['name':'STAGING.TABLE2', 'alias':'TABLE2'],
		 ['name':'STAGING.TABLE3', 'alias':'TABLE3'],
		 ['name':'STAGING.TABLE4', 'alias':'TARGET_TABLE'],
	])
	.select('TABLE2')
		.lookup('LOOKUP', 'LOOKUP_TABLE', [join_condition: "TABLE2.ID = LOOKUP_TABLE.ID"])
		.join('JOIN', ['TABLE3'], [join_condition: "TABLE2.ID = TABLE3.ID" ])
		.filter('FILTER', [filter_condition: "TABLE3.COL1 = 'FILTER'" ])
		.expr('EXPRESSION', [attrs: [
				[ attr: "CONSTANT", expression: "42", datatype: "VARCHAR", size: "30"]]])
		.connect('TARGET_TABLE', [
				[ attr: "ID", expression: "LOOKUP_TABLE.ID" ],
				[ attr: "COL1", expression: "LOOKUP_TABLE.COL1 || EXPRESSION.CONSTANT" ],
				[ attr: "COL2", expression: "TABLE2.COL2" ],
				[ attr: "COL3", expression: "TABLE3.COL3" ],
				[ attr: "COL4", expression: "LOOKUP_TABLE.COL4" ],
		])
	.commit()
	.validate()
We now need to decorate this code with some variables, these variables will act as place holders for our metadata. The metadata we are going to use is from a database table, I'm keeping it simple for the purpose of this demonstration but the approach is the same. Our metadata table has 10 rows and from these 10 rows we are going to create 10 mappings, replacing certain properties with the values from the columns.
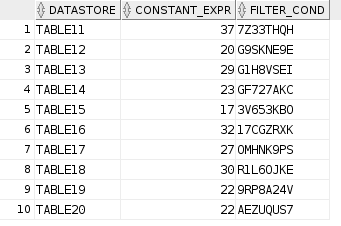
Remember that OdiDsl is expressed in Groovy. That means, as well as OdiDsl code, we also have access to the entire Groovy language. In the following code we are using a mixture of Groovy and OdiDsl. We are connecting to a database, grabbing our metadata and then looping over mapping.create(), once for each row in our metadata table. The columns in the metadata table are represented as the variables row.datastore, row.constant_expr and row.filter_cond. The code comments indicate where we are substituting these variables in place of our previously hard coded property values.
import groovy.sql.Sql

// Connect to the database and retrieve rows from the METADATA table.
def sqlConn = Sql.newInstance("jdbc:oracle:thin:@hostname:1521/pdborcl", "username", "password", "oracle.jdbc.pool.OracleDataSource")
def rows = sqlConn.rows("SELECT * FROM METADATA")
sqlConn.close()

// For each row in our METADATA table
rows.eachWithIndex() {  row, index ->

    mapping.create('MY_PROJECT', 'DEMO_FOLDER', "FEED_ME_METADATA_${index+1}") // Interpolate row number to make the mapping name unique
            .datastores([
                    ['name': 'STAGING.TABLE1', 'alias': 'LOOKUP_TABLE'],
                    ['name': "STAGING.${row.datastore}" ], // substitute in a different datastore
                    ['name': 'STAGING.TABLE3', 'alias': 'TABLE3'],
                    ['name': 'STAGING.TABLE4', 'alias': 'TARGET_TABLE'],
            ])
            .select(row.datastore)
                .lookup('LOOKUP', 'LOOKUP_TABLE', [join_condition: "${row.datastore}.ID = LOOKUP_TABLE.ID"]) // substitute in a different datastore
                .join('JOIN', ['TABLE3'], [join_condition: "${row.datastore}.ID = TABLE3.ID"]) // substitute in a different datastore
                .filter('FILTER', [filter_condition: "TABLE3.COL1 = '${row.filter_cond}'"]) // substitute in a different filter condition
                .expr('EXPRESSION', [attrs: [
                    [attr: "CONSTANT", expression: row.constant_expr, datatype: "VARCHAR", size: "30"]]]) // substitute in a different constant for the expression
                .connect('TARGET_TABLE', [
                    [attr: "ID", expression: "LOOKUP_TABLE.ID"],
                    [attr: "COL1", expression: "LOOKUP_TABLE.COL1 || EXPRESSION.CONSTANT"],
                    [attr: "COL2", expression: "${row.datastore}.COL2"], // substitute in a different datastore
                    [attr: "COL3", expression: "TABLE3.COL3"],
                    [attr: "COL4", expression: "LOOKUP_TABLE.COL4"],
                ])
            .commit()
            .validate()

}
Here is the output...
Connecting to the repository...

mapping FEED_ME_METADATA_1 created
Validation Successful
mapping FEED_ME_METADATA_2 created
Validation Successful
mapping FEED_ME_METADATA_3 created
Validation Successful
mapping FEED_ME_METADATA_4 created
Validation Successful
mapping FEED_ME_METADATA_5 created
Validation Successful
mapping FEED_ME_METADATA_6 created
Validation Successful
mapping FEED_ME_METADATA_7 created
Validation Successful
mapping FEED_ME_METADATA_8 created
Validation Successful
mapping FEED_ME_METADATA_9 created
Validation Successful
mapping FEED_ME_METADATA_10 created
Validation Successful
And here are our 10 mappings, each with it's own configuration.
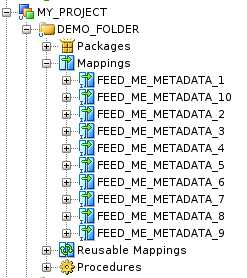
If we take a look at the FEED_ME_METADATA_5 mapping, we can see the metadata has been reflected into the mapping.
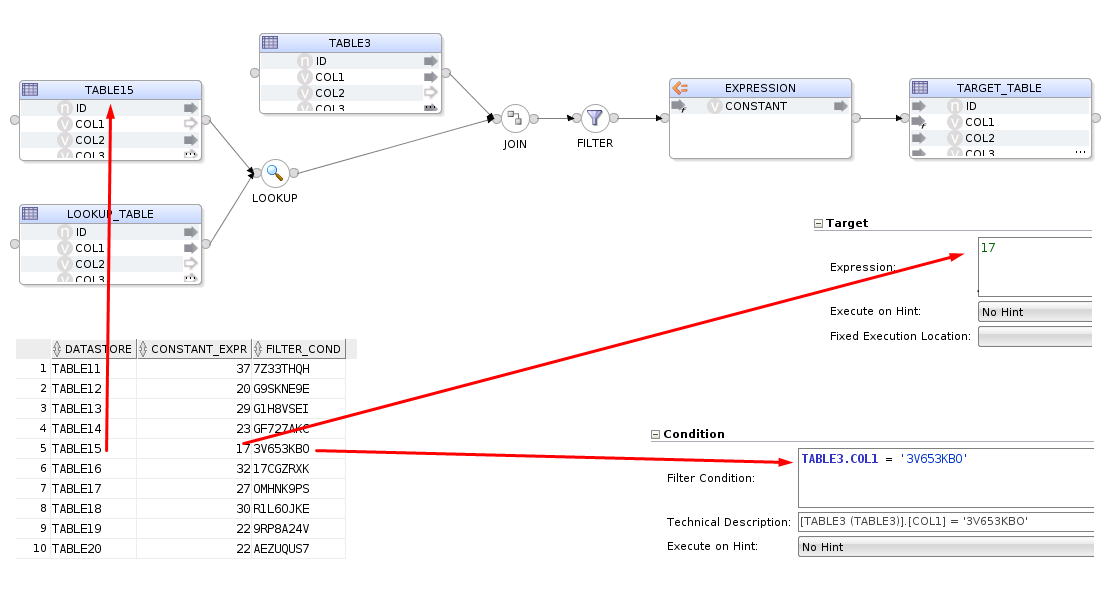
And that's about it. We've basically just built a mini accelerator using OdiDsl and we hardly had to write any code. The OdiDsl code was generated for us using .reverse(). All we really had to code, was the connection to the database, a loop and bit of variable substitution!
Summary
With the Rittman Mead ODI Tool kit, accelerating your ODI implementation has never be easier. If you are thinking about migrating to ODI from another product or embarking on a new ODI Project, Rittman Mead can help. For more information please get in touch.